Studio scale X-Wing Salzo V4 painting guide my way....RED5

Flyscriber

Sr Member
RPF PREMIUM MEMBER
Hi Folks.
Here's another commission I have done this last year. Its a Salzo V4 X-wing which will be in the Unsurprising guise of Red 5.
I have spend 5 day up to this point building the kit with the clients wishes foremost. The cockpit was never going to be the a singing ,all dancing hyper detailed version as seen in some builds. As my self and the client were wanting something as close as possible to the "real deal" as on the ILM model. So it was modified to have a flat surface and minimal detailing. The interior has had a Eurofighter seat installed, as the original bucket seats seen in the ful size version simply look wrong in the miniature without a pilot.
Cockpit sub assembly was painted before installation as was the cockpit itself. These will be masked during the main painting session.
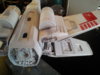
The starting colour was my obligatory off white which I like so much as it works really well with the colours I choose for the "dirt"
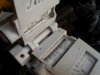
So this is now day one of painting.
It is shot in a base coat of automotive off white. This supplies a great base which you can cut back to with thinners etc when needed later on in the job.
cockpit sub assembly.jpg
 
Next stage is to get the surfaces all sketched out with the main panels and colour idents added.
x5.jpg

x1.jpg

x3.jpg

I start with the darkest areas seen on the reference images and add some colour washes to the grimy parts as a sketch to check out the position and balance of the model.
x11.jpg

Chipping is masked using latex masking fluid, and some are done later using thinners to add another style to the paint job where needed.
x nose and squares.jpg

I removed the offending raised details which match red 2 and others and replaced them with the red 5 raised squares. Grey panel positions going on as well as the first multi layered panels using masking fluid, and the red stripe.
x side 2.jpg

x nose top 1.jpg

x side 4.jpg
 

Attachments

  • base coat on some weathring sketches.jpg
    base coat on some weathring sketches.jpg
    802 KB · Views: 317
  • 20170725_171032.jpg
    20170725_171032.jpg
    2.4 MB · Views: 227
Next up is some more panel detailing and adding panel lines to the wing rears. all areas which were marked with the initial dark pin wash and splodges are now airbrushed to blend them in and add a more subtle edge to the splodge etc.
rear.jpg

top rear.jpg

Also starting to individually shade some panels to give more relief to the surfaces.
top wings.jpg
left wing top.jpg
 
Now the complexity starts to take over the overall look which I look forward to during these paint jobs, as you need to creep up on the overall look and not try to bomb it in too short a time. Just keep looking at it and mostly the references to get the balance right as best you can. Remember this is no where near finished and what looks a bit "in your face " now, will tone down as the layers of grime go on. Notice the slight light grey overspray on the red wing details to knock back the red without making it too Pink. Initial streak placement going on with a light pass of 50/50 black and dark decking brown.
a.jpg

d.jpg

more soon. :)
 
Next up is just following the references for shading and more surface detailing
ad1.jpg

A single panel has been added to the model on top of the rear left engine, as it is missing from the casting as seen on red 2. Blast marks are done with a fine brush in a thinned down dark grey as a sketch for the positions before going over them with an airbrush for the slightly shaded edges.
ad2.jpg

Rust and other grime is added and airbrushed to feather it in a little. Scratches and other marks made by sanding down through the layers on the original are added by paint, as sanding it is only good for a finish which doesn't need to follow references quite so accurately. There are always differences to the details as getting it 100 percent correct is almost impossible by eye, but we can but try.
ad8.jpg

sketching in the internal streaks and blast marks.
ad9.jpg

The rear is stating to come together now with rust on the rear panels of the wings, grey sections inside the rear greebies etc
 
Another day on, and im onto fitting the engines and guns. The guns are mounted on 3mm steel rods inserted into the wings with a corresponding hole in the underside of each gun pod. These will be glued when finished for a nice solid mount.
al1.jpg


al2.jpg

The underside is coming together as well. Notice the surface details are missing from around the lower mounting point and there is a white section with no weathering where the lower panel fits, this is to bring this into line with the filming miniature. The lower panel was moulded before removal, and I have cast a replacement which fits perfectly and matches the weathering in case the client wants to rear mount this one.
al3.jpg

rear view is starting to look pretty sick now.
al4.jpg

Side view is coming together as well, but the guns need work to bring them into line with the rest of it.
 
nose side.jpg
So here is the final incarnation with more done on the guns, wings, and everything else. Images are from my phone so don't have the best colour reference and tend to blur some colours together so please excuse this. Tons of small black rectangles and other idents all over the place.
rear details added.jpg

side gun eathering.jpg

subtle surface details added with some thinners on a scrunched towel to break up the smoother look of the airbrushing. Its important not to go all in with one particular style/ method of painting as the models can look to shaded for want of a better word.
top engine maarks with rag and thinners.jpg

engine tops.jpg

The camera is making the rust look a bit on the harsh side as it seems to love to intensify any red in the image.
overall done on red.jpg

So here it is on its stand ready for delivery. I cant thank the client enough for having me do this for him, as each one I do seems to be more fun.
on stand 1.jpg

side close.jpg
ON STAND L SIDE ANGLE.jpg
ON STAND R SIDE.jpg
 
Last edited:
I hope this may help anyone out there who is thinking of attacking this paint job. Take your time and don't be too precious about the application of the paint. Check your references all the time, never think you know where anything goes without a picture!. Don't be shy with the dirt, it loves it, and if you screw it up, just wash it with a thinner soaked rag and start again. Its part of the adventure. Thanks for getting this far down the page. Happy modelling folks.
 
Cheers for the kind words folks. As it turns out, the client loves it. Which is great news ;-)
Images don't do the paint job justice though. I think I need to purchase a better camera.
 
That's beautiful, and thank you for the run down. It's always helpful when someone breaks down their process like this. I will be doing Red 5 with my V5, and this will definitely come in handy.
 
Im not sure about reference images Fett-ish. But thanks for the praise.
If anyone is planning to do theirs, please do it from the original references in case the dreaded "Chinese whispers" move from painter to painter as I believe the y wings may have done over time. ;-)
But im super stoked you all like it. Thanks
 
This thread is more than 4 years old.

Your message may be considered spam for the following reasons:

  1. This thread hasn't been active in some time. A new post in this thread might not contribute constructively to this discussion after so long.
If you wish to reply despite these issues, check the box below before replying.
Be aware that malicious compliance may result in more severe penalties.
Back
Top