Studio Scale X-Wing build/paint (Korbanth ‘Pyro’ Resin Kit)

ecl

Sr Member
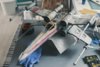
I’ve been working on this Korbanth X-wing kit for a while now; it’s been sitting mostly assembled for months, but I started painting it this week. Used Tamiya Insignia White as a base color—the color shifts a lot after all the weathering layers. The rest of the colors are my own acrylic mixtures and a few other techniques. It’ll be slow going, but I’ll update with more photos as things progress! I’m generally using the ‘blue 4’ reference photos for the color scheme, but may tweak some of it. I’m not necessarily aiming to replicate an existing x-wing exactly, seeing as this kit has a few inherent differences anyways. I still need to trim the ends of the blasters too; they’re a bit long and pointed as is.

I’m waiting on an upgraded cockpit and pilot before I finish up the canopy! It’s just sitting on top for the photos below.

1033946


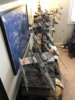
Here’s a pic of it with a 1/72 Bandai X-Wing

1033945


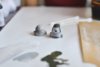
Chipping into the paint is always fun:

1033947


1033948
 
That is looking really great! I have a few of these kits to build, it's nice to see one together. Any issues with assembly or paint adhesion?
 
That is looking really great! I have a few of these kits to build, it's nice to see one together. Any issues with assembly or paint adhesion?

Assembly was actually very straightforward, very minimal finishing work; the castings looked sharp and fit together pretty well out of the box. I did however end up with some paint adhesion issues on a couple of the wings and the ‘thrusters’ (not sure what people call them). Probably didn’t clean them thoroughly enough, so I stripped those parts, used rubbing alcohol on them, and then repainted; seems to be working better now.


Paint looks excellent

How does this compare to the Captain Cardboard?


Thanks! I haven’t personally worked on a Capt. Cardboard kit, so I can’t really give an accurate comparison. During my research I’ve run across a lot of photos of the Capt. Kit, among others. I know Korbanth says that this kit is based on a pyro model, but I feel like it’s been modified enough for it to be something different on its own. The nose cone that it came with was overly long and tall, so I had to reshape it into something little easier on the eyes. I’m also waiting for a replacement cockpit interior and pilot to replace the stock ones, which I felt were the weakest parts of this kit. Over the years I’ve tried to get a Salzo x-wing, but could never really find the opportunity to get one.


Did a little paintwork on one of the wings!

1036095
 

Attachments

  • E39B752B-ECC4-4E45-AE90-A4104F53EA52.jpeg
    E39B752B-ECC4-4E45-AE90-A4104F53EA52.jpeg
    1.6 MB · Views: 291
Last edited:
I’m anxiously awaiting updates to this..currently building Salzo V5’s into Red 3 and Red 4.

Great work, keep it up!!!
 
Last edited:
Thanks! That’s fantastic with the Salzo X-Wings!

I’m treating this build as more of a painting experiment, which is the most fun part of it for me. I don’t own an airbrush, so I have to resort to different methods (light acrylic washes/paint, weathering powders) to achieve a similar look with the weathering. It’s a slow process, adding very thin layers at a time.

1036166


One of the more satisfying parts of the painting process is seeing the subtle textures appear through the weathering layers.

1036167
 
Yours looks awesome! I can’t wait to see it finished. You’re doing an amazing job without an airbrush!! Carry on!

I have Red1,2,5&6 built now. 3&4 left to finish.
 

Attachments

  • B7ED4B3C-AC69-41C8-B793-45E969BE0521.jpeg
    B7ED4B3C-AC69-41C8-B793-45E969BE0521.jpeg
    1.7 MB · Views: 555
Yours looks awesome! I can’t wait to see it finished. You’re doing an amazing job without an airbrush!! Carry on!

I have Red1,2,5&6 built now. 3&4 left to finish.


That is amazing! Especially seeing them together like that; fantastic work.
 
Thanks for the comments!

Today I ended up casting a resin copy of the r2 unit that came with the kit. The intent was to resculpt the head into the cone shaped R4-M9. Still need to refine it some more, but he’ll fit right in :D

631ADEBA-0557-4F2E-9AE1-EDF7190A07C9.jpeg


1038257


1038276
 

Attachments

  • 48EB36CC-60F0-4654-B32E-0F0C9B35B70A.jpeg
    48EB36CC-60F0-4654-B32E-0F0C9B35B70A.jpeg
    1.9 MB · Views: 276
  • 9629EF91-991F-450D-9CFC-D0A462FC69D9.jpeg
    9629EF91-991F-450D-9CFC-D0A462FC69D9.jpeg
    3 MB · Views: 311
Last edited:
Thanks!

Below are photos of the current progress. I added in the upgrade cockpit—I like this one a whole lot more than the stock one, as it more closely resembles the original pyro cockpit. I got it from ‘the replica forge’ on facebook. I had to sand the edges down a bit for it to fit, but it’s a good looking alternative. I’m still looking for a better pilot—or maybe might just not put one in—because I don’t really like the one that came with the kit. Most of the top part of the ship is done—aside from a few small touch ups here and there—but the bottom part remains unweathered. I’ll probably take a break from this for a little while and work on a Tie Bomber kit that I have coming in soon.

Sorry about the pic heavy nature of the thread; might load a bit slower than usual. It was getting dark so I used my flash for these photos; interesting how the weathering looks a bit more pronounced when using a flash!


A7903AEC-6BEC-4DB1-9DBA-ABBFDD5966AD.jpeg


78E31B00-A9AA-43DA-AC2F-C1307596399F.jpeg


E91D90C5-DAD1-44F5-96E5-02BCC4A8D127.jpeg
 
I love your work on the smaller Bandai stuff. Nice to see you taking on a large model.

Excellent work!


Thanks! I’m still amazed at the level of detail that the small Bandai kits have. I have the 1/72 X-Wing here, and it’s cool to see just how much of the detailing seen on the film models that Bandai has captured on theirs. The funny thing is, it’s actually easier to paint the studio scale model; takes longer, but with the larger ‘canvas’ to work on, I can vary the marks and techniques. With the small Bandai kits—despite using similar techniques—I have to scale down everything in order to make things look right. The Perfect Grade Falcon that i’d painted before this SS X-Wing was the most challenging so far. Smaller brushes, smaller everything; often times stencils have to be used because the detailing is just too fine!
 
This thread is more than 4 years old.

Your message may be considered spam for the following reasons:

  1. This thread hasn't been active in some time. A new post in this thread might not contribute constructively to this discussion after so long.
If you wish to reply despite these issues, check the box below before replying.
Be aware that malicious compliance may result in more severe penalties.
Back
Top