You are using an out of date browser. It may not display this or other websites correctly.
You should upgrade or use an alternative browser.
You should upgrade or use an alternative browser.
Steampunk Ironman Helmet WIP - 5/31 update
- Thread starter indiefilmgeek
- Start date
indiefilmgeek
Sr Member
Re: Steampunk Ironman Helmet WIP - Updated 2/3/13
Did a little more work on the eye-lights last night...
Like I mentioned before, the lights I'm using are from two strings of LED X-mas lights, that I have cut apart and sanded into flat rectangular shapes with an angled edge on the end. The 'front' and 'sides' of the LEDs have been painted black to mask their light coming directly through the lenses. This all directs the light back toward a reflective surface that then provides a nice even lighted-glow.
Here is what the flat sanded LED's looked like as I hot glued them into notches I cut into the welding goggle lenses.

After all the wires are soldered (I suck at this so don't judge), it looks like this...

So, from the front...
Here is a high-angle shot (where you can make out the blacked out LEDs).

And once a white backing is added (this is just some white paper), it looks like this...

Of course, I had to tuck this behind the faceplate as well, just to see what it might look like in the helmet...

So, now it's time to do this ALL again as I re-do the lens I had created as a 'test' almost a year ago. :unsure
Did a little more work on the eye-lights last night...
Like I mentioned before, the lights I'm using are from two strings of LED X-mas lights, that I have cut apart and sanded into flat rectangular shapes with an angled edge on the end. The 'front' and 'sides' of the LEDs have been painted black to mask their light coming directly through the lenses. This all directs the light back toward a reflective surface that then provides a nice even lighted-glow.
Here is what the flat sanded LED's looked like as I hot glued them into notches I cut into the welding goggle lenses.
After all the wires are soldered (I suck at this so don't judge), it looks like this...
So, from the front...
Here is a high-angle shot (where you can make out the blacked out LEDs).
And once a white backing is added (this is just some white paper), it looks like this...
Of course, I had to tuck this behind the faceplate as well, just to see what it might look like in the helmet...
So, now it's time to do this ALL again as I re-do the lens I had created as a 'test' almost a year ago. :unsure
indiefilmgeek
Sr Member
Re: Steampunk Ironman Helmet WIP - Updated 2/4/13
Should also make another mention, that if anyone wants to own a raw cast of the helmet and faceplate, they are up for sale on the JY. Orders are being taken until Friday (2/8/13), so PM me or comment on the sale thread.
STEAMPUNK IRON MAN HELMET - Sales Thread
Should also make another mention, that if anyone wants to own a raw cast of the helmet and faceplate, they are up for sale on the JY. Orders are being taken until Friday (2/8/13), so PM me or comment on the sale thread.
STEAMPUNK IRON MAN HELMET - Sales Thread
Last edited:
indiefilmgeek
Sr Member
Re: Steampunk Ironman Helmet WIP - Updated 2/4/13
To finish up the design of the lighted eye units, I wanted to show you what I have planned for the reflective backing. First off, I should show you the difference between the same 8-LED lighting rig with and without a reflective backing...

In the last post I used a white piece of paper, but that won't work for the final build. So, I wrapped the glass lens with aluminum foil, heated some plastic sheets with my heat gun and molded the heated plastic over the lens to create the general shape I wanted.


(it ain't perfect...)

(but it works!)
I also got the second lens wired up last night! Hurrah! :cool
So, now that I have the lenses worked up, I walked through the whole design and process in this video.

******
...and finally, I've gotten a couple coats of filler primer on the jaw area tubing. It's far from perfect, but it should work to get a workable junk mold. That should provide me with a decent resin copy that I can clean up for both sides.

To finish up the design of the lighted eye units, I wanted to show you what I have planned for the reflective backing. First off, I should show you the difference between the same 8-LED lighting rig with and without a reflective backing...
In the last post I used a white piece of paper, but that won't work for the final build. So, I wrapped the glass lens with aluminum foil, heated some plastic sheets with my heat gun and molded the heated plastic over the lens to create the general shape I wanted.
(it ain't perfect...)
(but it works!)
I also got the second lens wired up last night! Hurrah! :cool
So, now that I have the lenses worked up, I walked through the whole design and process in this video.
******
...and finally, I've gotten a couple coats of filler primer on the jaw area tubing. It's far from perfect, but it should work to get a workable junk mold. That should provide me with a decent resin copy that I can clean up for both sides.
Rysjin7717
Well-Known Member
Re: Steampunk Ironman Helmet WIP - Final Eye Set-up Video
Indie, your at th' home stretch brah Wow!!!! lookin' sweeeet!!!! opcorncool
Indie, your at th' home stretch brah Wow!!!! lookin' sweeeet!!!!
opcorncoolScandvoice
Well-Known Member
Re: Steampunk Ironman Helmet WIP - Final Eye Set-up Video
Whoa! The gears are just perfect!
Whoa! The gears are just perfect!
Scandvoice
Well-Known Member
Re: Steampunk Ironman Helmet WIP - Final Eye Set-up Video
And the tubes, too!
And the tubes, too!
indiefilmgeek
Sr Member
Re: Steampunk Ironman Helmet WIP - Final Eye Set-up Video
Been pretty busy at work, which has cut into my construction time. But I wanted to post a quick look at the main tube piece in rough place with the inset gear detail...

The tube piece isn't perfect, but it's close enough for me to stop messing with it and get it cast.
Been pretty busy at work, which has cut into my construction time. But I wanted to post a quick look at the main tube piece in rough place with the inset gear detail...
The tube piece isn't perfect, but it's close enough for me to stop messing with it and get it cast.
Re: Steampunk Ironman Helmet WIP - Final Eye Set-up Video
It looks great and I love the gears too. Really nice job!
It looks great and I love the gears too. Really nice job!
indiefilmgeek
Sr Member
Re: Steampunk Ironman Helmet WIP - Final Eye Set-up Video
Thanks!
I spent almost half of the day Saturday run all over town collecting broken plastic toys from thrift stores. And while my collection of interesting 'fiddly-bits' for costume detailing grew, my poor kids are completely traumatized. :unsure
When heading to the toy section of any store my kids now ask me: "Are we looking for toys for us, or ones for your to break?" :facepalm
My intention is to make HUGE strides tonight on the jaw detail so I can start hitting this thing with primer. I'd really like to finish up exterior of the helmet by the first week of March, so we can begin working on the rest of the suit.
It looks great and I love the gears too. Really nice job!
Thanks!
I spent almost half of the day Saturday run all over town collecting broken plastic toys from thrift stores. And while my collection of interesting 'fiddly-bits' for costume detailing grew, my poor kids are completely traumatized. :unsure
When heading to the toy section of any store my kids now ask me: "Are we looking for toys for us, or ones for your to break?" :facepalm
My intention is to make HUGE strides tonight on the jaw detail so I can start hitting this thing with primer. I'd really like to finish up exterior of the helmet by the first week of March, so we can begin working on the rest of the suit.
Re: Steampunk Ironman Helmet WIP - Final Eye Set-up Video
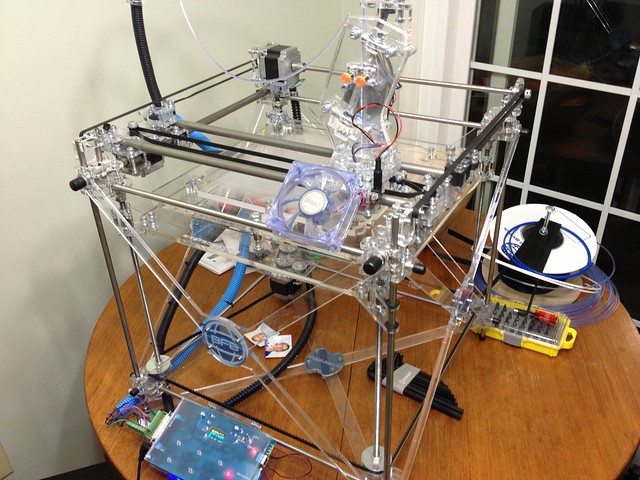
I've been lurking the thread, since Indie has been doing the work. Today's acquisition warrants a post, however. I finally got my 3D printer setup at home! While Indie is very much the scratch-build-with-whatever-he-can-find kind of guy, I'm going to use this to make whatever other parts we don't want to scratch build. :love
I've been lurking the thread, since Indie has been doing the work. Today's acquisition warrants a post, however. I finally got my 3D printer setup at home! While Indie is very much the scratch-build-with-whatever-he-can-find kind of guy, I'm going to use this to make whatever other parts we don't want to scratch build. :love
Re: Steampunk Ironman Helmet WIP - Final Eye Set-up Video
Ha! These things are getting cheaper every day. This one does a very nice job and I'm extremely lucky to have it. I bought it off my old company for a fraction of what they paid for it.
I'm more than willing to offer printing services to anyone who needs it. :love
That cause we are all jealous of your printer or just drooling
Ha! These things are getting cheaper every day. This one does a very nice job and I'm extremely lucky to have it. I bought it off my old company for a fraction of what they paid for it.
I'm more than willing to offer printing services to anyone who needs it. :love
indiefilmgeek
Sr Member
Re: Steampunk Ironman Helmet WIP - Final Eye Set-up Video
Sorry to keep you all waiting for so long. Several things have been happening here. Most important was the construction of a 10'x16' lofted barn workshop in my backyard!

As some of you know, up to this point all of my projects have been created on my wife's kitchen table or the tiny outside storage closet off our car port that I converted into my workspace.
At the beginning of this year, I took some of my annual bonus from work, so cash gifts from a couple of good friends and a bit I had saved up for this project and hired a company to begin construction of my very first 'official' workshop. :$
I've since built the porch/stairs and put up the lattice work around the bottom of the workshop. All of that is just killing time, as I won't have the power run to the building until March 22. Insulation and walls will be next, followed by counters, shelves and some tools I've always wanted, but just haven't had a place to put them. On the list to acquire: Drill Press, 2-in-1 Belt/Disc Sanding Station, Ban Saw, Router Table and a proper bench vise.
Anyway, this has been a BIG part of the delay in updates on this project, so I hope you forgive me... hopefully the 'workshop' will lead to not only a faster completion of this project, but many others!thumbsup
*****
So, I have gotten some limited work done on the jaw area. Before I could start I had to raid my local thrift shops to gather plastic toys that I could destroy for parts. That done, I started cutting interesting bits off toys and mounting them to the jaw area of my helmet.
Here's one example... plastic toys from the $0.25 bin.

I cut off the exhaust/vent thingy.

Then mounted them to the recessed jaw area.

Rinse and repeat a few more times and you get a colorful, but detailed area.


Now, I've been staring at this thing for weeks now (as I've been working on the workshop) and I JUST haven't been very much in love with it. So, tonight, it was finally warm enough to hit this section with primer to see what it looked like as a 'whole'...

And one shot with the gear section added for reference.

I'm much happier seeing it THIS way. Now, I can add a bit more detail where it still needs it, and then we can get this puppy ready for painting and assembly!:thumbsup
Sorry to keep you all waiting for so long. Several things have been happening here. Most important was the construction of a 10'x16' lofted barn workshop in my backyard!
As some of you know, up to this point all of my projects have been created on my wife's kitchen table or the tiny outside storage closet off our car port that I converted into my workspace.
At the beginning of this year, I took some of my annual bonus from work, so cash gifts from a couple of good friends and a bit I had saved up for this project and hired a company to begin construction of my very first 'official' workshop. :$
I've since built the porch/stairs and put up the lattice work around the bottom of the workshop. All of that is just killing time, as I won't have the power run to the building until March 22. Insulation and walls will be next, followed by counters, shelves and some tools I've always wanted, but just haven't had a place to put them. On the list to acquire: Drill Press, 2-in-1 Belt/Disc Sanding Station, Ban Saw, Router Table and a proper bench vise.
Anyway, this has been a BIG part of the delay in updates on this project, so I hope you forgive me... hopefully the 'workshop' will lead to not only a faster completion of this project, but many others!
thumbsup*****
So, I have gotten some limited work done on the jaw area. Before I could start I had to raid my local thrift shops to gather plastic toys that I could destroy for parts. That done, I started cutting interesting bits off toys and mounting them to the jaw area of my helmet.
Here's one example... plastic toys from the $0.25 bin.
I cut off the exhaust/vent thingy.
Then mounted them to the recessed jaw area.
Rinse and repeat a few more times and you get a colorful, but detailed area.
Now, I've been staring at this thing for weeks now (as I've been working on the workshop) and I JUST haven't been very much in love with it. So, tonight, it was finally warm enough to hit this section with primer to see what it looked like as a 'whole'...
And one shot with the gear section added for reference.
I'm much happier seeing it THIS way. Now, I can add a bit more detail where it still needs it, and then we can get this puppy ready for painting and assembly!
:thumbsupelectraflier
Well-Known Member
Re: Steampunk Ironman Helmet WIP -updated 3/11
Looking soo awesome!!!
Looking soo awesome!!!
Lord Magneto
Sr Member
Re: Steampunk Ironman Helmet WIP -updated 3/11
That is coming together really nicely.
Man oh man am I jealous of that work space. I'm sure you're kids will want to use that as a fort
That is coming together really nicely.
Man oh man am I jealous of that work space. I'm sure you're kids will want to use that as a fort
Similar threads
- Replies
- 10
- Views
- 369
- Replies
- 3
- Views
- 949
- Replies
- 10
- Views
- 1,339
- Replies
- 4
- Views
- 1,738