Steampunk Half Mask

GiiZmOMakes

New Member
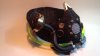
Custom Steampunk Half Mask
Design & Build By #GiiZmOMakes


So, this started out as making a sub zero type mask but quickly changed to just a fully custom mask.
A while back, i duct taped the crap out of my head and filled it with expanding foam in attempts of making a budget head cast. I than wrap it with some dollar store plastic wrap and add a few layers of duct tape over the right side of the part I'm designing on. To keep things symmetrical I draw and use one side of the pattern, just flipping it over to do the opposing side.
IMG_2314.JPGIMG_2315.JPGIMG_2317.JPGIMG_2313.JPGOnce the design is solid, i simply cut along the lines and the pieces fall right off ready to transfer onto, in this case, EVA foam.

There are pros and cons for both hot glue and cyanoacrylate. I don't usually use a contact glue like barge on these thinner EVAs. Its quicker for me to use hot or cyanoacrylate for these. I love cyanoacrylate because it literally welds the foam together. (but use with caution. It generates a lot of heat, to the point of smoke.) The Drawback is not being able to touch the glue in attempts to not get it everywhere. Hot glue is way easier for rapid gluing. Just glue, stick, wipe and hold for a few seconds. For the project its mostly cyanoacrylate.
IMG_2319.JPGIMG_2321.JPG
IMG_2323.JPGIMG_2322.JPGIMG_2325.JPGIMG_2324.JPG
IMG_2336.JPGIMG_2328.JPGIMG_2326.JPG

The design more or less was playing as i go. i started with flaps for a front "respirator filter".
IMG_2331.JPGIMG_2333.JPG

I first cut a rubber tube in half and was planning on lining the flaps with it but it just wasn't looking as good as I pictured it.
IMG_2334.JPG

So I went with a more simple approach.
IMG_2362.JPGIMG_2363.JPGIMG_2364.JPG

IMG_2313.JPG


IMG_2314.JPG


IMG_2315.JPG


IMG_2317.JPG


IMG_2318.JPG


IMG_2319.JPG


IMG_2320.JPG


IMG_2321.JPG


IMG_2322.JPG


IMG_2323.JPG


IMG_2324.JPG


IMG_2325.JPG


IMG_2326.JPG


IMG_2328.JPG


IMG_2331.JPG


IMG_2333.JPG


IMG_2334.JPG


IMG_2336.JPG


IMG_2362.JPG


IMG_2363.JPG


IMG_2364.JPG
 
Last edited by a moderator:

IMG_2374.JPGIMG_2375.JPG
IMG_2376.JPGIMG_2377.JPGIMG_2378.JPGIMG_2379.JPG
IMG_2366.JPG
IMG_2383.JPGIMG_2384.JPGIMG_2385.JPG
IMG_2388.JPGIMG_2389.JPGIMG_2390.JPG

Took the sponge out of a highlighter and shook it up in some hot water.
IMG_2387.JPG
IMG_2392.JPGIMG_2391.JPGIMG_2393.JPG
View attachment 592971IMG_2409.JPGIMG_2408.JPG
IMG_2517.JPGIMG_2519.JPGIMG_2518.JPG

*Lemme say, using snap chat to document my stuff is maybe a mistake.
The saved pictures are all right side up in my window but once they're uploded here they're sideways.
Its getting very frustrating. The only way i can get them right is if i got into paint and rotate it there and save. ugh...
 

Attachments

  • IMG_2517.JPG
    IMG_2517.JPG
    81.2 KB · Views: 106
That looks awesome. I built one not too long ago (see below), but never got around to doing the last touch up work. (Original Creator of the idea) I also never could integrate it into my costume in a way I liked, so it's currently collecting dust until I get some new ideas. I used the same highlighter trick for the tubes on my left arm, it adds a really neat effect, especially when lit with some LEDs.
Mask and the final costume
IMAG0139.jpgIMAG0140.jpgIMAG0356_1.jpg
 
This thread is more than 8 years old.

Your message may be considered spam for the following reasons:

  1. This thread hasn't been active in some time. A new post in this thread might not contribute constructively to this discussion after so long.
If you wish to reply despite these issues, check the box below before replying.
Be aware that malicious compliance may result in more severe penalties.
Back
Top