I've had this project on my desk for absolute ages. I did the initial CAD design in what seems like a year ago but I think it was sooner. Nonetheless, I digress. attached are the other photos of it.

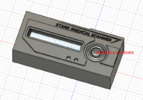
My plan for this prop is to have a simple light strip under the display screen which will be triggered by a momentary switch under the round button part. A very simple but effective way of giving the prop some life. As well the standby red light will turn to green. Aand I'll also need to sneak in a switch for the whole circuit somewhere I suppose XD.
I'm designing the parts in CAD to be ready to print on my NEW SLA PRINTER. Can you tell I'm excited?!?! Funny enough I've had the machine for a while but only recently got it up and running. This project has always depended on it to be able to make these parts. There's no way I would be able to make these parts on my current FDM.
More updates coming...
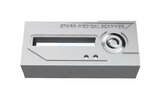
") ) I have a whole list of measurements somewhere for the screen used. I think I originally scaled it using the milling lines on the aluminum of the sides. Will hopefully post an update soon and scratch the itch for this project!
) I have a whole list of measurements somewhere for the screen used. I think I originally scaled it using the milling lines on the aluminum of the sides. Will hopefully post an update soon and scratch the itch for this project!