You are using an out of date browser. It may not display this or other websites correctly.
You should upgrade or use an alternative browser.
You should upgrade or use an alternative browser.
Star Wars The Force Unleashed II - General Rahm Kota WIP
- Thread starter Koda Vonnor
- Start date
Koda Vonnor
Well-Known Member
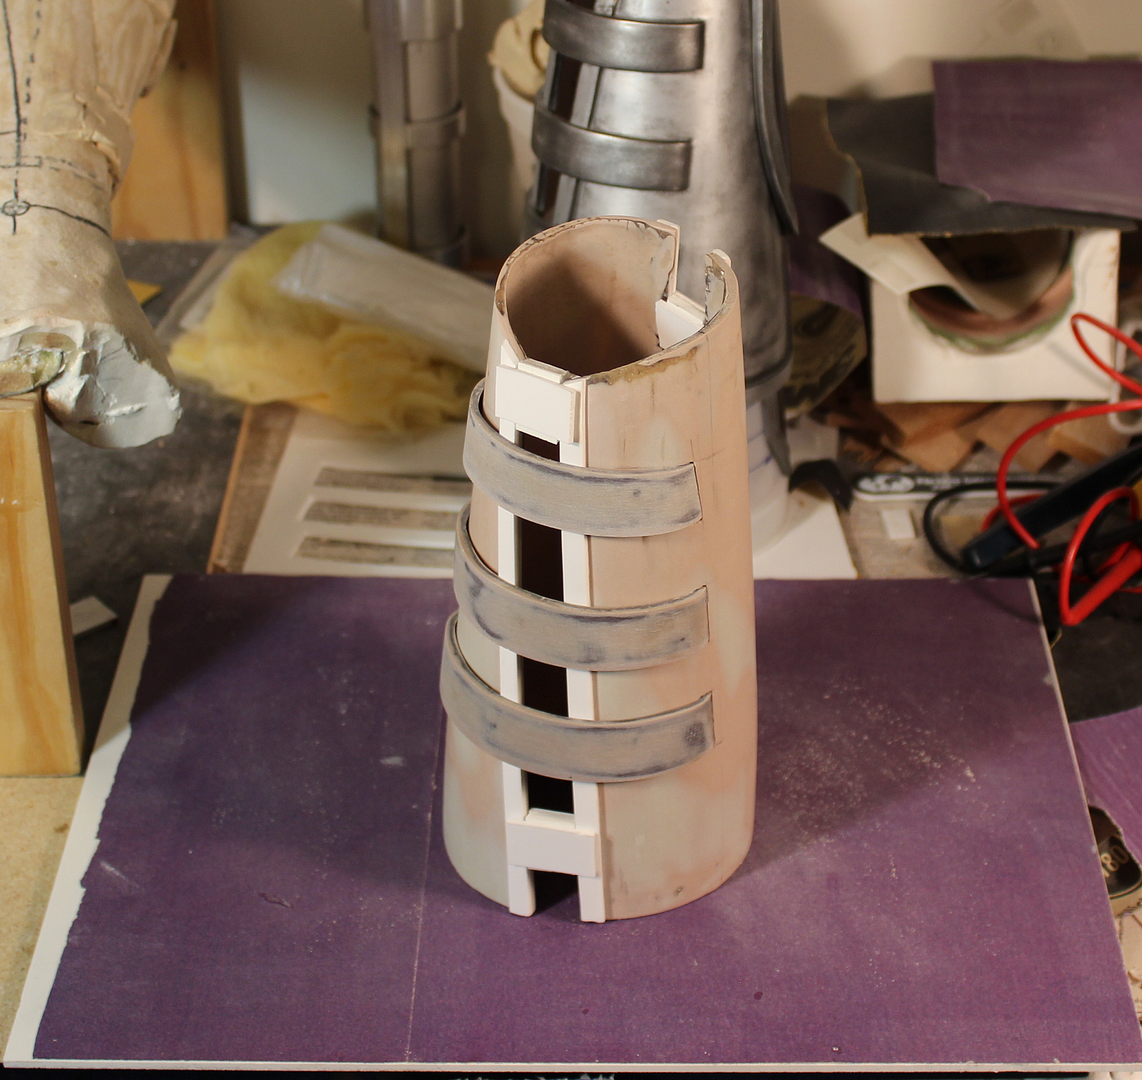
Eighteen months those three fiberglass cross-straps for the right gauntlet sat on my shelf. Today I told some Starkiller costumers I would have this finished by CVIII, so sandpaper finally hit the bondo. It took a bit of grinding and shaping but here they are sitting nice and flush along the main body assembly. These will be bonded to the radius and ulna plates using polyester resin at the slots, and superglue at the edge trim as soon as the weather cooperates.
Like a book, the costume project waits patiently until you pick it up again, no matter how long you've been away.
Tick tock.
~ vonnor
Like a book, the costume project waits patiently until you pick it up again, no matter how long you've been away.
Tick tock.
~ vonnor
Koda Vonnor
Well-Known Member
Thanks Spicer.
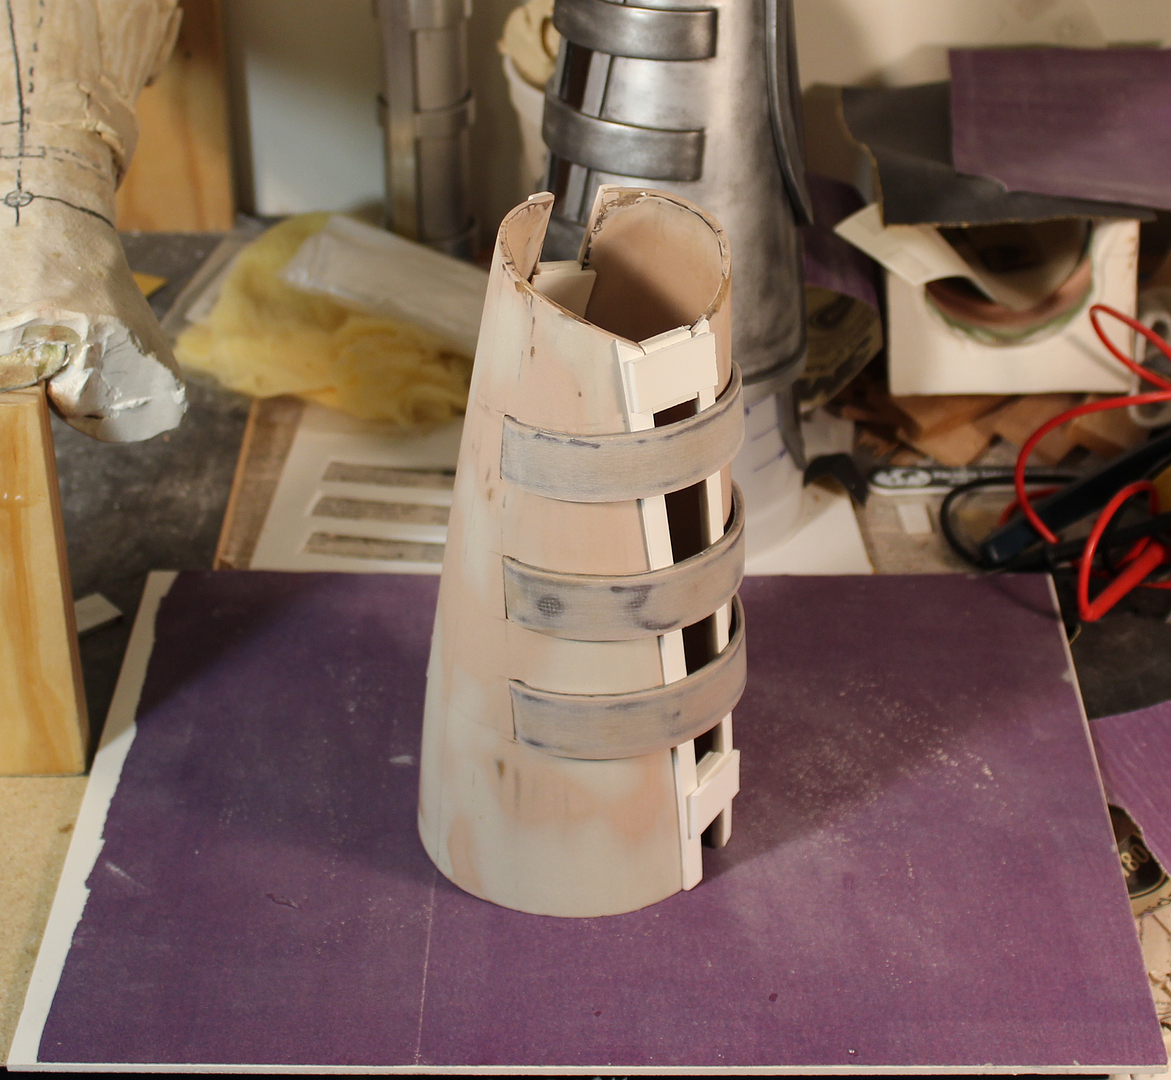
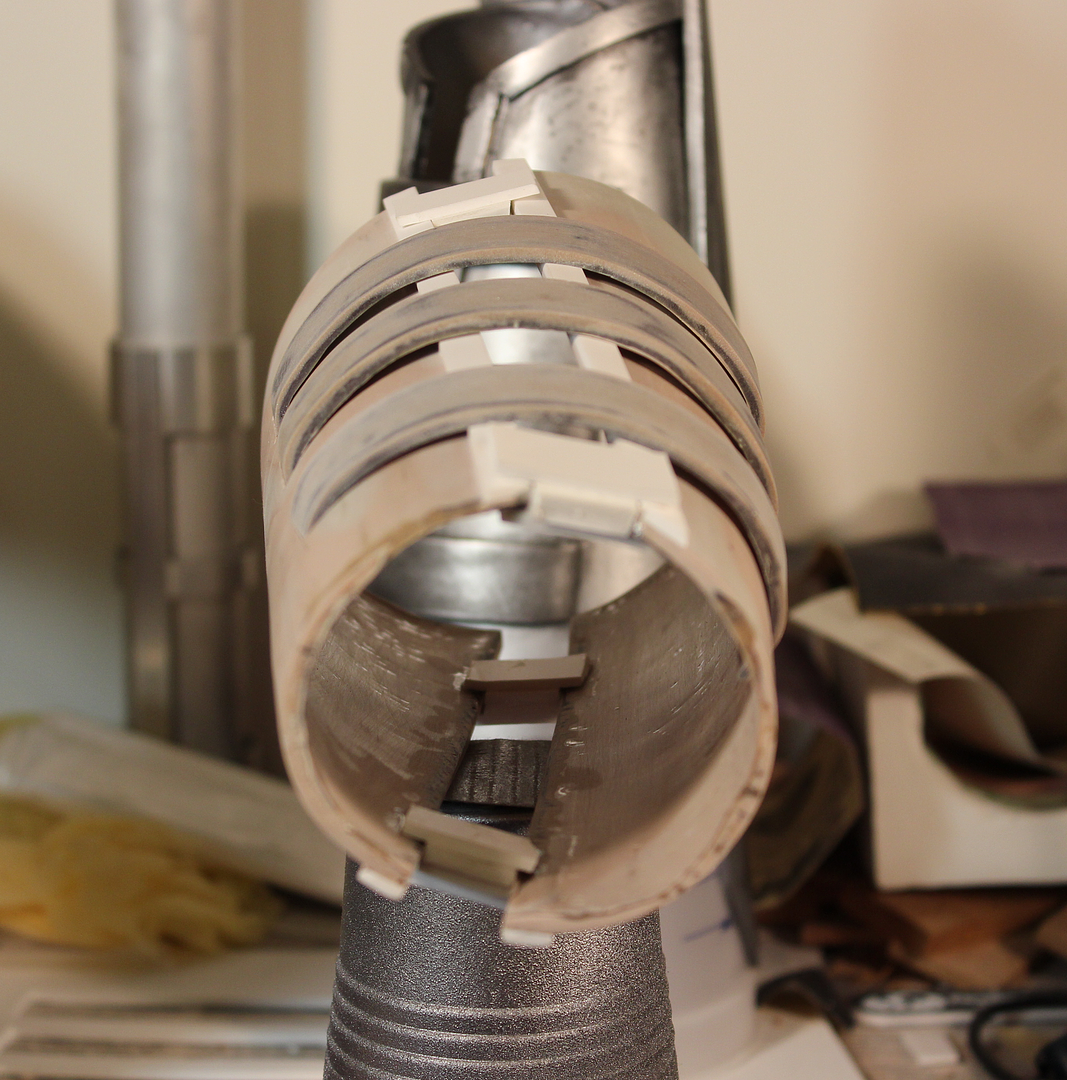
No pictures this time but Saturday I attached the cross-straps using 50/50 Bondo/Polyester resin, then took off the temporary spacers, cut off the elbow end to the correct length, and dremeled down the ends of the straps that were run through the slots on the insides. Smoothed out the inside surfaces with sandpaper and tacked the upper two straps to the axial edge trim with superglue. The strap near the wrist I left un-tacked. I glued it tight to the edge trim on the left vambrace and opening the unit to get my hand in has caused hairline cracks (not visible past 1 metre). I hope to avoid this on the right vambrace by allowing the flex along most of the strap length.
Next up is to add the radial edge trim at the wrist and elbow, and fill the tiny gaps at the strap slots.
~ vonnor
Koda Vonnor
Well-Known Member
Today I got back to this, and carefully sanded around the epoxy fills I did a few weeks ago. Here is the first primer coat, there are only a few little scratches that I will fill in with styrene model putty and do one more primer coat. This one is cleaner, sharper and more screen accurate than the left vambrace, mostly due to lessons learned on the previous piece. Next up is the right forearm plate.

~ vonnor
~ vonnor
Koda Vonnor
Well-Known Member
This will be the right forearm guard junk model. The paper template will be aligned over these grooves, and the rigid model cut out. A silicone rubber mold will be made on the flat, and a urethane rubber flexible model will be cast. The flexible model will be laid over a plastic sheet wrapped around the main assembly, then a plaster backed silicone mold taken of the flexible model while it's in place. When the rigid production piece is cast in fiberglass it will hold the same contour as the flexible model while it was wrapped around the main assembly.


~ vonnor
~ vonnor
Koda Vonnor
Well-Known Member
I cast the flexible model for the right forearm plate using urethane rubber then krazy-glued it to a .020 thick plastic sheet that I had taped tightly around the main assembly. Tomorrow evening I will make a silicone rubber mold of the thing. Hopefully I can get it in fiberglass on Sunday morning. This soft model was cut about 1/8" too big around the edges so I can dremel/sand it down to spec. The 1mm sintra edge trim will go on the fiberglass production casting.
Tryin' to roll this mutha' forward. :cool


~ vonnor
Tryin' to roll this mutha' forward. :cool
~ vonnor
Koda Vonnor
Well-Known Member
I brushed on a few layers of Smooth-On Rebound-40 silicone rubber and after it set up I under-cut the edges all around. This helps the rubber mold liner stay tight inside the plaster mold shell. I sprayed clear cote acrylic on some scrap cardboard then hot-glued an ugly but good enough bowl around the green rubber. Poured in some hobby plaster and now waiting for it to solidify enough to break it out. Note I carved a sorta flat bottom on the mold so it will sit better while I do the fiberglassing. I will bake the mold in the oven for a few hours at 180F to get rid of any moisture, then wax the mold liner a bit to help the fiberglass dry after I cast the production forearm plate in the morning.


~ vonnor
~ vonnor
Koda Vonnor
Well-Known Member
Thanks Drac.
Flexible model of the right forearm plate on the left, cleaned up mold in the middle, production main vambrace assembly on the right:

Finished fiberglass and rondo layup, still in the mold. 50/50 bondo/polyester resin gel-cote, 6 layer glass cloth, 60/40 bondo/resin finish coat:

Production right forearm plate - freshly broken out of the mold:

I had to do all this between 7 and 8am today. Even at that, it was freaking HOT out by the time I finished. :eek
Next step is careful sanding then edge trim. The edges to be sanded down to meet the trim extents.
~ vonnor
Flexible model of the right forearm plate on the left, cleaned up mold in the middle, production main vambrace assembly on the right:
Finished fiberglass and rondo layup, still in the mold. 50/50 bondo/polyester resin gel-cote, 6 layer glass cloth, 60/40 bondo/resin finish coat:
Production right forearm plate - freshly broken out of the mold:
I had to do all this between 7 and 8am today. Even at that, it was freaking HOT out by the time I finished. :eek
Next step is careful sanding then edge trim. The edges to be sanded down to meet the trim extents.
~ vonnor
Koda Vonnor
Well-Known Member
Fits pretty good. ")


~ vonnor
~ vonnor
Koda Vonnor
Well-Known Member
I cast a 2mm thick flexible elbow guard in the same mold I used for the left one, then took one of those plastic sheets you put over a bowl in the microwave to keep your soup from sputtering all over and tack-glued it inside the main assembly. I superglued the flexible model in place on the plastic sheet, then capped off the ends with clear-coat sealed cardboard and hot glue. Poured in some plaster to make a mandrel/mold. The plaster is baking in the toaster oven at the moment, but will be sealed and waxed this evening, and a 4-layer fiberglass production elbow guard will be cast in the morning tomorrow.
Stay tuned.


~ vonnor
Stay tuned.
~ vonnor
Koda Vonnor
Well-Known Member
I cut out 4 pieces of fiberglass cloth in the shape of the mold, and this morning laid them on with a couple rondo coats to top it all off. Had some difficulty with the Bondo mix and it started to gunk up real bad. But when in doubt, throw another layer on there. You can always sand it off.
She's kinda ugly on the surface, but underneath she's a beauty.

~ vonnor
She's kinda ugly on the surface, but underneath she's a beauty.
~ vonnor
Koda Vonnor
Well-Known Member
See? A beauty.
Just a few battle-damage pock marks, but those will fill in with plastic model putty. Next up is the elbow guard edge trim and the magnetic closure system. I'll probably do that at the 501st armor party next Saturday.


~ vonnor
Just a few battle-damage pock marks, but those will fill in with plastic model putty. Next up is the elbow guard edge trim and the magnetic closure system. I'll probably do that at the 501st armor party next Saturday.
~ vonnor
Koda Vonnor
Well-Known Member
Three puzzle pieces. Just add magnets.
The squares will be milled out and 1/2" x 3/8" round neo-D magnets glued in the holes. 1/2" x 1/8" mates to these will be glued on the galvanized strip that's attached to the elbow guard. The other sintra pieces are guides that mesh with the edge trim on the main assembly and keep everything locked tight. This is the same closure system that was used for the left vambrace.

I hope to have this ready to prime and test at the 501st armor party on Saturday.
~ vonnor
The squares will be milled out and 1/2" x 3/8" round neo-D magnets glued in the holes. 1/2" x 1/8" mates to these will be glued on the galvanized strip that's attached to the elbow guard. The other sintra pieces are guides that mesh with the edge trim on the main assembly and keep everything locked tight. This is the same closure system that was used for the left vambrace.
I hope to have this ready to prime and test at the 501st armor party on Saturday.
~ vonnor
Koda Vonnor
Well-Known Member
Left one on the right, right one on the left. Symmetry is pretty good. The magnetic closure is in place but the glue has to set up before I can take it apart. I put epoxy filler on all the edges as well.

~ vonnor
~ vonnor
Koda Vonnor
Well-Known Member
Here's 3/4 of the whole right arm vambrace, all sanded and primed. Gotta put it on that plaster arm behind it and sculpt the wrist clip next. Moving right along.

~ vonnor
~ vonnor
Koda Vonnor
Well-Known Member
Here is a rough cut of the right wrist clip sculpt. I still have to adjust the alignment a bit and smooth out the surfaces and edges. Just wanted to get the basic shape and volume on there. Shooting for fiberglass rigid model this weekend.


~ vonnor
~ vonnor
Koda Vonnor
Well-Known Member
Thanks Scott.
I stalled a little bit over the weekend on this sculpt clean-up. Can't seem to get it symmetrical with the completed left wrist. Not liking my edge cut angles and the overall extents and contours. If I can't get it to an acceptable condition in the next few days I'll probably say *****-it and cast it anyway. Clean it up on the hard-master.
~ BC
Similar threads
- Replies
- 1
- Views
- 1,134
- Replies
- 3
- Views
- 1,622
- Replies
- 6
- Views
- 1,577
- Replies
- 2
- Views
- 1,768