You are using an out of date browser. It may not display this or other websites correctly.
You should upgrade or use an alternative browser.
You should upgrade or use an alternative browser.
Star Wars Card Games and others
- Thread starter Raptor98
- Start date
Just got two decks from CloudAll and they're great. They feel a million times nicer than the ones from Galaxy's Edge and he through in a few extra pieces for free. Looking forward to playing with these!
ibspitfire
Well-Known Member
A few more screengrabs of what I am now fairly certain are Pazaak cards.
In the last frame, you can see the Trandoshan has a blue card with a "+" in the center diamond.
In the first frame, you can see a blue and red card (perhaps a "+/-" value?).
In the second frame, you can see another green card held by the dealer.
And in the third frame, you can see the reverse of the card in blue, there are also red-backed cards, I presume the blue is the "player" deck while the red is the "dealer/house" deck. They have somewhat of a gold-foil finish to them by the looks of it...
Attachments


woodywaverider
Sr Member
Not my photo’s, saw these on Facebook group for galactic cruise, thought they should go here
Halcyon Sabacc - Rules of Coruscant Shift.
credit: u/PatternMixingMomma (reddit)


Halcyon Sabacc - Rules of Coruscant Shift.
credit: u/PatternMixingMomma (reddit)
Last edited:
BetaCygni
New Member
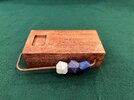
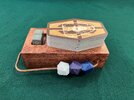
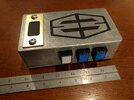
Here's my version of the Sabacc Dealer Block seen in "Solo: A Star Wars Story".
It is made from fine-grained hardwood cut to screen-accurate dimensions (length, width, and height) and stained to look like the block in the movie. Two coats of clear-coat are applied to preserve the finish. The top of the block has a well for storing the Sabacc dice in between rolls.
A solid copper rod extends from one end around to the right side.
The rod holds three 3-D printed "honest stones" that are used to keep track of the betting rounds of a hand.
Each stone has a unique shape and color.
Attachments
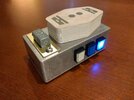
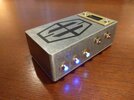
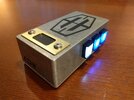
New to the forums, but just though I would pop in here with my take on a Sabacc Dealer Block/Round Counter. I thought I would make one that looked a little more mechanical.
It's made out of an aluminum enclosure with push-button switches replacing the "Honest Stones" to track rounds. I tried to match the blue, blue, white colors seen in the movie. I also put similar-colored LEDs on the opposite side so that all players can see the round indicators. To hold the dice, I used a deadbolt strike plate. While not as deep as the pocket in the movie, it does the job. I finished it off with some homemade vinyl decals and some brass washers for some added flair.
It's made out of an aluminum enclosure with push-button switches replacing the "Honest Stones" to track rounds. I tried to match the blue, blue, white colors seen in the movie. I also put similar-colored LEDs on the opposite side so that all players can see the round indicators. To hold the dice, I used a deadbolt strike plate. While not as deep as the pocket in the movie, it does the job. I finished it off with some homemade vinyl decals and some brass washers for some added flair.
Attachments
Protoss
Well-Known Member
Awesome! Very good idea and great look!New to the forums, but just though I would pop in here with my take on a Sabacc Dealer Block/Round Counter. I thought I would make one that looked a little more mechanical.
It's made out of an aluminum enclosure with push-button switches replacing the "Honest Stones" to track rounds. I tried to match the blue, blue, white colors seen in the movie. I also put similar-colored LEDs on the opposite side so that all players can see the round indicators. To hold the dice, I used a deadbolt strike plate. While not as deep as the pocket in the movie, it does the job. I finished it off with some homemade vinyl decals and some brass washers for some added flair.
farway
New Member
Hello, your card images look great! Your post here is quit a while ago. Do you still have the images for download? I really would like to make a print for myself.Custom Made Standard Sabacc Deck Has Arrived!
First thing I said when I unboxed these was, "Oh. My. Word."
This has to be the highest quality and sleekest deck I have gotten so far!
View attachment 1055520 View attachment 1055522
View attachment 1055523
With the options I selected, the price was on the cheaper end at $29.55 before shipping with my shipping cost being an additional $7.99.
The cards got to my mailbox in only 6 business days or 11 total days accounting for weekends and Labor Day.
Step-by-Step Walkthrough
Here is a tutorial of exactly what I did to get the deck:
Booklet
- Go to the free-to-use graphic designs of the canon Standard Sabacc card deck that Muddler referenced:
- https://drive.google.com/drive/folders/0B62WplduZvqmdktRWHNjNUNjXzg
- Let me know if the above link does not work.
- Once Google Drive loads, select all 77 images and then right-click and click "Download."
- Locate the downloaded ZIP file on your computer and extract all the files.
- Now go to the custom card deck creator:
- That link should take you to a page with the following card type:
- Custom Game Cards (63 x 88mm)
- Select the following options (unless you prefer fancier/pricier options
):
- Card stock: (P10) Plastic
- Size of deck: Up to 90 cards
- Finish: MPC card finish
- Packaging: Plain white tuck box (only adds 50 cents to the order)
- Wrapping: Shrink-wrapped (meaning the plain white tuck box itself is shrink-wrapped)
- Booklets: None (however, read the note at the bottom of this message and view the "Booklet.zip" attachment)
- Click the "start your design" button and start by customizing the front of the cards.
- A popup will load.
- Set the number of cards in the deck to the number 76.
- Leave packaging as is.
- Click the "Different images" button under the "Image & Text" heading.
- The popup will close.
- In the top-left corner of the website, give your design a name (e.g. Standard Sabacc) and then click the "Save" button.
- Now click the red "Upload images" button on the right.
- In the popup, select the 76 front images (excluding the image of the back side of the cards) extracted from the ZIP file.
- Then click the option "[Help me autofill image!]."
- If you want, you can save the images for later into a library by clicking the gray "Save Images to Library" button.
- In the popup, select the "Create new album" option
- Give the album a name (e.g. Standard Sabacc Deck) and then click the "save" button.
- Once the website is done auto-filling all 76 card fronts, click the blue "Next Step" button in the upper-right corner of the screen.
- Click the blue "Next Step" button again (unless you want to add a watermark for one or more card fronts).
- Now you will customize the back of the cards.
- A popup will load.
- Keep the number of cards at 76.
- This time, click the "Same image" button under the "Image & Text" heading
- The popup will close.
- Now click the red "Upload images" button on the right.
- In the popup, select only the single image of the back side of the cards extracted from the ZIP file.
- Then click the option "[Help me autofill image!]."
- If you want, you can save the image into the library you made by clicking the gray "Save Images to Library" button.
- In the popup, select the "Choose Album" option.
- Select the corresponding album (e.g. Standard Sabacc Deck) and then click the "save" button.
- Now click the blue "Next Step" button in the upper-right corner of the screen.
- Click the blue "Next Step" button again (unless you want to add a watermark for one or more card backs similar to Toydarian Toymaker).
- Scroll to the bottom of the page and check the box to confirm that these images are indeed free to use.
- Click the gray "Update to Saved Projects" button and then click the blue "Add to Cart" button.
- Click the red "Go to Checkout" button and then you are on your own from there.
As many of you know, the 2015 Celebration Anaheim version came with a set of rules and images.
The 2015 Celebration Anaheim booklet is actually simply two cards, but I preferred the bi-fold booklet layout better.
I recreated that booklet (with the designs used by the aforementioned Google Drive folder) and have attached the 4 images in the "Booklet.zip" file.
If you are like me and prefer to save some money:
Or if you would prefer to order the booklet:
- I have included a printable Microsoft Word version in the "Booklet.zip" file.
- Make sure you print it with the "Print on Both Sides: Flip on the Short Edge"option and "Landscape" layout.
- After printing it off, you can fold it into a bi-fold booklet.
- Feel free to use the 4 images provided inside the "Booklet.zip" file
- Then go ahead and use the "Booklet - Bi-fold (4 sides)" on the makeplayingcards website and go from there.
division 6
Master Member
That person hasn't visited the forum in over a year.
MOBLCIBI
New Member
Hello there! I'm still here and have stayed subscribed to notifications on this forum.Hello, your card images look great! Your post here is quit a while ago. Do you still have the images for download? I really would like to make a print for myself.
If I'm thinking of the same card images that you are referring to, then I believe that the Google Drive link in that old post of mine should still be good.
I just clicked on it and it still works for me:
Just in case you cannot access it, I went directly to Google Drive and manually copied the link directly:
Let me know if one of those work and if it gets you the card images you are looking for.
May the Force be with you!
Mara Jade's Father
Master Member
Mara Jade's Father
Master Member
Omega plays a game of cards not seen before in Star Wars: "balaans." The deck consists of five red and five blue number cards, as well as face cards consisting of two "destroy," two "deflect," two "bluff," two "steal," and four "block" cards; the game includes the near-unbeatable hand called Three Eastern Stars.
A full round of the game between Omega and Lt. Mann was shot but cut down to the main moves in an effort to keep the pace of the episode moving.
Balaans spell cards concept art by Dawn Carlos, Taylor Chojecki, and Andre Kirk
Balaans suits concept art by Dawn Carlos
Last edited:
NakedMoleRat
Master Member
Sigh, take my money.
EdwinG25
New Member
Hi all, was hoping someone could help me with this card rule. We were playing and my cards added to one, the other person had a Sylop and a green one card (only two cards), but they were saying it also added to one. To me having a Sylop (zero) was like having a pair, but then you need at lease two other card for the other pair (unless you have another sylop which is zero). Anyone even come up with this, haven't seen it in the rules so it hard to argue.
BetaCygni
New Member
You both have a Nulrhek (non-zero hand)Hi all, was hoping someone could help me with this card rule. We were playing and my cards added to one, the other person had a Sylop and a green one card (only two cards), but they were saying it also added to one. To me having a Sylop (zero) was like having a pair, but then you need at lease two other card for the other pair (unless you have another sylop which is zero). Anyone even come up with this, haven't seen it in the rules so it hard to argue.
There are different rule sets, but this one is good: Yarith Bespin Casino's Corellian Spike | Sabacc
If your hand doesn't total to 0, it doesn't matter if you have a pair or not.
Apply the first test>
Nulrhek
Closest to zero.Both your hands total to one, so go onto the next test>
Nulrhek with Positive Score
Closest to zero with a positive score.You don't say if your hand is +1 or -1
If it is -1, then the player with the Sylop (0) and the Green One (+1) would win.
If your hand is +1 as well, then you go to the next test>
Nulrhek with Highest Value Cards
Closest to zero with the highest positive card total.The other play has +1 for positive cards.
If your cards were -1 & +2 (total = +1) you would win, because you have a higher positive card than the other player.
Since you have 2 cards and neither is a sylop, this test should determine the outcome if your total is +1.
MOBLCIBI
New Member
Just as a fun comparison with how different house rules handle ties, see the "Ranking for Resolving Ties" section at the bottom of the attached Fort Ypso Lodge house rules, which were compiled earlier in this forum thread. Under those house rules, whoever has more cards (step 2) wins (assuming you both have a +1 total sum). You mentioned your opponent had "only two" cards; therefore, you presumably had three or more cards and would have won under the Fort Ypso Lodge house rules.
Attachments
Similar threads
- Replies
- 3
- Views
- 577
- Replies
- 0
- Views
- 339
- Replies
- 5
- Views
- 829
- Replies
- 2
- Views
- 596