Davidishida

Active Member
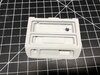
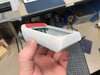
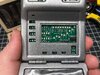
Just wanted to share my Tricorder build. This is going to be a Mark X build, from late Next Generation, Voyager, and DS9.

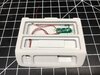
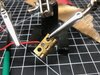
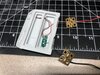
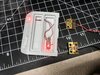
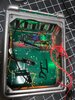
The body is from Stapelton Productions (Stapleton Productions), and the electronics are from gmprops (by PropEFX).

Both are incredibly well made and I recommend picking up any of their products, you won't be disappointed.

I am also using this tutorial as well as my own main guidance on the build. Mk IX Tricorder - YouTube


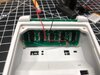
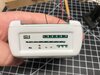
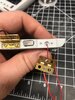
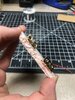
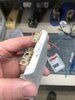
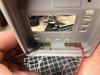
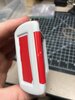
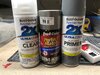
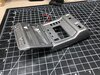
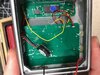
First thing I did was sand all the body parts with a fine sanding sponge, just to smooth things out. Then I added the lights and board to the lower panel with hot glue. Then after some trial and error I got the upper LED array into the main body. Then some bondo and sanding to get the two parts of the main body attached. I am also regularly testing the boards to make sure that I am not breaking a solder.


IMG_2302.jpeg
 

Attachments

  • IMG_2295.jpeg
    IMG_2295.jpeg
    2.3 MB · Views: 422
  • IMG_2296.jpeg
    IMG_2296.jpeg
    2.1 MB · Views: 416
  • IMG_2297.jpeg
    IMG_2297.jpeg
    1.7 MB · Views: 528
  • IMG_2298.jpeg
    IMG_2298.jpeg
    1.7 MB · Views: 365
  • IMG_2299.jpeg
    IMG_2299.jpeg
    1.6 MB · Views: 394
You definitely got great kits.. so you're set there... looks like a good start. How are going to protect the boards during painting? Do think you'll set this up to turn on when you flip it open?

The top board and the small board in the bottom door are the only ones I'm putting in before painting. So I'll be taping them off. I put them in first because getting some of those parts mounted involved some holes being drilled and parts being sanded and cut. So I didn't want to mess up my paint job in doing that.

And yeah it should be turning on when open. The GMProps kit comes with the required magnetic switches to detect the opening and closing of the door to trigger it turning on and the ratchet sounds.
 
I had a long delay with my electronics, but Gerry always seems to come through. I also installed my electronics before spraying. I just masked the holes and inside off beforehand.
 
I got TNG dustbuster phaser electronics from Gerry.... great kit, installs perfectly (got the phaser kit from Stapleton) i heard Gerry has stopped taking orders... is he back at it?
 
More work today! Finally got my extra wire in, so I was able to work on the hinges.

I also ground out the hole for the magnet in the door. This magnet triggers a read switch in the bottom of the main body that will do the closing ratchet sound when you close the tricorder.

Then I prepped the hinges, scratching the surface up on the door side for as much purchase on the solder, and then a hole on the body side to hook the wire though. It took me a few tries as it's been a while since I soldered, and while it isn't the prettiest solder its solid.

Then I ground a wider hole in the door to accomodate the solder. And finally attached the hinges. And again through all of this I am testing the wiring to be sure it all still works.

Last thing for today is to put Bondo on the lower door hinge area to hide my crimes.

Next up, a bit of sanding and then painting!
 

Attachments

  • IMG_2311.jpeg
    IMG_2311.jpeg
    2.2 MB · Views: 410
  • IMG_2313.jpeg
    IMG_2313.jpeg
    1.8 MB · Views: 398
  • IMG_2312.jpeg
    IMG_2312.jpeg
    2.1 MB · Views: 340
  • IMG_2314.jpeg
    IMG_2314.jpeg
    2.6 MB · Views: 356
  • IMG_2315.jpeg
    IMG_2315.jpeg
    2.6 MB · Views: 341
  • IMG_2316.jpeg
    IMG_2316.jpeg
    1.8 MB · Views: 440
  • IMG_2317.jpeg
    IMG_2317.jpeg
    1.7 MB · Views: 364
After sanding down the Bondo on the door hinge area, I super glued the door hinges to the main body.
Next I began taping off the boards, LEDs, and wires for priming. I found that the easiest way to protect the main sensor LEDs was to tape up the plastic cover/diffuser, and pressure fit that on.

I used Rustoleum grey primer for the base. And I painted the EMRG cover and back plate to its final color before sealing. In my research, the current closest color to the original is Medium Marblehead, picture below, it looks pretty darn close by eye.

Next up is doing some retouching on the body, then another layer of primer!
IMG_2338.jpeg
 

Attachments

  • IMG_2322.jpeg
    IMG_2322.jpeg
    1.6 MB · Views: 356
  • IMG_2334.jpeg
    IMG_2334.jpeg
    1.5 MB · Views: 353
  • IMG_2335.jpeg
    IMG_2335.jpeg
    1.8 MB · Views: 359
  • IMG_2336.jpeg
    IMG_2336.jpeg
    1.4 MB · Views: 441
  • IMG_2320.jpeg
    IMG_2320.jpeg
    2.5 MB · Views: 435
  • IMG_2339.jpeg
    IMG_2339.jpeg
    3.1 MB · Views: 430
Well Funky I jinxed myself.

Painting took a while. Got two coats of primer down, but then didn't wait quite long enough and did the first coat of metallic. Ended up spraying a little too close, caused some beads. So I had to start over on paint.

TL;DR I wasn't patient enough and had to sand back a lot of my painting and try again.

Taking my time on letting the primer and metallic paint dry, I finally got a finish I am happy with. There are a few imperfections, but all ones I'm happy living with. After the drying was done, I was able to put the main boards in and get them secured in place. Then I got the magnetic reed switches glued in also. They were a bit more finicky about placement to get things to work, so I some trial and error to find the right placement.

And since I was on a roll, I went ahead and did up all the wiring so I could do a full systems test of the lighting and sounds. After some putzing I can say that everything seems to be working great! I'm very happy with all the placement. Next steps are getting the stickers attached to the body and the insert pieces. Getting Close!
IMG_2351.jpeg
 

Attachments

  • IMG_2346.jpeg
    IMG_2346.jpeg
    2.7 MB · Views: 370
  • IMG_2347.jpeg
    IMG_2347.jpeg
    2 MB · Views: 321
  • IMG_2348.jpeg
    IMG_2348.jpeg
    3 MB · Views: 504
  • IMG_2350.jpeg
    IMG_2350.jpeg
    2.8 MB · Views: 406

Your message may be considered spam for the following reasons:

If you wish to reply despite these issues, check the box below before replying.
Be aware that malicious compliance may result in more severe penalties.
Back
Top