Star Trek The Next Generation costume build amateur hour

CapKirk34

Member
Hi, everyone. This is my first post here, and I'd like to lead off with a couple TNG-themed costumes I've, both, worked on and am currently working on.

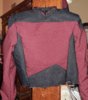
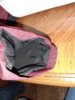
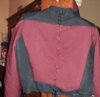
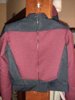
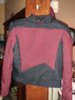
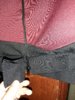
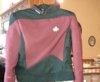
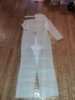
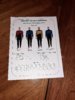
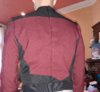
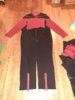
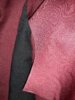
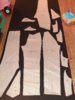
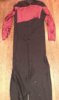
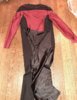
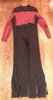
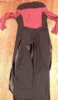
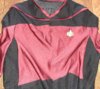
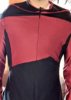
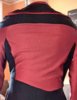
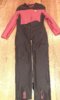
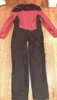
First up is my "Mirror Broken" inspired mirror Picard. I made it using the Kerezman pattern, modified to account for the deeper yoke, higher collar, and sleeveless nature.
th_20190622_171404_zps2107xym6.jpg
th_IMG_-e64t9d_zpst3cpdteb.jpg

th_20190624_150134_zpsgcgwoxm2.jpg
th_20190624_161535_zpsxzxukxfn.jpg

th_20190625_131941_zpsl0hm7sne.jpg

th_IMG_48r7th_zpsdbft5wae.jpg

th_IMG_pwccuz_zpsfl7wfzoy.jpg
th_IMG_duo6du_zps54duftpb.jpg


th_20190702_094840_zpsf7emza9s.jpg
 
And now I'm revisiting (for the third time, hopefully correcting many of my previous errors: color, collar piping, sleeve insertion, interfacing the bodice, etc.) a command tunic from TNG. I'm still waiting on my collar piping to arrive, so the project is on hold for now, but roughly 3/4 completed. Once this is done, I'll try my hand at the season 1-2 jumpsuit...yes, I bought jumbo spandex for that.


th_20190903_193722_zpsqzim6dan.jpg
th_IMG_9m9v0j_zpsf0mhu00r.jpg

th_20190903_215452_zps4ttd6jbl.jpg
th_20190903_215748_zps6yoyglna.jpg
th_20190906_174610_zpsmyswq6c9.jpg
th_20190906_194425_zps7pvpynjk.jpg

th_20190906_194528_zpsqcz86b1m.jpg
th_20190906_212714_zps8fmhpeqg.jpg

th_20190907_173239_zpsaeafjfd8.jpg
th_20190907_173252_zpsiccfhtfj.jpg
th_20190907_173332_zpspfw0gpvf.jpg
th_20190907_183804_zpschdd5zcv.jpg


I'm always open to advice. Thanks!
 
Last edited:
Thank you, both.

The TNG tunic has been my white whale of Trek costuming. It's one I've never gotten right, one that I've never been able to find on the secondary market to my 'screen accurate' standard, and *maybe* this time I'll get it nailed. One of those details is the braided collar, and my first sourcing of the trim was too red, but fortunately I found a large stash of trim that matched my burgundy/cranberry/wine color perfectly.

th_20190914_133920_zpsfb80igp2.jpg


I pinned in the waistband and collar over the past few days, and once I've placed the shoulder pads, and closed the lining, I can add both of those properly. This is just a test for fit. I may end up tweaking the collar a bit more before finally stitching it in, though.

th_20190914_153534_zpstevv3qsd.jpg
th_20190914_153618_zpstwh19sma.jpg
 
Was kind of productive today. Pads are sewn in, lining is machined in place (SO PROUD OF MY SLEEVE CUFFS), and the zipper/collar are pinned in place. Gratefully, I was able to get the color blocking to line up on the first try.

Waistband will get added later this week to finish this thing off.
 

Attachments

  • IMG_-kreo0d.jpg
    IMG_-kreo0d.jpg
    3.4 MB · Views: 349
  • 20190916_191052.jpg
    20190916_191052.jpg
    2.4 MB · Views: 409
  • IMG_ds44o6.jpg
    IMG_ds44o6.jpg
    3.3 MB · Views: 367
Got the waistband, collar and zipper in today. I tried to make the zipper invisible, but my skills weren't up to the task. I'll need to find a burgundy that matches well enough to hide the stitch.

I'm really happy with the collar. When I tried it on, the 'dive' in the center looked similar to Picard's on screen equivalent.

The waistband is one piece, rather than the two the pattern calls for, to better replicate the on screen style.

All that's left now, other than the burgundy stitch on the zipper, is hand sewing the base of the zipper to the waistband, adding hook and eyes to the collar, and snaps to the waistband flap.

I'm feeling really good about this!
 

Attachments

  • 20190917_224125.jpg
    20190917_224125.jpg
    2.7 MB · Views: 217
  • 20190917_224033.jpg
    20190917_224033.jpg
    2.6 MB · Views: 227
  • 20190917_224143.jpg
    20190917_224143.jpg
    3.6 MB · Views: 350
So, it turns out what I need for the zipper is something called a reverse coil zipper. I've deduced that it is a more durable style of invisible zipper. Back to the fabric store with me!
 
I am vexed, confounded, perplexed, and dumbstruck by the zipper. I thought I had it set up perfectly, then I go to put it in on, and there's a gap.

I'll be ripping it out and reinstalling it soon, I imagine.

Very much open to advice on this.
 

Attachments

  • IMG_-sxt0a8.jpg
    IMG_-sxt0a8.jpg
    3.5 MB · Views: 331
  • IMG_36qrfy.jpg
    IMG_36qrfy.jpg
    3.8 MB · Views: 330
I've reached the point with the zipper where I've totally abandoned trying to totally hide it (no top-stitching, more like screen-used, and the Anovos tunics). I just, for the life of me, couldn't get it to work, even with the reverse coil zipper that is in place.

If anyone has some advice on how to do it, along with some photos, I'd love to give it one more go.

20190922_195827_zps5dtqmgec.jpg

20190922_195846_zpsmrc5iore.jpg


And here are some comparison shots for fit (my command vs. the Anovos standard ops).
IMG_-eg1yj5_zpsayqo8nc8.jpg
IMG_jnex47_zpseoxlppel.jpg
 
So, I've not quite finished the tunic. I'm giving the zipper one last go this week as someone on another board clued me in to an invisible separating zipper. I'm optimistic about that prospect.

For now, another bonehead project comes to the fore: the TNG season 1-2 spandex jumpsuit! I'll be using the Bad Wolf pattern for this. I've already sourced, and acquired, the spandex. Today I got the pattern traced and cut. I'll likely get to the fabric before the end of the week.

WISH ME LUCK!
 

Attachments

  • 20190929_171828.jpg
    20190929_171828.jpg
    2.6 MB · Views: 352
  • 20190929_172429.jpg
    20190929_172429.jpg
    2.2 MB · Views: 340
  • 20190929_172521.jpg
    20190929_172521.jpg
    1.7 MB · Views: 377
  • 20190929_151906.jpg
    20190929_151906.jpg
    1.6 MB · Views: 348
  • 20190929_164743.jpg
    20190929_164743.jpg
    1.5 MB · Views: 339
Success, finally on the TNG jacket. Thanks to an Amazon purchase of a Bias Bespoke brand zipper, I've got the jacket successfully closed with no top stitching. I need to give the back a good pressing, but IT'S DONE.

Now, time to really dig in on the jumpsuit. I got the red spandex traced and cut the pieces. Next up is the black jumbo spandex.
 

Attachments

  • IMG_s171eu.jpg
    IMG_s171eu.jpg
    2.8 MB · Views: 196
  • 20191005_094210.jpg
    20191005_094210.jpg
    1.4 MB · Views: 207
  • 20191003_205850.jpg
    20191003_205850.jpg
    2.3 MB · Views: 218
'Dry fit' looks good. I *think* the gap by the left front leg, and the odd angle on the left side get corrected by the seam allowances, but I'll need to keep an eye on that during assembly.

The last, I think, photo shows how well this berry shade matches my newly completed season 3-7 tunic.
 

Attachments

  • 20191005_200743.jpg
    20191005_200743.jpg
    2 MB · Views: 208
  • 20191005_204109.jpg
    20191005_204109.jpg
    1.8 MB · Views: 135
  • 20191005_212642.jpg
    20191005_212642.jpg
    1.9 MB · Views: 200
  • 20191005_212703.jpg
    20191005_212703.jpg
    3.6 MB · Views: 214
  • 20191005_194003.jpg
    20191005_194003.jpg
    2.3 MB · Views: 189
Okay, so I've addressed the yoke issues, and some shoulder puckering, but haven't done much this week beyond getting some of the back assembled.

I pinned the front to the back just to get a better sense of how much I need to hem at the bottom.

It's *not* bad?
 

Attachments

  • IMG_kzi1py.jpg
    IMG_kzi1py.jpg
    1.6 MB · Views: 175
  • IMG_-1we42e.jpg
    IMG_-1we42e.jpg
    4.1 MB · Views: 189
Front and back assemblies are sewn together down to the "waist". I'm leaving the legs open for now to try and get a better sense of the leg hem, and Judy what the hell to do with the pant piping. Then, it's zipper time, and collar trim.

That part worries me the most.

BUT IT DOESN'T LOOK LIKE TOTAL TRASH AND I'M VERY PROUD
 

Attachments

  • IMG_ghmxyw.jpg
    IMG_ghmxyw.jpg
    2.9 MB · Views: 182
  • IMG_fgs8jq.jpg
    IMG_fgs8jq.jpg
    3.3 MB · Views: 208
Zipper is in! Alignment looks good, and just a few steps left: close the legs, add the shoulder pads, add the collar closure, and finally add the pant piping before hemming the legs and sleeves.

SO CLOSE TO FINISHED
 

Attachments

  • IMG_c02s10.jpg
    IMG_c02s10.jpg
    164.9 KB · Views: 187
  • IMG_mvpuus.jpg
    IMG_mvpuus.jpg
    201.8 KB · Views: 192
Apart from some inseam issues, it's - for all intents and purposes - finished. My damn needle broke coming down the left leg, so it isn't totally closed.

I'm very happy with this, and optimistic I can get the inseam figured out soon. Then maybe a photo wearing it.
 

Attachments

  • IMG_9lwsj9.jpg
    IMG_9lwsj9.jpg
    1.5 MB · Views: 165
  • IMG_7bd0l4.jpg
    IMG_7bd0l4.jpg
    3.2 MB · Views: 174
This thread is more than 3 years old.

Your message may be considered spam for the following reasons:

  1. This thread hasn't been active in some time. A new post in this thread might not contribute constructively to this discussion after so long.
If you wish to reply despite these issues, check the box below before replying.
Be aware that malicious compliance may result in more severe penalties.
Back
Top