Star Trek Nemesis 'Dolphin' phaser

Dreamscape

Active Member
Hey guys,

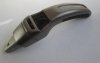
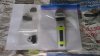
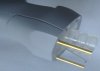
I'm new here, and will shortly be starting a project to build a Star Trek Nemesis 'Dolphin' phaser. I've ordered the kit from Stapleton - I've had experience from other recasters before and while they were satisfactory for messing around with, I wanted a 'proper' phaser to showcase.

I'll post images here as I progress.

I do have a question about the electronics. I haven't purchased these (yet) - as I have limited money. So what I wonder is, how easy is it to create a static prop, and then at a later date turn it into a hero prop?

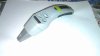
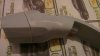
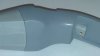
From what I've seen of others' work, they've blended the back piece of the phaser cowling into the top, so you can't see the join. And it doesn't look like there is much scope with the cast to add in a screw to hold it in place. Has anyone had experiece with this?

Cheers

Phil
 
Last edited:
In all my experience it's a disaster to build a static prop and then add electronics. IT CAN BE DONE, but it is such a mess. A lot of times you have to disassemble sections not meant to be disassembled to upgrade. It's easy to damage parts during dis-assembly that create even more headaches. If you can wait till you can afford the electronics it will be a lot easier. That's just my opinion.
 
That was kind of my hunch. Ideally, it would be good if the back piece can be made to be detachable, like the First Contact phaser. But given the way the cowling can open and the pins are mounted on the bottom, I'm not sure how feasible that is. I guess I need to weigh up how likely it is my wife will give me permission to spend another substantial amount of money - given it's taken me a good couple of years to get her to be "happy" with this spend.
 
So today my phaser arrived. It was very well packed, and despite seeing what other people have posted about this kit, I was still blown away by the quality of the molding.

attachment.php


There are only a few VERY minor imperfections that will need filling/sanding, one bubble on the rear of the handle and a couple of tiny ones on the end of the cowling near the phaser emitter.

The phaser emitter wouldn't fit in the cowling (the hole was a tad too small) but some light sanding with a 280 grit sand paper fixed that.

attachment.php


I've had a think about the electronics - and while I can't justify the cost I do want some "functionality". So I'm going to be looking around the hardware shops for small LED torches with a push on-push off button. I'll strip it down and use the components to create a phaser that I can switch on with one of the power buttons, and light up both the display and the power cells at the same time. As with some other people - I'm not overly keen on the screws for the rubber handle - so I'm going to look for something black that will fit more with the rubber.

I've just polished up the emitter and it's looking nice and shiny. It was surprising how much residue came off of it.

attachment.php
 

Attachments

  • IMAG0378.jpg
    IMAG0378.jpg
    1.5 MB · Views: 1,846
  • IMAG0380.jpg
    IMAG0380.jpg
    994.3 KB · Views: 1,769
  • IMAG0381.jpg
    IMAG0381.jpg
    215.6 KB · Views: 1,687
Last edited:
I've found some bike lights that were only £2.99 ($4.70) which do exactly what I need them to do. But on an off-chance I've approached GMProps - and asked how much a reduce functionality version would be (I only really care about the power display lighting up, I don't mind about the power cells or sounds).

I've used some hardening resin to glue the back of the cowling to the top piece - dried in 5 minutes, and I'm glad to say the resin stayed where it should have done (and didn't get onto the exterior or other parts).

attachment.php


I'll wait until I've completely firmed up my electronic plans and done a fitting test before moving onto priming, filling, and sanding.
 

Attachments

  • IMAG0384.jpg
    IMAG0384.jpg
    235.2 KB · Views: 1,648
Last edited:
I've had contact from GM - and while it was almost half the cost - I was unable to convince my wife. After doing a fitting test I'm happy the cowling will fit my basic circuit, led and battery.

So I've started by filling in the imperfections with putty, and rubbing them down with 600 grit sandpaper. Several times later:

attachment.php


Next stage will be the first grey primer.
 

Attachments

  • IMAG0389.jpg
    IMAG0389.jpg
    1.2 MB · Views: 1,686
Last edited:
The first coat of primer went on and I was really pleased with the finish on the seams. I only had to wet sand them, add another coat of primer, and sand again - for them to completely disappear. Not bad considering this is my first attempt at using putty!

attachment.php


There's one or two bits that need a tad more putty/primer/sanding - but mainly just the end of the handle where the bubble was:

IMAG0394.jpg

After removing this bubble, I'll move on to the front cowling and get that primed/sanded.
 

Attachments

  • IMAG0390.jpg
    IMAG0390.jpg
    1.4 MB · Views: 1,636
  • IMAG0395.jpg
    IMAG0395.jpg
    912.3 KB · Views: 167
Last edited:
So today I finished the sanding and put what I think is the last coat of primer on:

attachment.php


In a turn of events - i said (in jest) to my wife about spending the money on the electronics and she said "we'd need to see how our finances were at the end of the month". Well that's better than a no!

Question: should I leave the last coat of primer in its natural state, or sand it before painting?
 

Attachments

  • IMAG0398.jpg
    IMAG0398.jpg
    307.9 KB · Views: 1,609
Last edited:
Half price from Gerry? and his boards are extremely economical to start with! I'd say jump on it, you will NEVER find boards for less. Hell, you can't make them for that much!
 
Well, it's not exactly half price. It's a reduced functionality version - no sound and no lights for the emitter/power cells - so the cost reflects the reduced boards/LEDs etc.

But I'm working on it. ;)
 
Ok, so I'm guessing as a cast aluminium part I won't be able to get the emitter like a mirror and after removing residue that it's about as shiny as it's going to get.

I also decided to do one further coat/prime to make sure the fit between cowling and handle was flush.
 
Last edited:
Well I couldn't find the same paint colours that others have used (they all seem to be discontinued) so I tried to pick a Halford's car paint that was similar enough - hopefully others will agree that it's not far off.

attachment.php


I need to sand a few imperfections and do a couple more coats - but really happy with it so far.
 

Attachments

  • 2qx2vsk.jpg
    2qx2vsk.jpg
    140.4 KB · Views: 1,741
I've decided not to spend too much on the electronics - so opted for a simple on/off power display. I'm using a Green 10 LED Bar Dsplay which will sit under the transparent display (although I've misted it up on the reverse so that the bars aren't visible.

attachment.php


This gives me a nice full powered illumination - but I'm going to consider whether tinting the display so the higher settings are yellow/red. A test fit showed this all fits nicely into the cowl - so no need to drill through to the handle/grip section to house the batteries.
 

Attachments

  • IMAG0431.jpg
    IMAG0431.jpg
    118.8 KB · Views: 1,603
This gives me a nice full powered illumination - but I'm going to consider whether tinting the display so the higher settings are yellow/red. A test fit showed this all fits nicely into the cowl - so no need to drill through to the handle/grip section to house the batteries.

you can get those bar graph displays with 7 green LED and 3 red LED.
 
you can get those bar graph displays with 7 green LED and 3 red LED.

The phaser normally has 16 separate LEDs with the stop row being 4 yellow and 4 red. So that wouldn't' quite work - but thanks for the suggestion, that'll come in handy to look out for other projects that require something similar.
 
Just an update - I am still working on this project, but have been patiently letting the paint cure (it's been nearly a month and finally my nail is starting to have trouble making an indent).

attachment.php
 

Attachments

  • IMG_0879.JPG
    IMG_0879.JPG
    881.9 KB · Views: 1,472
Well I couldn't find the same paint colours that others have used (they all seem to be discontinued) so I tried to pick a Halford's car paint that was similar enough - hopefully others will agree that it's not far off.

http://www.therpf.com/attachment.php?attachmentid=499812&stc=1

I need to sand a few imperfections and do a couple more coats - but really happy with it so far.

I think I used halfords Vauxhall Smoke Grey/Silver (one of the two) for my "Starfleet" silver colour as it's a pretty good match for the Tricorder and phaser I have from Master Replicas.
 
I used the Audi A3 Dakota Grey car paint from Halfords. It might be a tad darker than the proper colour but I like the fact it makes the aluminium emitter look more chrome like.
 
So it's been a while since I did an update as this took a back seat while real life things got in the way. Good news is that the clear layer went on a while back and is nice and hard.

I've just ordered the electronics from GMProps so should get those in a month or so!
 
So I've now installed the electronics, and the only thing left to do is spray the button surround black.

The only thing I'd do differently is to go for a lighter colour - although it does look darker in the pictures that it is in real life.

20180301_195715.jpg20180301_200019.jpg

I've just purchased a tricorder from Stapleton - and will be looking to get the electronics for that too.
 
This thread is more than 5 years old.

Your message may be considered spam for the following reasons:

  1. This thread hasn't been active in some time. A new post in this thread might not contribute constructively to this discussion after so long.
If you wish to reply despite these issues, check the box below before replying.
Be aware that malicious compliance may result in more severe penalties.
Back
Top