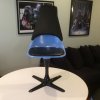
Star Trek Bridge Chairs Build

mercuryapollo

Well-Known Member
RPF PREMIUM MEMBER
This is a build that i have had in the works for a while. Finally had time to complete. Of course the captains chair is on my bucket list but i just don't have the time to commit right now. So when I saw some original burke chairs on Ebay a while back I decided to jump into that. And why build one when you can build six. The listing had six charts and a table. They are Burke 103's. Not the 115's like they used for the original chairs. But the are close, look good when completed and were super reasonably priced. Here is a completed photo. I will go through the build in subsequent posts.

IMG_2981.jpg
 
Those look fantastic. Congratulations.

I owned a Kirk chair for years. Sold it recently as I moved and didn't want to drag it with us. It was a dream come true. I hope you build one for yourself one day. It is an awesome feeling sitting in the Kirk chair for the first time.

Cheers.

Ted.
 
4E27A027-5045-4F79-A40E-226E2BC4C112.JPG733DA401-164C-4696-98F0-ACD7D8BA4A8D.JPG
First thing I did was find the correct black vinyl for the seat cushions and chair backs. I bought some really nice material at Joann, very soft and feels like real leather. The seats were covered in some nasty pink fabric. I started to remove it but found it was just easier to cover over. The base of the seat was a thin but dense mdf type of material. I could not staple into it so I use hot glue to adhere the vinyl. I decided to wear gloves after burning myself a few times. Not fun. Needed to work fast and stretch the vinyl to adhere before the glue set. Next finding the correct color to paint the chairs.
 
Last edited:
I tested a few different blue spray paints and found a very close match with Rustoleum Gloss Spa Blue. The base was painted gloss black. The trickiest part of the build was the chair back. I built a wood shell that i cover with half inch foam and then sewed the slip cover that would go over the shell and foam. It took bit of trial and error as there were no plans available and the sizing would be different anyway, with the #103 chair.

IMG_2543.jpgIMG_2705.jpgIMG_2686.jpgIMG_2509.jpgIMG_2513.jpg
 
The triangles on the back were a bit of a challenge as well. I had a friend CNC them out of half in MDF, The problem was that the chair curves vertically and horizontally. I was able to sand the backs of the triangles to make them fit better but it was a ton off work and I needed to do 18 in total. I then decided to mold and cast them in a flexible urethane. That worked perfectly. They need to bend slightly to fit on the back and I was able to attach with CA glue. I used Smooth On Smooth Cast 45 D for the casting material.

IMG_2915.jpgIMG_2899.jpgIMG_2900.jpgIMG_2908.jpgIMG_2907.jpg
 
Wow, such an awesome tutorial, thanks so much. I'm about to embark on this chair-building adventure too. Though I cannot get original or repro burke chairs here in Thailand but I have located a chair that has a very similar bucket shape (Star Trek TOS Blue Chair possibility). The fact that they are currently 77% off in price clinched the deal! Anyhow, they have four wooden legs but I did notice that the same bucket is available with a desk-chair base but far more expensive. I'll instead search out second-hand or discounted desk chairs as donors for the base. I know it's not authentic, but I do prefer castor wheels for the base, but will aim for as discrete a design as possible. Thanks for all your detailed photos, I'm sure that they will provide all the design info I need to complete the bucket design. A question though, can you post a product listing for the black vinyl? Do you have any side-on photos showing how you attached the front and back panels?
 
Last edited:
I tested a few different blue spray paints and found a very close match with Rustoleum Gloss Spa Blue. The base was painted gloss black. The trickiest part of the build was the chair back. I built a wood shell that i cover with half inch foam and then sewed the slip cover that would go over the shell and foam. It took bit of trial and error as there were no plans available and the sizing would be different anyway, with the #103 chair.

View attachment 769861View attachment 769866View attachment 769865View attachment 769863View attachment 769864
This is great!!! I Am about to try this basic thing on my own But I did not even have a Burke chair to Start with - So I went with a generic Tulip shaped seat that I am going to mount on a standard adjustable office chair base for the Wheels and Height adjustment. Your notes here helped me on the colors - I have two questions - The back is made from a front and a back piece of wood. It looks like you used a nail gun (or staple gun) to attach them to some framework??? What is in between the two sheets of wood?
Did you curve this somehow? Or is this just flat wood on a curved back? This is my very first attempt at anything like this so I need all the help I can find.
 
Between the front and back plywood I used 3/4" wood cut to width, I dont remember the measurement. You can see it a bit in this pic.


IMG_2718.jpg
 
Between the front and back plywood I used 3/4" wood cut to width, I dont remember the measurement. You can see it a bit in this pic.


View attachment 1495439
Thank you for responding. These all look like flat sandwiches made to this shape. I thought there would be some sort of curve to match the bend of the existing chair back.

Am I mistaken? Or is it just not visible? Or is this construction somewhat flexible and bends to fit the chairs? I a missing something here.

Thanks in advance!
 
I tested a few different blue spray paints and found a very close match with Rustoleum Gloss Spa Blue. The base was painted gloss black. The trickiest part of the build was the chair back. I built a wood shell that i cover with half inch foam and then sewed the slip cover that would go over the shell and foam. It took bit of trial and error as there were no plans available and the sizing would be different anyway, with the #103 chair.

View attachment 769861View attachment 769866View attachment 769865View attachment 769863View attachment 769864
Is there any chance you would share the template for the wooden shell you made?
I am using a generic "tulip shaped chair" as my base seat with an office chair base (I wanted wheals and the height adjustment) but I am hoping it will be close enough.

Thanks in advance for any and all input.
 

Your message may be considered spam for the following reasons:

If you wish to reply despite these issues, check the box below before replying.
Be aware that malicious compliance may result in more severe penalties.
Back
Top