Star Trek Boomerang Phaser Project

47AlphaTango

New Member
New user and starting my first build! I picked up a boomerang phaser kit from Stapleton Productions and electronics from gmprops. I have messed around in the past, but my attempts were less than successful (mostly I wasn't paying enough attention to detail and painting) so my goal is to do this one right!

Anyone having suggestions or tips I'd be happy to take them! Also (caution, amateur question ahead) what's the best way to sand the few spots that need it? I've seen differing opinions on grits of sand paper, etc.

I'll update as I go!
 
Preparation is the key to any good build. Get the surface of the resin clean and dry. Make sure when you spray the prop you follow the instructions on the can i.e. dry, warm, dust free environment.
Allow at least 48 hours for one painted section to cure before using a low tack tape, like Tamiya brand tape, to mask off parts of the phaser to paint the next section.
My method would be, two coats of primer to reveal and deal with any pinholes etc. Let that cure for 24 to 48 hours.
Paint the whole prop with 2 coats of Matt black let that cure for 48 hours. Then you can mask off the black areas and spray the main body "Starfleet Silver".
Painting it this way means you wont be getting a potential situation of having tape marks in the final metallic painted areas of the main body of the phaser.
Good luck.
Enjoy the build.
 
Last edited:
Preparation is the key to any good build. Get the surface of the resin clean and dry. Make sure when you spray the prop you follow the instructions on the can i.e. dry, warm, dust free environment.
Allow at least 48 hours for one painted section to cure before using a low tack tape, like Tamiya brand tape, to mask off parts of the phaser to paint the next section.
My method would be, two coats of primer to reveal and deal with any pinholes etc. Let that cure for 24 to 48 hours.
Paint the whole prop with 2 coats of Matt black let that cure for 48 hours. Then you can mask off the black areas and spray the main body "Starfleet Silver".
Painting it this way means you wont be getting a potential situation of having tape marks in the final metallic painted areas of the main body of the phaser.
Good luck.
Enjoy the build.
Awesome... Thanks!! My problem the last time I think was not letting it dry long enough and I didn't use multiple coats of anything.

My Rodd.com cobra head build is posted on my website here - The Star Trek: The Next Generation Type II Phaser Project (Cobrahead) – Complete

The process should be relatively similar for the Stapleton kit.

Please post progress photos and keep asking questions!

Sean
Thanks... I book marked the page as I'm sure I'll be returning often!
 
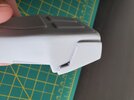
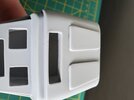
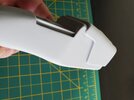
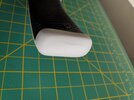
So here is the kit I got from Stapleton Productions. The quality is excellent with very minor spots that I'll have to fill and sand. I picked up a really cheap resin mold on eBay to practice on (I don't want to mess up on the Stapleton kit) and that has a significant amount of sanding, filling and resending that I need to do so that will give me the practice I need.

20210127_140538.jpg


20210127_140712.jpg20210127_140707.jpg20210127_140701.jpg20210127_140649.jpg

I got both the eBay mold and Stapleton kit washed yesterday and started the sanding on the eBay mold. I'll finish up the sanding today (hopefully) and then I'll use the filler and let it dry.

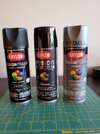
I'll test the paints I picked up as well. Here is the Krylon paints that I picked up to start with. Anyone use these Krylon ColorMaxx and Krylon Fusion before? It's all I can find from Krylon in the stores around me.

20210129_073833.jpg

I'll use the flat black as a base coat for the whole phaser and then use the gloss black for the emitter. I like the look of the flat black for the button pad.

Thanks to Tripper (here is his project) for the picture of the custom paint mix he was able to figure out from scanning a screen used prop. I took that picture to a shop near me and they were able to replicate it. So that's what I'll be using for the main body.
 
Love seeing Stapleton's and GMProps stuff being built. Check out my thread for some of the things I did wrong along the way!

 
So here is the kit I got from Stapleton Productions. The quality is excellent with very minor spots that I'll have to fill and sand. I picked up a really cheap resin mold on eBay to practice on (I don't want to mess up on the Stapleton kit) and that has a significant amount of sanding, filling and resending that I need to do so that will give me the practice I need.

View attachment 1416930

View attachment 1416931View attachment 1416932View attachment 1416933View attachment 1416934

I got both the eBay mold and Stapleton kit washed yesterday and started the sanding on the eBay mold. I'll finish up the sanding today (hopefully) and then I'll use the filler and let it dry.

I'll test the paints I picked up as well. Here is the Krylon paints that I picked up to start with. Anyone use these Krylon ColorMaxx and Krylon Fusion before? It's all I can find from Krylon in the stores around me.

View attachment 1416935

I'll use the flat black as a base coat for the whole phaser and then use the gloss black for the emitter. I like the look of the flat black for the button pad.

Thanks to Tripper (here is his project) for the picture of the custom paint mix he was able to figure out from scanning a screen used prop. I took that picture to a shop near me and they were able to replicate it. So that's what I'll be using for the main body.
Did you ever finish the kit? What kind of store can make the paint if you give them a code? Thanks
 

Your message may be considered spam for the following reasons:

If you wish to reply despite these issues, check the box below before replying.
Be aware that malicious compliance may result in more severe penalties.
Back
Top