Star Trek Boomerang Phaser Build

Davidishida

Active Member
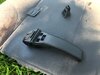
Starting my build for a Type II Boomerang Phaser, my favorite, and specifically in the First Contact version.

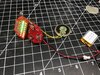
The phaser body is by stapleton13 (Stapleton Productions), and the electronics are from gmprops (by PropEFX).
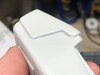
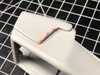
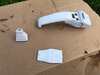
First off the electronics are awesome, and are super well made. The phaser body is exceptionally well cast, and feels great to hold. There are a couple voids in the casting on the side, but nothing that a little bit of Bondo won't fix.

First thing I did was to check the electronics, just in case something got messed up in shipping. Lights and sounds all check out. Then, as mentioned above I filled the small voids with bondo. Now I play the waiting game before sanding for paint.

One question for people, I've seen a lot of variance in the black paint used for the nozzle and around the buttons. Some use flat black, others satin, and still others gloss. Thoughts?

IMG_2533.jpeg
 

Attachments

  • IMG_2534.jpeg
    IMG_2534.jpeg
    2.5 MB · Views: 159
  • IMG_2535.jpeg
    IMG_2535.jpeg
    972.4 KB · Views: 213
  • IMG_2536.jpeg
    IMG_2536.jpeg
    1.2 MB · Views: 205
I just responded on the phaser thread to your question. Emitter is definitely satin-gloss. I think the button area is matt (that's how I have mine, and it feels nicer as a matt finish).

boomerang.png


20200609_012614.jpg


20200609_012839.jpg
 
I think definitely semi gloss at the least. Remember the TNG Laser pointer Phasers replicas? Those had a very shiny emitter
 
I'm looking forward to your build. Mine was build by Myron number of years ago and appears to be flat or at the most a bit satin.
 
Thank you all for your thoughts! I think I am going to go with your suggestions of satin or gloss for emitter and matte for button area. That does look really nice.
 
Small update today. I'm waiting on my semi gloss and flat paint to arrive.
Just finished sanding the body, and put on a black primer layer. Once this dries I'll paint the body and back panel in the Medium Marblehead.
 

Attachments

  • IMG_2729.jpeg
    IMG_2729.jpeg
    2 MB · Views: 212
  • IMG_2730.jpeg
    IMG_2730.jpeg
    2.2 MB · Views: 204
Once this dries I'll paint the body and back panel in the Medium Marblehead.

FYI, if you want something closer to the real Plasti-Kote GM7173, the paint color code WA216B "Silver Sage Metallic" (from 1998 or before, as GM changed all their color codes after that) misted over top with a dusting of Medium Marblehead is really close. See comparison pics and more information here.

(I'm still working to figure out what the OEM color code for 7173 actually was. Medium Marblehead aka WA9924 is about the closest off the shelf there is, and it's not very close; too bright and not brown/copper enough. I've never seen anything out of a can that actually matches.)

Thanks for that tip! I think I will do that! For clarity, do you mean a normal coat of Sage Metallic, then dusting marblehead? Or full coat of marblehead, then misted sage, then dusting marblehead again.
 
Thanks for that tip! I think I will do that! For clarity, do you mean a normal coat of Sage Metallic, then dusting marblehead? Or full coat of marblehead, then misted sage, then dusting marblehead again.

Full coat of Sage, then mist with Marblehead while it's still wet.

And good luck! I look forward to seeing what you think of the results.
 
Last edited:
OOooooo AnubisGuard !!
Thank you again for your advice on color! Got the proper paints in today and it looks gooooood! Pictures below don't do it justice, the slight copper undertone looks amazing.IMG_2793.jpeg

Today I sprayed the body and back plate in the Silversage Metalic, then dusted in Medium Marblehead. Then a light clear coat for protection! I need to wait 24 hours for that to dry properly then I'll paint the matte finish around the button cluster. And thank you to Dreamscape and Caveneau for advice on the emitter paint, I did go with satin black and it looks great.

In the next few days I should be finishing this project up!!
IMG_2792.jpeg
 
And it's done!

Clear coat dried, then I painted the matte black portion around the buttons. The plexiglass light indicators pressure fit in perfectly, then I hot glued in the upper board. I had it plugged in at this time to make sure alignment was correct.
IMG_2795.jpegIMG_2797.jpegIMG_2796.jpeg
Then the button rubber, and lower board was hot glued in place. This one took a bit of work to get lined up with the buttons in the right way, but it got there eventually. Then I drilled out a little of the emitter to better fit the front led and that got a dab of hot glue to keep it in place. The emitter was super glued to the front.
IMG_2798.jpegIMG_2799.jpegIMG_2800.jpegIMG_2801.jpeg
The batter was placed in the handle, and I just let it float there for right now. I don't like the idea of having to unscrew the rubber handle every time I want to turn the phaser on, so I may look into cutting a small hole to put the switch in so it can be accessed from the outside. Likely on the palm side of the phaser so it won't show up much.
IMG_2803.jpeg
And finally the blue decal to the bottom of the phaser and it's done! I am super happy with how this build came out, all the buttons, lights, and sounds all work great.
Thank you again to everyones advice on this build, it really helped bring the project to the next level. And the phaser sits in its place of honor by the tricorder and my Star Wars props haha.
IMG_2804.jpegIMG_2805.jpegIMG_2806.jpeg
Now my next decision is if I should repaint my tricorder to this better paint scheme.....

IMG_2807.jpeg
IMG_2808.jpeg
 
This thread is more than 3 years old.

Your message may be considered spam for the following reasons:

  1. This thread hasn't been active in some time. A new post in this thread might not contribute constructively to this discussion after so long.
If you wish to reply despite these issues, check the box below before replying.
Be aware that malicious compliance may result in more severe penalties.
Back
Top