You are using an out of date browser. It may not display this or other websites correctly.
You should upgrade or use an alternative browser.
You should upgrade or use an alternative browser.
Star Lord w/ lights and sound - 3d Print Files - Infinity Orb Base in Progress
- Thread starter Ein
- Start date
Ein
Sr Member
Re: Star Lord w/ lights and sound - hair and blaster progress
I've printed the 'thin' one out about 6 times so far without problems. If people want, I can post the thicker one up too, but Shapeways being fussy is a good way to put it.
Will you update the DL link with the new thicker ear piece or do you feel that the thin one is fine and Shapeways is just being fussy?
I've printed the 'thin' one out about 6 times so far without problems. If people want, I can post the thicker one up too, but Shapeways being fussy is a good way to put it.
Ein
Sr Member
Re: Star Lord w/ lights and sound - hair and blaster progress
Enough people have PMed me asking about it, so I'm going to take some time out tonight to write up a quick how-to for wiring one of the earpieces. In the mean time, please enjoy progress on the pants!


The material used on the pockets is actually a pretty solid black, but it's shinier material than the heavy fabric used as the base, so my interior, nighttime photography of it has not done it justice to date in the thread. The leather side panels have been done up and prepped, and are being attached tomorrow morning, probably with some kind of snaps!
Enough people have PMed me asking about it, so I'm going to take some time out tonight to write up a quick how-to for wiring one of the earpieces. In the mean time, please enjoy progress on the pants!
The material used on the pockets is actually a pretty solid black, but it's shinier material than the heavy fabric used as the base, so my interior, nighttime photography of it has not done it justice to date in the thread. The leather side panels have been done up and prepped, and are being attached tomorrow morning, probably with some kind of snaps!
Ein
Sr Member
Re: Star Lord w/ lights and sound - hair and blaster progress
Here's a quick step-by-step for the earpiece. I printed one up for this demonstration, so please ignore that it isn't really clean - I just hit it with a silver spraypaint for demonstration's sake.
Materials!

Earpiece, 3mm red LED, 2x M2x4mm screws, 2x AG10 coin cell batteries (aka LR1130 batteries depending on manufacturer), a 680 ohm resistor, some thin wire, and a switch. My switch is 9mm wide, and a DPDT switch which is wholly unnecessary since all we need is a SPST switch. Nevertheless, it works for what we're doing! You're also going to need solder, a soldering iron, a pair of snips, a screwdriver that's small enough to use on those M2 screws, and maybe a hot glue gun, who knows.
First thing we're going to do is trim the unnecessary legs off the DPDT switch.


Those two legs I have left will join when the switch is in one position, and break when it is in the other position. Your switch may vary, so make sure you check the legs before you cut them!
Snip the resistor down good and short...

Then solder it onto one of the remaining legs of the switch, with the wire on the other leg.


Ugly soldering job, that! But it works.
Next, insert the LED into the 3mm hole. Bend one of the legs down as shown. I used the longer leg (the Cathode) for this example. You can use the other leg of the LED, but remember, LEDs have a polarity, so if you use the other leg, you have to reverse the way the batteries are oriented!

Bend the extra length of the leg in on itself. This is going to be one of the battery contacts.

Insert your switch assembly into the appropriately sized hole on the back of the earpiece.


I did a poor job photographing it here, but what I've done is I've taken the longer remaining leg of the resistor and wound it up on itself inside the earpiece. This is a contact point for the second battery! The red wire coming from the switch was soldered to the other leg of the LED, and the excess lead was snipped from the LED after.

Taking a bit of spare wire, I coiled it on itself and glued it to the back plate in the middle to hold it in place. What we're doing here is we're making a bridge between the two coin cells so that we end up with the batteries in series, to give us a combined total of 3 Volts.

I'm holding a wire to both batteries in place here. You can see that once the batteries are joined together across their tops, the circuit is complete, and the LED glows. Make sure you have the switch in the on position! It's just an easy way to test to make sure you haven't bodged any of the connections.

Screw the back on, and you're... well, done.

I will say that I could probably thicken the entire earpiece by about half a millimeter to get the battery cover sitting as flush as possible. As-is, I overwound the wire on the back cover a tiny bit, and it pushed the back panel up away from the body a touch. No big deal, nobody ever really sees the back of this thing anyway.

Sorry for the poor quality of the guide, I'm just trying to do it as quickly as I can so I can keep working on stuff that needs to get done.
Here's a quick step-by-step for the earpiece. I printed one up for this demonstration, so please ignore that it isn't really clean - I just hit it with a silver spraypaint for demonstration's sake.
Materials!
Earpiece, 3mm red LED, 2x M2x4mm screws, 2x AG10 coin cell batteries (aka LR1130 batteries depending on manufacturer), a 680 ohm resistor, some thin wire, and a switch. My switch is 9mm wide, and a DPDT switch which is wholly unnecessary since all we need is a SPST switch. Nevertheless, it works for what we're doing! You're also going to need solder, a soldering iron, a pair of snips, a screwdriver that's small enough to use on those M2 screws, and maybe a hot glue gun, who knows.
First thing we're going to do is trim the unnecessary legs off the DPDT switch.
Those two legs I have left will join when the switch is in one position, and break when it is in the other position. Your switch may vary, so make sure you check the legs before you cut them!
Snip the resistor down good and short...
Then solder it onto one of the remaining legs of the switch, with the wire on the other leg.
Ugly soldering job, that! But it works.
Next, insert the LED into the 3mm hole. Bend one of the legs down as shown. I used the longer leg (the Cathode) for this example. You can use the other leg of the LED, but remember, LEDs have a polarity, so if you use the other leg, you have to reverse the way the batteries are oriented!
Bend the extra length of the leg in on itself. This is going to be one of the battery contacts.
Insert your switch assembly into the appropriately sized hole on the back of the earpiece.
I did a poor job photographing it here, but what I've done is I've taken the longer remaining leg of the resistor and wound it up on itself inside the earpiece. This is a contact point for the second battery! The red wire coming from the switch was soldered to the other leg of the LED, and the excess lead was snipped from the LED after.
Taking a bit of spare wire, I coiled it on itself and glued it to the back plate in the middle to hold it in place. What we're doing here is we're making a bridge between the two coin cells so that we end up with the batteries in series, to give us a combined total of 3 Volts.
I'm holding a wire to both batteries in place here. You can see that once the batteries are joined together across their tops, the circuit is complete, and the LED glows. Make sure you have the switch in the on position! It's just an easy way to test to make sure you haven't bodged any of the connections.
Screw the back on, and you're... well, done.
I will say that I could probably thicken the entire earpiece by about half a millimeter to get the battery cover sitting as flush as possible. As-is, I overwound the wire on the back cover a tiny bit, and it pushed the back panel up away from the body a touch. No big deal, nobody ever really sees the back of this thing anyway.
Sorry for the poor quality of the guide, I'm just trying to do it as quickly as I can so I can keep working on stuff that needs to get done.
BUBBENSTEIN
Well-Known Member
Re: Star Lord w/ lights and sound - hair and blaster progress
Great demonstration. However, could you simply coil or glue the resistor to the switch rather than solder?
Great demonstration. However, could you simply coil or glue the resistor to the switch rather than solder?
Re: Star Lord w/ lights and sound - hair and blaster progress
Looking great, like the pants and ear peace. What fabric did you use for the pants and did you stetch the lines in the fabric?
Looking great, like the pants and ear peace. What fabric did you use for the pants and did you stetch the lines in the fabric?
Re: Star Lord w/ lights and sound - hair and blaster progress
Ein, sorry if I missed this earlier. What program do you use to slice the models for your printer? The reason I am asking, is that in both the helgak files and yours the two back pieces have something weird going on with the mesh.. This is causing my goto slicers (slic3r, cura, kissslicer) all kinds of problems and preventing me from printing out these last two pieces.
I tried running the models through netfabb, and playing with them a bit in 123D but I'm still a novice and have nothing to show for it. I appreciate all the hard work, it is amazing.
Ein
Sr Member
Re: Star Lord w/ lights and sound - hair and blaster progress
The pants are primarily a heavy cotton... Honestly not sure I remember what the inseam and other patches were made from specifically, although I'll have a proper answer for you tomorrow once I look. Screen accurate pants would be made from canvas and twill, but this was a bit more of a budget and comfort option. The lines on my pants were stitched in, though, yes.
I guess you could try, but it's worth soldering properly. A well-soldered joint is fairly strong, and you don't want the connection to be moving too much or else you might end up with flickering in the LED.
I use Simplify3d for my slicing. It's expensiveish - about $130 to buy a license - but worth it, imo. The supports it slices are easy to remove and fairly intelligent, and it has a manual support option so you can place them where you think you need them.
Which parts are slicing strangely? There's a strange... texture to Helagak's original mouthpiece that I didn't have the time or inclination to get rid of, since it'll sand out, but that's the only part I had an issue with. Also, what kind of printer are you using? I might be able to get you gcode files as a last resort, though you'd have to PM me your preferred heat settings and what material you're working with.
Looking great, like the pants and ear peace. What fabric did you use for the pants and did you stetch the lines in the fabric?
The pants are primarily a heavy cotton... Honestly not sure I remember what the inseam and other patches were made from specifically, although I'll have a proper answer for you tomorrow once I look. Screen accurate pants would be made from canvas and twill, but this was a bit more of a budget and comfort option. The lines on my pants were stitched in, though, yes.
Great demonstration. However, could you simply coil or glue the resistor to the switch rather than solder?
I guess you could try, but it's worth soldering properly. A well-soldered joint is fairly strong, and you don't want the connection to be moving too much or else you might end up with flickering in the LED.
Ein, sorry if I missed this earlier. What program do you use to slice the models for your printer? The reason I am asking, is that in both the helgak files and yours the two back pieces have something weird going on with the mesh.. This is causing my goto slicers (slic3r, cura, kissslicer) all kinds of problems and preventing me from printing out these last two pieces.
I tried running the models through netfabb, and playing with them a bit in 123D but I'm still a novice and have nothing to show for it. I appreciate all the hard work, it is amazing.
I use Simplify3d for my slicing. It's expensiveish - about $130 to buy a license - but worth it, imo. The supports it slices are easy to remove and fairly intelligent, and it has a manual support option so you can place them where you think you need them.
Which parts are slicing strangely? There's a strange... texture to Helagak's original mouthpiece that I didn't have the time or inclination to get rid of, since it'll sand out, but that's the only part I had an issue with. Also, what kind of printer are you using? I might be able to get you gcode files as a last resort, though you'd have to PM me your preferred heat settings and what material you're working with.
Re: Star Lord w/ lights and sound - hair and blaster progress
Specifically the mask_back_left and right. When I view the model it looks solid from the inside of the helmet, but from the outside both pieces are missing some of the outer detail, it actually renders as nothing there. This causes the slicers I have been using to completely ignore a fairly big chunk of the model. I'll have to check out Simplify3d, but if you or anyone has any suggestions on making this work I'd love to know
Specifically the mask_back_left and right. When I view the model it looks solid from the inside of the helmet, but from the outside both pieces are missing some of the outer detail, it actually renders as nothing there. This causes the slicers I have been using to completely ignore a fairly big chunk of the model. I'll have to check out Simplify3d, but if you or anyone has any suggestions on making this work I'd love to know
Re: Star Lord w/ lights and sound - hair and blaster progress
Here's a few screenies.
http://imgur.com/8rJC2c6
http://imgur.com/2TsCnFL
Here's a few screenies.
http://imgur.com/8rJC2c6
http://imgur.com/2TsCnFL
Ein
Sr Member
Re: Star Lord w/ lights and sound - hair and blaster progress
Okay, my hunch was wrong. I'm not sure what's causing that.
To help you troubleshoot, here's the same files but in .obj format. Does that work any better?
http://www.fusedcreations.com/adam/mask_back_left.obj
http://www.fusedcreations.com/adam/mask_back_right.obj
Okay, my hunch was wrong. I'm not sure what's causing that.
To help you troubleshoot, here's the same files but in .obj format. Does that work any better?
http://www.fusedcreations.com/adam/mask_back_left.obj
http://www.fusedcreations.com/adam/mask_back_right.obj
akidnamedcesar
New Member
Re: Star Lord w/ lights and sound - hair and blaster progress
Those pants! :thumbsup
Those pants! :thumbsup
Re: Star Lord w/ lights and sound - hair and blaster progress
Hot off the printer!
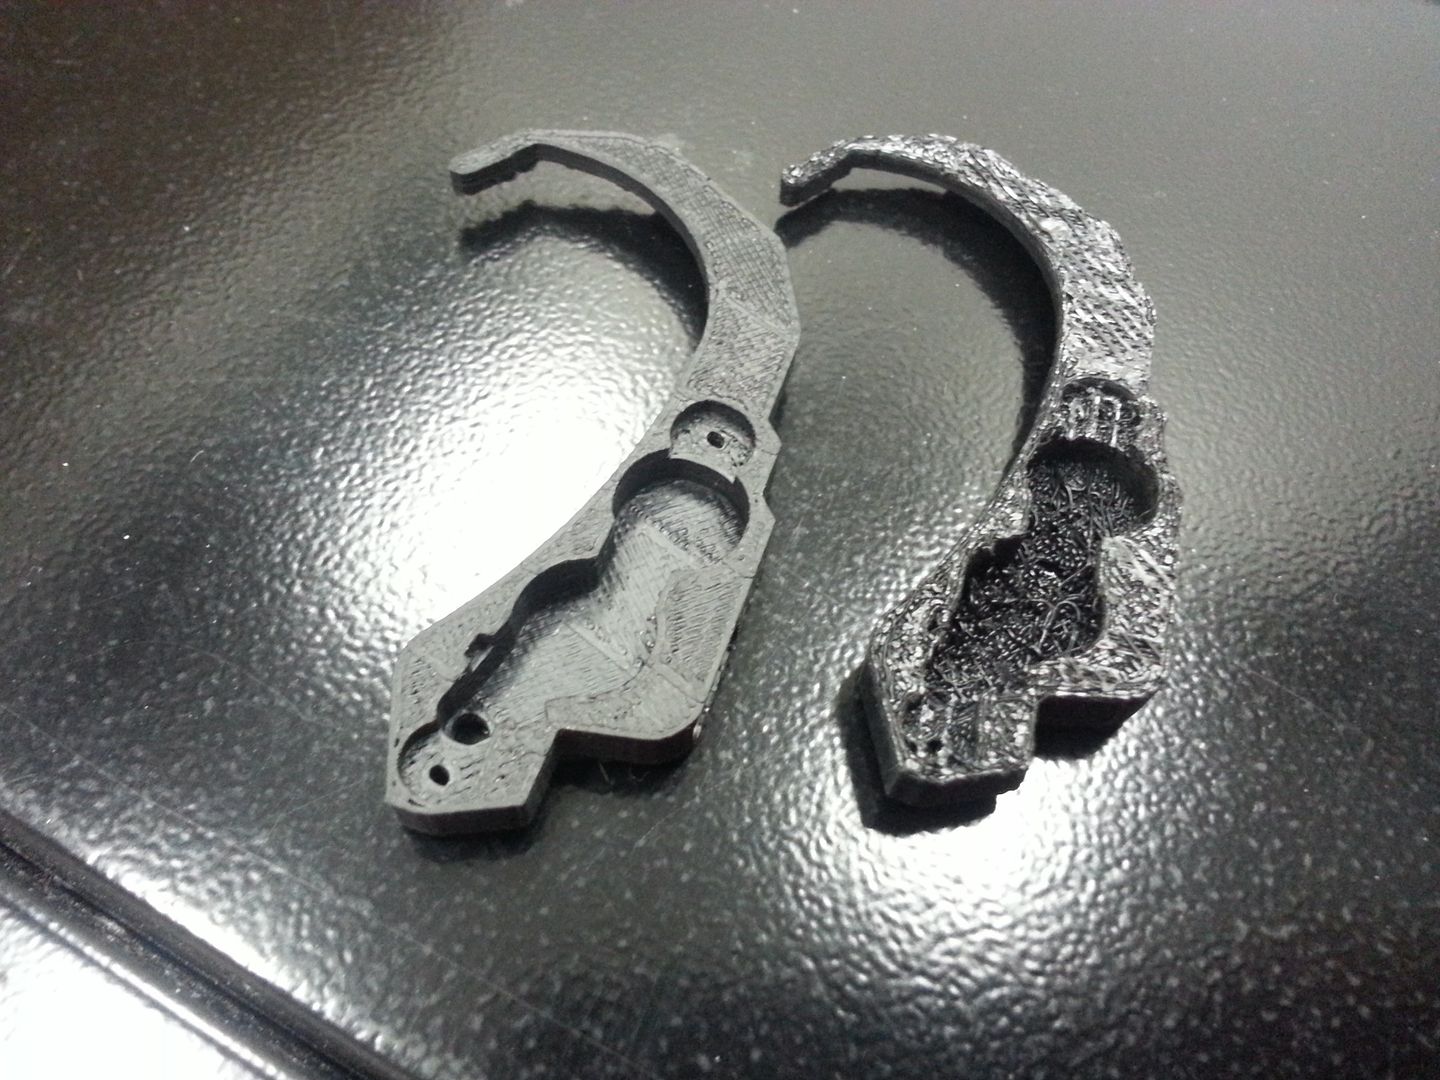

I tried printing one upside down so I would have a cleaner finished interior. Both are going to require some work.
Thanks again Ein!
Hot off the printer!
I tried printing one upside down so I would have a cleaner finished interior. Both are going to require some work.
Thanks again Ein!
Ein
Sr Member
Re: Star Lord w/ lights and sound - hair and blaster progress
Got the pants back tonight! Unfortunately, it was a bit too late in the day to take outside pictures, which is really what's required to get the details on these to show up properly. The good news, however, is the convention is tomorrow, and I will have proper pictures of the whole outfit as it stands tomorrow morning.
Here's some crappy ones I took with my phone to hold you over! They do not do the pants justice.


The leather side panels snap onto the pants in a couple locations right now. This is not final. I prefer it this way for now, because it means I can easily get behind the leather side panels to add the gun holsters once I get the costume along to that point - after that, I'll look at attaching it more permanently. Because of that, they sit a little bit away from the leg, but I'm not worried about it for now. The primary fabric is a dark, dark brown Moleskin fabric; the inseam and pocket areas are done in a waxed heavy cotton, and the hip panels are synthetic leather. These aren't screen accurate materials, but they are very, very comfortable to wear.
I've also rushed the blasters along and I'll have at least one of them ready for tomorrow. More photos on that later, still painting.
Glad to see they're useful to you! I always find the surface finish on 3d printed parts that have a flat face to be a bit gnarly, but I didn't see an easy way of doing this one face-down or I would have. I'd say the one on the right'll probably do ya pretty well, though - nobody will ever see a rough interior.
nice commentary...............more pants update
Got the pants back tonight! Unfortunately, it was a bit too late in the day to take outside pictures, which is really what's required to get the details on these to show up properly. The good news, however, is the convention is tomorrow, and I will have proper pictures of the whole outfit as it stands tomorrow morning.
Here's some crappy ones I took with my phone to hold you over! They do not do the pants justice.
The leather side panels snap onto the pants in a couple locations right now. This is not final. I prefer it this way for now, because it means I can easily get behind the leather side panels to add the gun holsters once I get the costume along to that point - after that, I'll look at attaching it more permanently. Because of that, they sit a little bit away from the leg, but I'm not worried about it for now. The primary fabric is a dark, dark brown Moleskin fabric; the inseam and pocket areas are done in a waxed heavy cotton, and the hip panels are synthetic leather. These aren't screen accurate materials, but they are very, very comfortable to wear.
I've also rushed the blasters along and I'll have at least one of them ready for tomorrow. More photos on that later, still painting.
Hot off the printer!
Thanks again Ein!
Glad to see they're useful to you! I always find the surface finish on 3d printed parts that have a flat face to be a bit gnarly, but I didn't see an easy way of doing this one face-down or I would have. I'd say the one on the right'll probably do ya pretty well, though - nobody will ever see a rough interior.
Ein
Sr Member
Re: Star Lord w/ lights and sound - hair and blaster progress
I haven't worked anything out for holstering the guns yet. I'll be hanging it off a belt tomorrow, most likely.
I had to give the body of the gun a rush paintjob in order to get things done for tomorrow. Not really satisfied with it... and the paint, despite my best efforts, seems to inhibit the opening action of the gun. It'll open manually if you touch it, but the stock springs aren't strong enough on their own to do the job otherwise. Honestly a bit of a bummer. I'm considering redoing these blasters from scratch, rather than using the nerf ones as a base. I feel like I'd get better results if they were designed specifically for what I was trying to do.
Nevertheless, here's a selection of what's coming along tomorrow!

I'll take better photos of everything tomorrow morning before heading out.
I haven't worked anything out for holstering the guns yet. I'll be hanging it off a belt tomorrow, most likely.
I had to give the body of the gun a rush paintjob in order to get things done for tomorrow. Not really satisfied with it... and the paint, despite my best efforts, seems to inhibit the opening action of the gun. It'll open manually if you touch it, but the stock springs aren't strong enough on their own to do the job otherwise. Honestly a bit of a bummer. I'm considering redoing these blasters from scratch, rather than using the nerf ones as a base. I feel like I'd get better results if they were designed specifically for what I was trying to do.
Nevertheless, here's a selection of what's coming along tomorrow!
I'll take better photos of everything tomorrow morning before heading out.
Similar threads
- Replies
- 4
- Views
- 743
- Replies
- 9
- Views
- 1,282
- Replies
- 3
- Views
- 1,325
- Replies
- 16
- Views
- 630