xeno
Sr Member
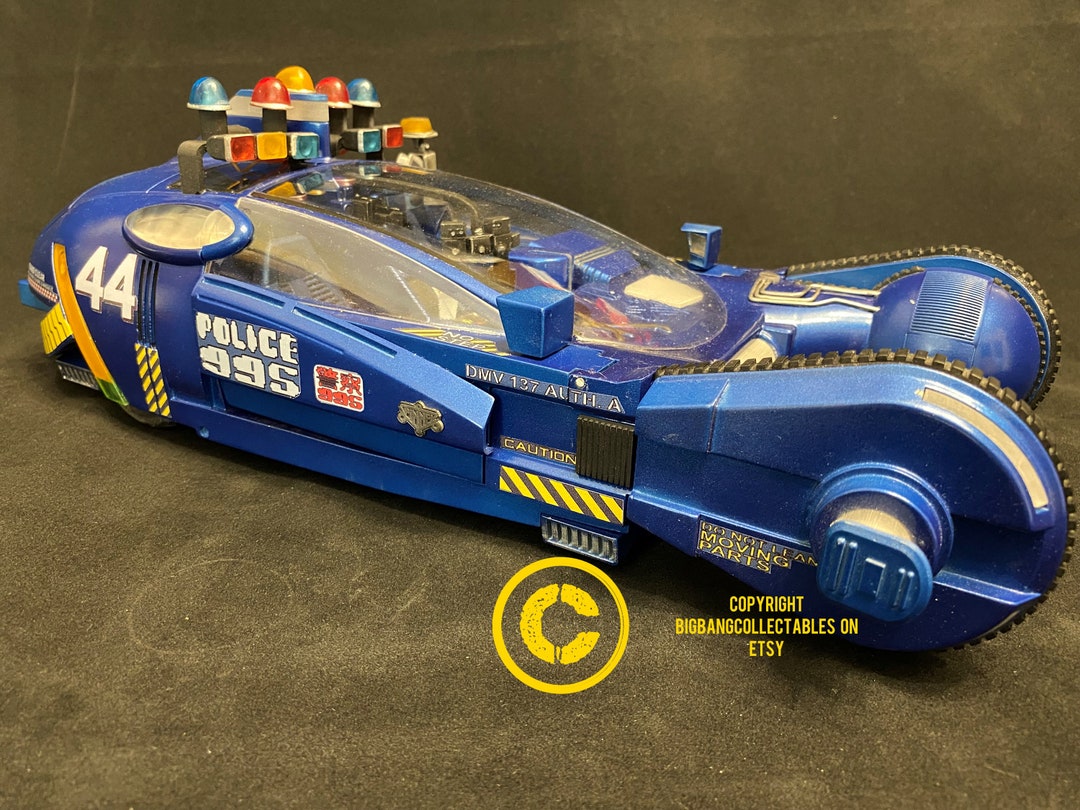
After long years of wanting, looking and hoping for a good size kit, I finally started a 1/8th scale for my own.
Why 1/8th scale, because I don't have room for a 1/6th scale, and it would fit nicely with my 1/8th scale Delorean I am also building.
After finding a few 3D models that were way off, I found the BigBangCollectibles 3D model, that had a good enough basic shape, but details were lacking,
luckily the maker was open to redo a lot of the model, to make it better, and I sent all the information I had to help.
The result was a much better looking Spinner Car.

I saw that after some more studying there were still a lot of details I wanted altered, and decided to those myself, it took some weeks of work to get it to a point that I decided to print the bulk of the parts, and printed these on my Anycubic M7 Max.
The first parts went really good, although I forgot to hollow the model and now had a 1Kg backside, this worked out ok, as this would counterbalance the whole model on the stand,
for the rest I hollowed the parts with a 2mm wall thickness.

Even after printing I still noticed details were wrong, and had to adjust the drawings and reprint parts.

All the parts were connected with 2part epoxy, the parts lined up good, but there was still some filling and sanding to do.
Printed resin prints are mostly accurate but with big parts you will still have some deformation, and it needs a lot of supports.

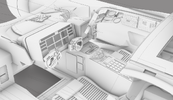
Another thing that was a bit of an obstacle for me, were the windscreen and figures.
The 3D files also had a buck shape for the windscreen, that was enough as a base to draw my own, and had this vacuum-formed, en I was really happy how this turned out.
I hired someone to 3D model both figures in the stretched sitting position, but because there is very limited room, I still had to do make a lot of changes to get them to fit.
Even in the movie you see they are really cramped")


In between printing and building I worked on drawing details on the inside of the Spinner, using all the images I had,
but quickly saw that between models and real live cars, there was a lot of difference in details, and I had to choose what to do,
And I chose to combine all the information to create something that just looked good


I just finished the top light array, and will print these in a tough resin, hoping it will not break easily

and that is where I'm at for now.
Still a lot of sanding to do, but I am happy with the progress.
Why 1/8th scale, because I don't have room for a 1/6th scale, and it would fit nicely with my 1/8th scale Delorean I am also building.
After finding a few 3D models that were way off, I found the BigBangCollectibles 3D model, that had a good enough basic shape, but details were lacking,
luckily the maker was open to redo a lot of the model, to make it better, and I sent all the information I had to help.
The result was a much better looking Spinner Car.
I saw that after some more studying there were still a lot of details I wanted altered, and decided to those myself, it took some weeks of work to get it to a point that I decided to print the bulk of the parts, and printed these on my Anycubic M7 Max.
The first parts went really good, although I forgot to hollow the model and now had a 1Kg backside, this worked out ok, as this would counterbalance the whole model on the stand,
for the rest I hollowed the parts with a 2mm wall thickness.
Even after printing I still noticed details were wrong, and had to adjust the drawings and reprint parts.
All the parts were connected with 2part epoxy, the parts lined up good, but there was still some filling and sanding to do.
Printed resin prints are mostly accurate but with big parts you will still have some deformation, and it needs a lot of supports.
Another thing that was a bit of an obstacle for me, were the windscreen and figures.
The 3D files also had a buck shape for the windscreen, that was enough as a base to draw my own, and had this vacuum-formed, en I was really happy how this turned out.
I hired someone to 3D model both figures in the stretched sitting position, but because there is very limited room, I still had to do make a lot of changes to get them to fit.
Even in the movie you see they are really cramped
In between printing and building I worked on drawing details on the inside of the Spinner, using all the images I had,
but quickly saw that between models and real live cars, there was a lot of difference in details, and I had to choose what to do,
And I chose to combine all the information to create something that just looked good
I just finished the top light array, and will print these in a tough resin, hoping it will not break easily
and that is where I'm at for now.
Still a lot of sanding to do, but I am happy with the progress.
Attachments
Last edited: