Springboarding off of a Halo costume I was thinking about a great halloween costume character to create and wear at parties. Weighing the pros and cons of a bunch of costumes (including buzz lightyear and the predator) I decided to settle on an old favorite movie of mine from childhood; Spaceballs. With the help of a newly acquired
3D Printer, and the knowledge gained from creating
the Halo Armor, I decided to create a Dark Helmet Costume.
Step 1 - Obtain a pepakura file of the Helmet. For that, I used
Dark Helmet helmet by Darkside501st. I have to give the creators of the pdo files a lot of credit for their time and effort contributed. Thank you. After resizing and printing the helmet on 100lb stock paper, it was time to start cutting and gluing. Nothing new here, just applying what I did with Halo armor below:
View attachment 893291
View attachment 893292
Used cardboard to reinforce supports. This decreases warping when applying fiberglass resin.
View attachment 893293
Step 2 - Coat with Fiberglass Resin:
View attachment 893294
View attachment 893295
Step 3 - Apply the Bondo:
View attachment 893296
View attachment 893297
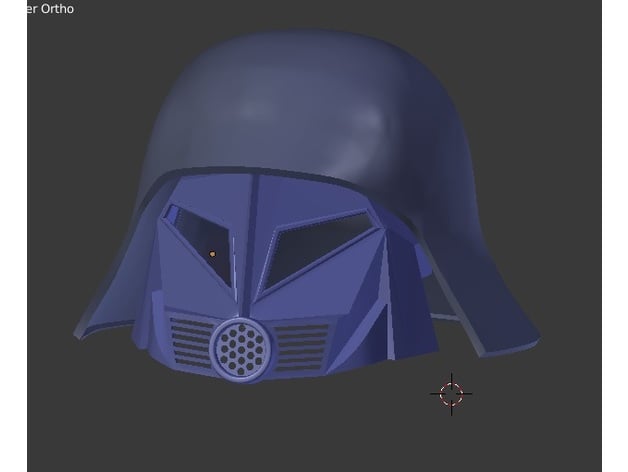
Step 4 - I decided to pull part of the mask out of the PDO and use the program Blender to help turn it into a
3d print .stl file. The below was the result:
View attachment 893298
Daughter photobomb! Since the mask was too big for the printer, I split it into 3 parts. You can see the seams above. Each seam was sanded and painted smooth. When gluing the parts together, I used hot glue first, then a rondo layer over the seam and
fiber tape across the seam as well. The fibers add a lot of strength.
View attachment 893299
Dry fit the pieces together. Looking good so far.
Step 5 - Now for the hard part. I need this thing to sit on my head and not my shoulders. I don't have many pictures but I should be able to give you an idea of how it was done.
I took a a hard hat that has an internal head holder like the one below:
View attachment 893300
Then cut the top of the hard hat off.
View attachment 893301
I cut along the top so that the dark helmet faceplate has a place to go when it is in the up position.
With the hard hat ready, I mounted it to the helmet making sure to place screws on the back half only.
Step 6 - Dryfit the helmet.
View attachment 893302
You can see the hinges above on either side.
Step 7 - Create tinted visors using plexiglass and car tint.
View attachment 893303
View attachment 893304
Step 8 - Paint and Finish assembly
View attachment 893305
View attachment 893306
View attachment 893307
View attachment 893308
The Clothes were a bit harder. Looking at a
reference picture, I needed to figure out each piece of the costume. The easiest parts to acquire were the
glovesand
boots. The rest had to be sewn from scratch using 5 yards of
black pleather, some
backer rod, and pyramid studs for the arms, gauntlets and around the coller.
The Shorts:
To sew the shorts, I used
this video on youtube to help establish a pattern. The rest came together rather easy. Thanks
C Martinez.
The Belt Buckle:
This was rather involved and I needed to know how to use blender. After some time creating, I finished with the following designs:
View attachment 893309
View attachment 893310
Pyramid studs:
I couldn't find any online the right size (3/4" x 3/4") so I made some on the 3d printer and placed a hole in the bottom to screw in an 8-32 1/4" screw. Worked nicely.
View attachment 893311
View attachment 893312
The Chest:
Basically difficult to describe but I used an old shirt as a template on the pleather and stitched along the seams. I placed a seam going up the middle of the chest and used the tie to cover all seams. The tie is sewn to one side and attached to the other with velcro.
View attachment 893313
The shoulder pads are attached via velcro and made from the
same mats used in a gym (eva foam). It was a very basic design and I used
heat gun to give it a curve.
Using an old underarmour shirt and wrapping the backer rod with pleather, the costume winds down to a close.
View attachment 893314
View attachment 893315
The final touch I added was a sound speaker hidden under the cape that plays "The Spinners - Spaceballs" theme song from my phone clipped to my shorts. The only problem is I might be too tall to play the part, that that's not going to stop me.
Thanks for looking.
Until next time, KEEP FIRING A**HOLES!
At the request of some RPF members, I'm sharing the STL files I used to make my costume. Some modifications may need to be made. If you used any of my files, please do me a favor and send pictures of it all done. I'd love to see it. Enjoy!