Space 1999 Eagle Transporter Build Club (PIC HEAVY!)

Hi Folks!

My first time posting to the RPF, just wanted to say thanks for all these amazing Eagle builds, they've really helped inspire me to have a go at the model. I'm afraid mine is fairly modest - being only the 12" AMT/MPC version, the one that's notoriously inaccurate. Because of the latter it has become a mini project for me - my first ever attempt at scratch building parts and my third kit since I took up model making again after a 23 year break. My original aims had been fairly modest - tidy up the most obvious flaws - the spine, the cages, the landing gear - but that led to more and then more still. As it stands, I have modified the command module (had to use the stock one because I couldn't get hold of one of Jim Small's excellent replacements :() so that it is detachable from the main body (ala season 1 episode "Dragon's Domain"). It uses tiny neodymium magnets for connection. For the Eagle eye'd amongst you (sorry for the pun) the backplate design was inspired by the artwork of Roberto Baldasarri. Although I'd originally intended to keep the cages that came with the kit and merely drill them out I didn't like the end effect and ended up scratch building replacements. But once I'd done these I then wanted the fore and aft walkways too! I then started on the landing gear. Again, my original intentions had been modest - just make the landing gear look better with some faux hydraulic brackets but I ended up going further, creating fully working landing gear. I reworked the parts for the engines, shortening the plasma accelerator pods and creating the superstructure. I had started on the passenger module but didn't like my attempt at the replacement bulkheads I tried to make from styrene so like my early attempt at the doors I decided to get some parts custom etched. However, I went a little 'wild' with the plans and instead of just producing the recessed detail I ended up getting parts made for the whole bulkhead and then for all of the other parts that I felt could be reasonably done through etch that would enhance the model, including new "feet" complete with brackets, engine and thruster baffles and the walkway details. I'm hoping to finish my build in the next week or so and then subject it to a dose of primer. In the meantime I've posted a few pictures of progress to date. Cheers for now folks! Nocool1.JPGNocool2.JPGNocool3.JPGNocool4.JPGNocool5.JPGNocool6.JPGNocool7.JPG
 
Finally! Four days after stumbling across this thread, I've caught up with the entirety of it.
Chaps, All I have to say is that I am staggered with your, quite frankly, frightening levels of skill and attention to detail. It's been *cough* years since I built anything at all, and even back then it was all from kits with me.
However, I fear you have stirred something within me, and negotiations have now begun with SWMBO (She Who Must Be Obeyed) regarding how much pain it's going to cause me to take over the spare room as a build bay.

Whether anything comes of it or not, just have to say thanks, you (and of course the supporting cast) are an absolute inspiration.

HD
 
Hi folks! A minor update on progress. Not a huge amount done unfortunately due to lots of other activities. I've used the new photo etch parts to re-do some of the earlier components, such as the walkways, and have added etched and other detail to existing parts such as spine connecting brackets for the cages, connecting brackets for the engine plasma accelerators and detail for the landing pods. I've also put together the parts for the 'feet' and the main parts for the passenger pod. Thanks to a very kind person I now have the beautiful command module from Jim Small which I will modify to include the door and rockets. I've provided a few photos below. Things are going to be busy for the next few weeks so it might be a while before I check back in. Cheers for now!

Cages & Pads.JPGPassenger Pod.JPGRear Walkway (left).JPGFront Walkway (right).JPGEngine Parts & Others.JPG
 
Finally! Four days after stumbling across this thread, I've caught up with the entirety of it.
Chaps, All I have to say is that I am staggered with your, quite frankly, frightening levels of skill and attention to detail. It's been *cough* years since I built anything at all, and even back then it was all from kits with me.
However, I fear you have stirred something within me, and negotiations have now begun with SWMBO (She Who Must Be Obeyed) regarding how much pain it's going to cause me to take over the spare room as a build bay.

Whether anything comes of it or not, just have to say thanks, you (and of course the supporting cast) are an absolute inspiration.

HD


Wow! On behalf of all the talented guys that have helped make this thread what it is, I thank you for your kind words, HD! :)
I hope you do manage to get a build going - even something small! Thank you for looking in and I cam astounded that you actually read the whole thread!!!:eek You should get a medal for that!!!
Darren

Hi folks! A minor update on progress. Not a huge amount done unfortunately due to lots of other activities. I've used the new photo etch parts to re-do some of the earlier components, such as the walkways, and have added etched and other detail to existing parts such as spine connecting brackets for the cages, connecting brackets for the engine plasma accelerators and detail for the landing pods. I've also put together the parts for the 'feet' and the main parts for the passenger pod. Thanks to a very kind person I now have the beautiful command module from Jim Small which I will modify to include the door and rockets. I've provided a few photos below. Things are going to be busy for the next few weeks so it might be a while before I check back in. Cheers for now!

View attachment 219917View attachment 219918View attachment 219919View attachment 219920View attachment 219921

I would like to take that beautiful brass sheet of parts, and mount it as it is in a frame on the wall! How beautiful is THAT!!! You are going to have one sweeeeeet eagle!
 
Hi Nocoolname :)

Love the dedication regarding cutting apart the kit and restructuring it to look AWESOME! Fantastic!!!!

A question, can you recommend a photo-etching place that myself and other could get brass work done?

Though I only build 44" Eagles I can't help stare at the amount of work and effort you have invested into this build.

Please PM me if you ever sell this build :thumbsup

Cheers,

Propland
 
I have learned a lot of things whilst building my 52" Eagle Transporter, not least of which, that there are a lot of things that Eagle owners would like to see made available but nobody seems to make.

With that in mind, I have started to address some of these issues and I thought that some Alphans in an accurate spacesuits would be a great place to start! :)
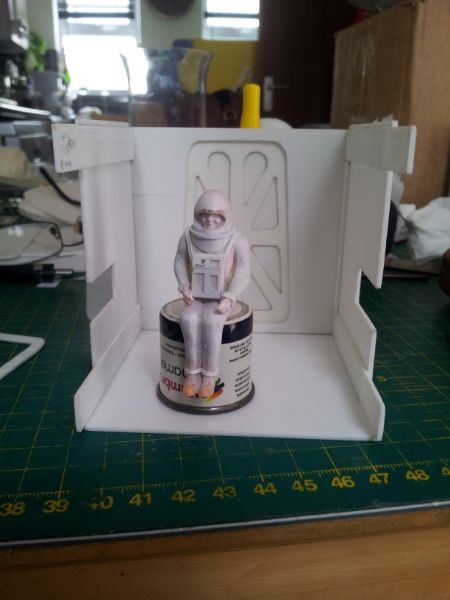
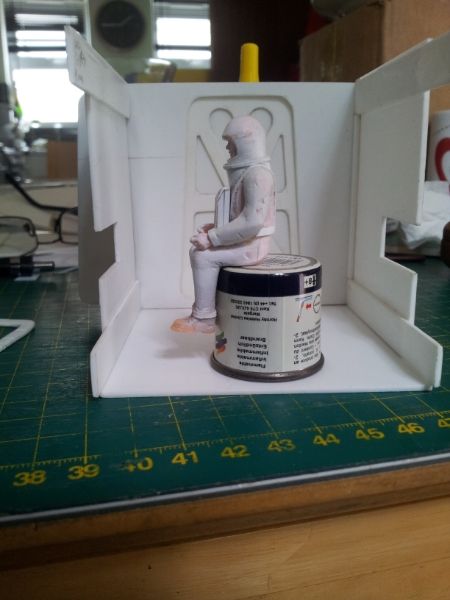
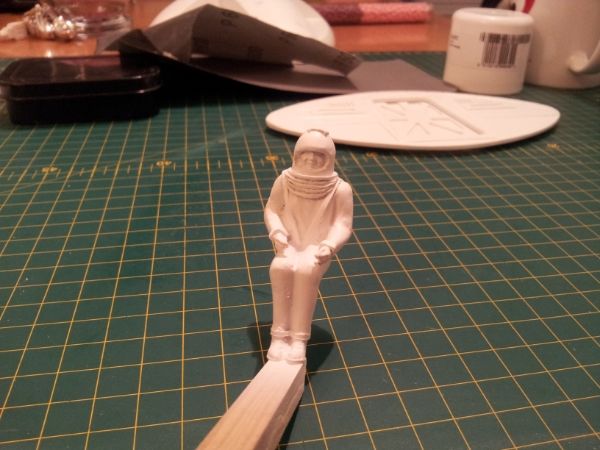
I will be building three of these figures; each at exactly 1:24 scale, so they will fit right into a 44" Eagle or a moonbuggy.

1) Sitting - legs bent (Moon buggy driver)
2) Sitting - legs straight (Eagle pilot)
3) standing - for interior displays etc...
I will then cast and mould them to produce multiples of each.

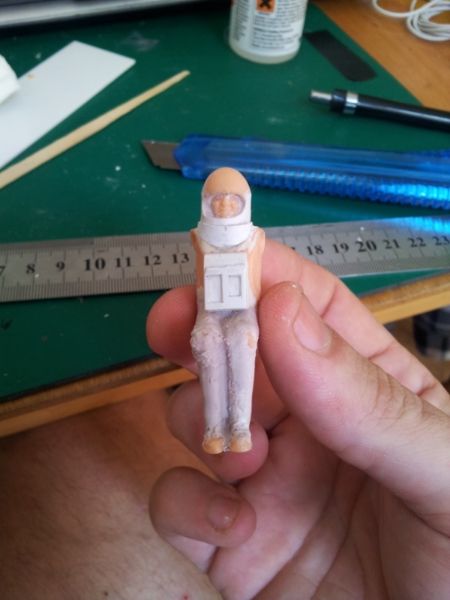
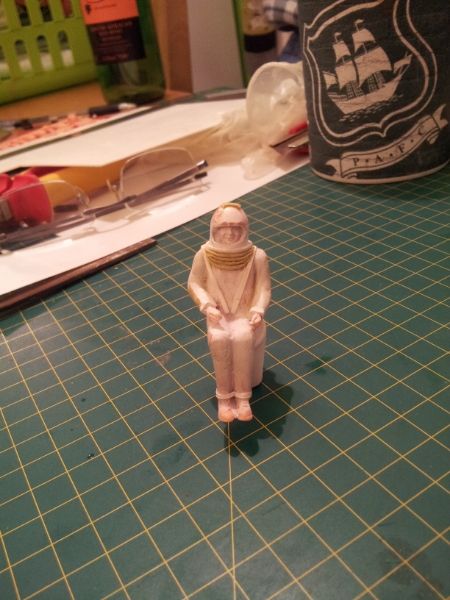
The first one to be made is the "Sitting - Legs bent (Moon Buggy Driver).

The head and torso are made from DAS Modelling Material, and then details are added on with Milliput and styrene sheet.
20130719_141657_zpse93c8e3e.jpg

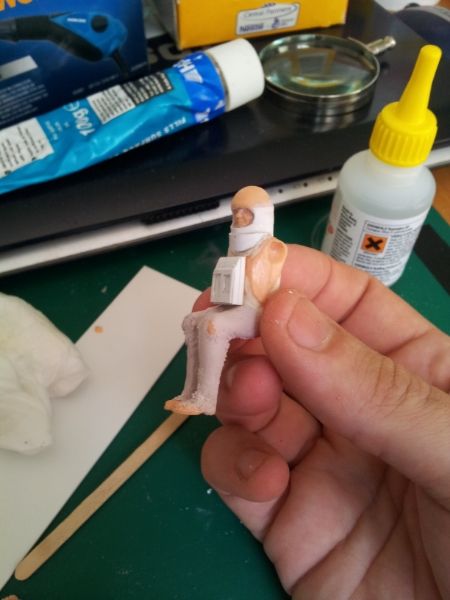
In this picture, I have started to construct the front box...
20130719_141743_zps3eedf511.jpg

.....And here, the straps to which it would be attached
20130725_134457_zps7ca03a18.jpg

A side view..
20130725_134524_zps27e7e2db.jpg

I have now started to add the finer details that make the alphan space suit so distinctive, such as the "corrugated" neck band and the "vent" on the top of the helmet.
20130816_003823_zpse3042144.jpg


I still have the rear air tanks to build and other little details to add, such as the knobs on either side of the neck piece. I also want to enlarge the square wristbands and generally tidy up the sculpt before I cast it and then mould it to produce a second figure to make the pair.


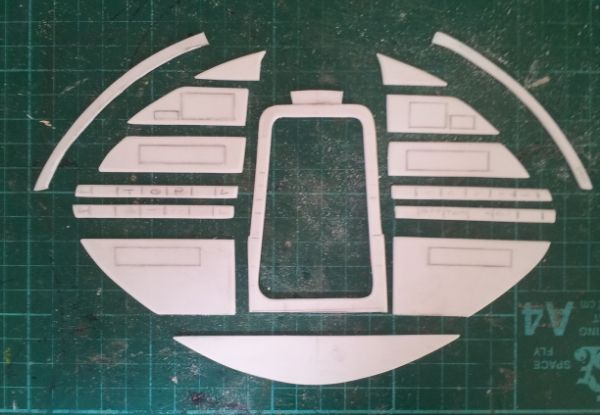
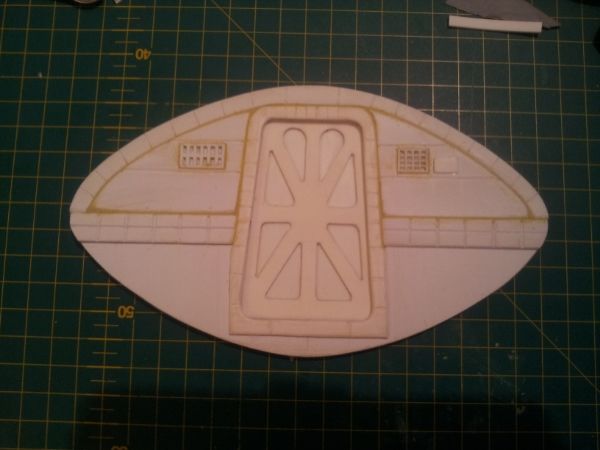
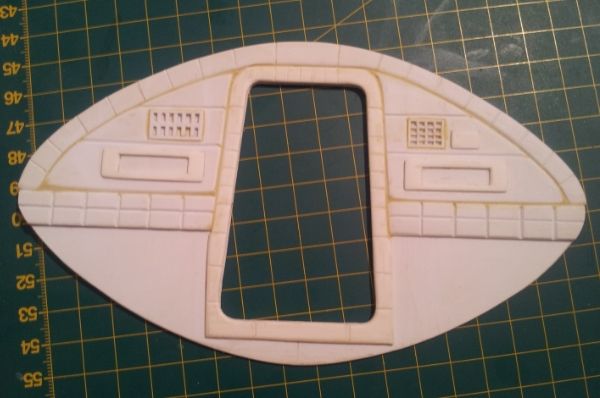
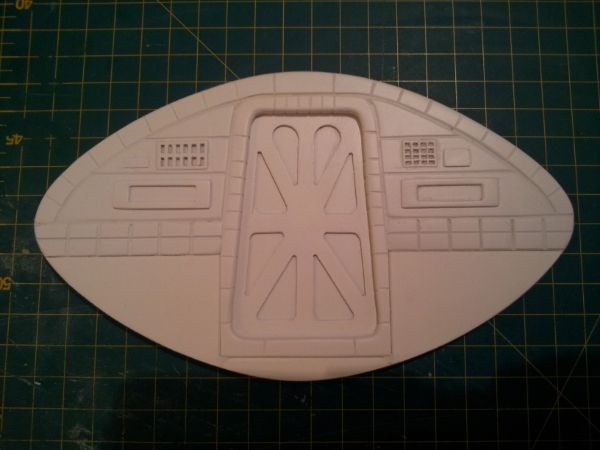
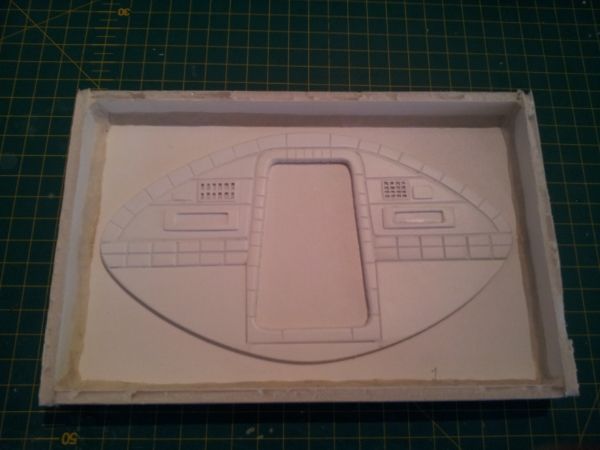
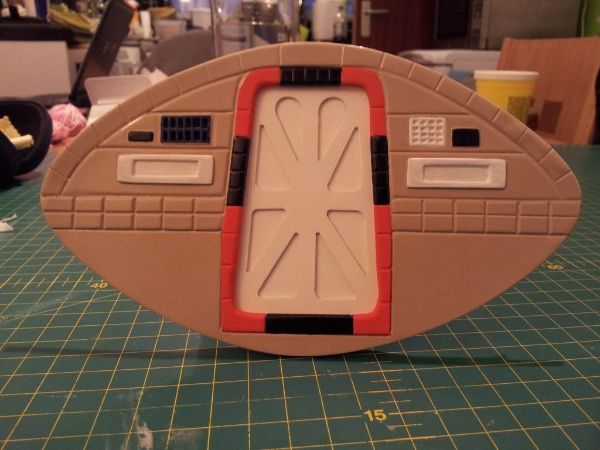
Another item that a lot of people seem to ask about regularly, is a decent back wall for their 44" Eagle cockpit. With that in mind, I took up the styrene sheet and set about making myself something that was at least evocative of the original studio set and would look the business in anyone's eagle Command module.

After some careful measurements, I proceeded to draw out the back wall on white card, and then, when I was happy, I cut the card up into seperate sections, ready to be transferred to styrene sheet.


20130701_173155_zps0acf9a81.jpg

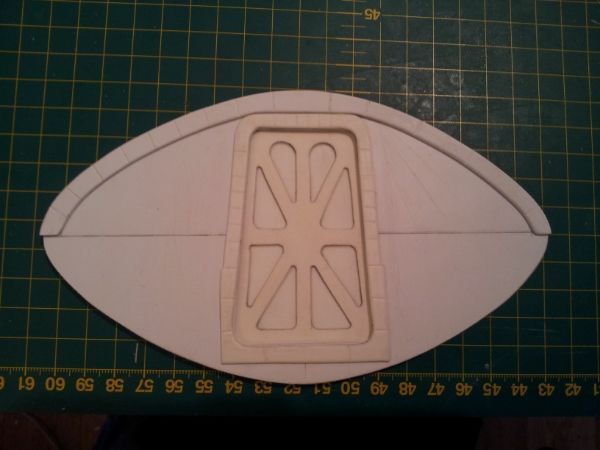
First in are the door and its surround, and the arc of tiles.
20130805_192938_zps95cc4477.jpg

Once these are inplace, I can cut and fit the the upper padded sections, into which the grills are fitted. What a revelation to build something so clean, staright and true! When I try to compare this to the one I made from Cereal box card, I realise that there is no comparison! God, I love Styrene!
20130806_220430_zps8f4d9432.jpg

Here I have cut and fitted the two rows of horizontal tiles.
20130809_230934_zpsd588f91b.jpg

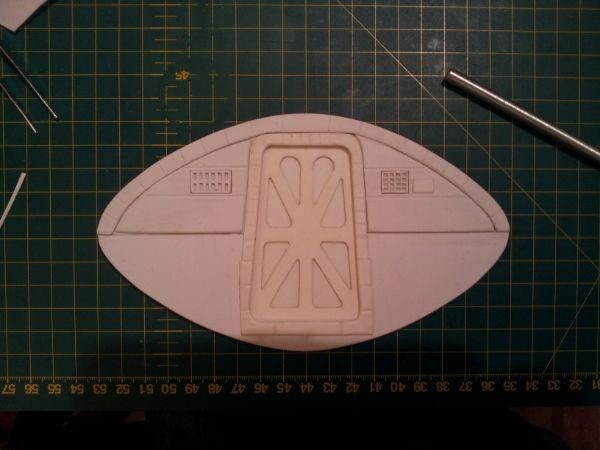
And here, I have added the white air vents. The bottom section will differ, according to which version I want to use. The first version will probably be filled in with two flat blanks, as they cannot be seen when installed in a closed cockpit. The second version will have the boxes built that would be directly behind the seats, in case I want to make a cutaway command module at some stage.

Either way, this wall is at the stage now where I can prime and spray it, ready for casting so that I may then mould several copies and build on the extra pieces as needed.
20130818_001641_zps3ec498b8.jpg


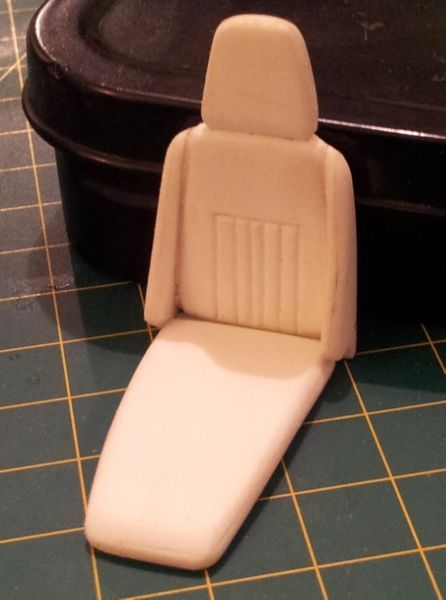
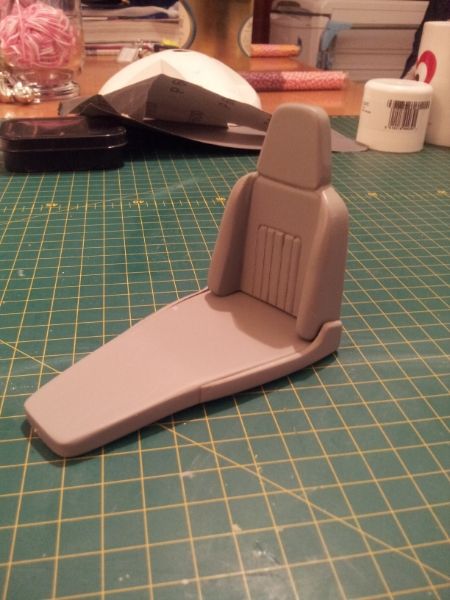
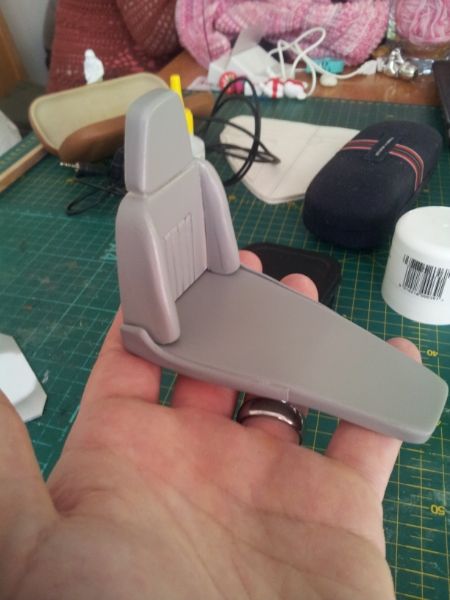
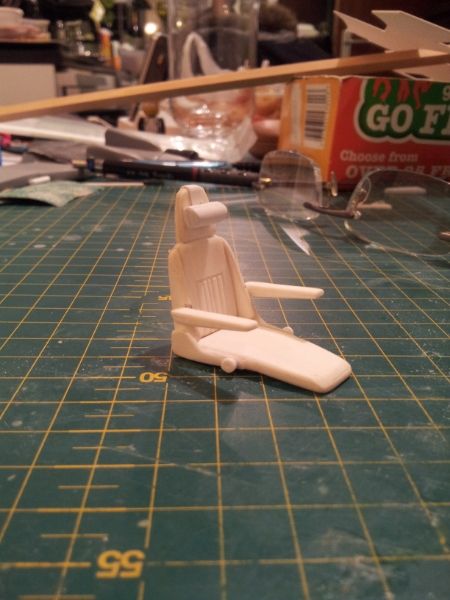
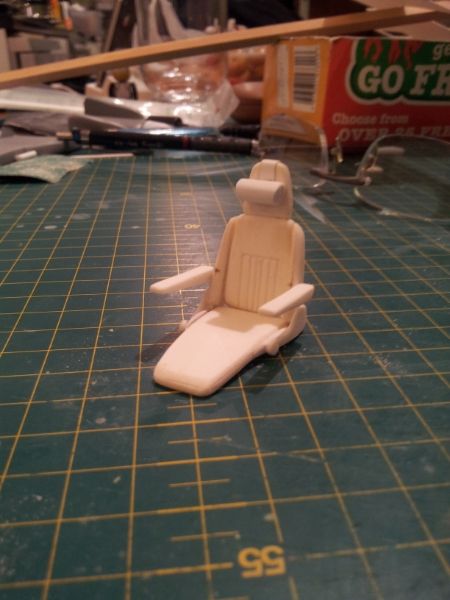
I have also decided to have a go at building a cockpit seat to fit the 44" Eagle command module. so far, I have constructed the back, and the seat section from styrene sheet.
20130816_003948_zps96a701a3.jpg


Still to do, are the arm rests, seat belts and neck support cushion. This should be a nice little chair when completed and I will then cast and mould it to make a pair.

Well, thats where I am at present and I will update soon! Thank you for looking in, Guys and I hope you enjoyed my little side project!
Regards,
Darren
 
Cheers, Mate!
I must admit that with my 52" Eagle on hold, I have been badgering away on these items for the 44" Eagle. I have made some progress, too!
The Back wall for the cockpit is now ready for moulding and casting:

20130826_204357_zps482130f2.jpg


The Alphanaut is all but ready for moulding and casting, bar a few little areas that need tidying:

20130826_204450_zps88bb611d.jpg


And here is another new project - a cockpit seat for an 88" Eagle:

20130826_204246_zps6b62b2c7.jpg

20130826_184534_zpsc502b7d3.jpg


Well, it's not my 52" Eagle but it is STILL all Eagle!!!
Thanks for looking in and I hope you are all well!
I just wish Bob (LMFAOSCHWARZ) would come back.....:(
 
Last edited:
Okay, I have managed to pretty much complete the 1/24 Scale seat today and I am pretty pleased with how it is turning out. I still have to tidy it up of course - a little filling and sanding here and there. I will take care of that tomorrow and add the vertical arm rest bars. Hopefully, this time tomorrow night, I will be able to post a final update of the finished article, in grey primer!
Here are a couple of pictures to show the progress. I hope you guys like it. Any comments are welcome, of course. :)
Darren

20130828_221834_zps7cffe698.jpg

20130828_221816_zps36537063.jpg
 
Small update: I have made a small box and attached the back wall to the bottom with Play-Doh. Also, all the inside edges and corners have also had Play-Doh applied to stop any bleeding or leaking of the silicon. Although the silicon will not stick to any of the surfaces with which it will come into contact, I will apply a coat of mould release over everything, just to help prolong the mould life and ease the extraction of the cast pieces. More on that as I go along.!
Anyway, here is a pic to show what I am talking about for those who don't Cast/mould.

20130829_191457_zps2e72c0b1.jpg


The door will be cast sperately and is double sided. This means that I will have the choice of either gluing the door into position or making it slide, should I choose to. :)

These should be ready for moulding by the weekend.

Regarding the Cockpit seats:
I added the arm rest supports today so now, I need to break the seat back down to its composite parts, ready for moulding.

20130829_195551_zps7b00b88d.jpg


More progress soon! :)
 
I hold you totally responsible my friend! :lol

I must admit that things are moving forward at such a pace for me at the moment that I can hardly keep up!

I hope to see you back soon, as we miss having you around :)
 
Small update:
I made a test mould which I was not happy with and so I used it to do a test cast - as much to test the materials as anything. I will be remoulding and casting from the new mould when cured but in the meantime, Here is the test piece all painted up.

20130901_201626_zps7749bf92.jpg
 
Looks cool! But I'm trying to see it through your eyes: what exactly is it that you weren't happy with? Maybe it's some non-visible quality it may have, but I'm scratching my head trying to figure it out! :confused
 
Nice of you to say, Bob and thank you but there are imperfections from demoulding it too quickly. If you look at the right hand arc of tiles, you will see that the third and fourth tiles up are distorted due to my premature demoulding. Also, I did not foresee the grills being traps for air bubbles when I poured the silicon mould onto the master. Consequently, I had to do a lot of work on this test casting to clean it up. It's fine though as this is all a learning experience!:)
 
Well, I have managed to make enough progress to make and pour up the moulds for the back wall and for the seat. Also, I have poured the first half of the mould for the Alphanaut. Tomorrow will see the results!
 
Back
Top