Manierista
New Member
Hello! I’ll be sharing with you guys my progress photos. I haven’t made a costume since 2017 so this project really motivated me due to including a little bit of everything. Fabric work, armor, prop and electronics.
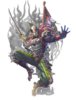
Yoshi’s outfit is pretty detailed in this game and the goal is to capture as much detail as possible into the costume, so my completion goal is currently August/September 2020.
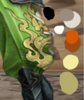
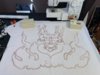
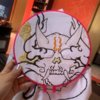
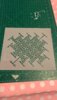
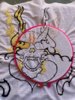
Currently my main focus is working on the pants. For now I bought a fabric that fits pretty well the color scheme, prepared a Sayagata stencil for pattern airbrushing and currently I’m working on the designs each leg has. It’s a horned skull with flames.
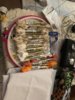
I thought about painting it directly to the fabric, but my experience with fabric medium isn’t so good and also I wanted something very traditional looking, so I went with embroidery.So far this is my progress.
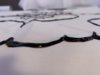
A 2-3 inch diameter piece can take up to an hour depending if it has detail or varies in color. It’s pretty worthwhile and relaxing. I learned from Ryan Wells that using puff paint can help give more volume to the embroidery, so I’ll be using that for the black outlines. Everything non outlined serves as a background graphic, that will show better later on.
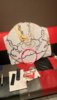
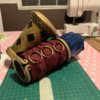
Last night I built Punished Props foam head and so with time I’ll be sculpting the helmet.
Thanks for reading my post, I’ll update more once I have more work done.")
P.S. It’s my first time in a long time since posting on a forum. I’m posting through my phone so
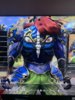
The arm beavers are done in Eva foam. The golden brace is layered. Body layer is 1/4” foam and the top layer is 2mm thin foam (to give the depth of the diamond shaped cuts. Most of the filling was done with funny gummy foam clay, later on sealed with wood glue,plastidip and primer filler.
Yoshi’s outfit is pretty detailed in this game and the goal is to capture as much detail as possible into the costume, so my completion goal is currently August/September 2020.
Currently my main focus is working on the pants. For now I bought a fabric that fits pretty well the color scheme, prepared a Sayagata stencil for pattern airbrushing and currently I’m working on the designs each leg has. It’s a horned skull with flames.
I thought about painting it directly to the fabric, but my experience with fabric medium isn’t so good and also I wanted something very traditional looking, so I went with embroidery.So far this is my progress.
A 2-3 inch diameter piece can take up to an hour depending if it has detail or varies in color. It’s pretty worthwhile and relaxing. I learned from Ryan Wells that using puff paint can help give more volume to the embroidery, so I’ll be using that for the black outlines. Everything non outlined serves as a background graphic, that will show better later on.
Last night I built Punished Props foam head and so with time I’ll be sculpting the helmet.
Thanks for reading my post, I’ll update more once I have more work done.
P.S. It’s my first time in a long time since posting on a forum. I’m posting through my phone so
The arm beavers are done in Eva foam. The golden brace is layered. Body layer is 1/4” foam and the top layer is 2mm thin foam (to give the depth of the diamond shaped cuts. Most of the filling was done with funny gummy foam clay, later on sealed with wood glue,plastidip and primer filler.
Attachments
-
 6B6FB19F-0614-4379-A180-B15DA9735AF0.jpeg141.6 KB · Views: 130
 -
 A470DAF0-755B-4A17-AD18-0430310B0180.jpeg2.5 MB · Views: 133
 -
 6F3C2089-11F9-40D1-A0B9-3E49A78336CA.jpeg1.8 MB · Views: 132
 -
 55C361FB-691F-4FFC-87EF-328F5D398CDA.jpeg112.1 KB · Views: 125
 -
 A1F5662C-B96E-4915-AB29-5D56C9513971.jpeg2 MB · Views: 123
 -
 9DFD366A-7197-4855-AED6-FCB6630EA8FA.jpeg3.2 MB · Views: 130
 -
 E5EDB4FF-F19D-48CA-AFE7-6F84DC39FDFE.jpeg672.1 KB · Views: 120
 -
 4E3CD28D-A158-4927-9F4D-BB819D4F1F11.jpeg1.3 MB · Views: 121
 -
 923C213B-6163-45B1-B670-8E999B7B6F8D.jpeg1.3 MB · Views: 124
 -
 EE2FF9D1-B325-4D46-8E91-9ED12DF9489B.jpeg1.4 MB · Views: 128
 -
 97E5C19B-3923-406F-9151-DD4BBAB70979.jpeg2.7 MB · Views: 133