Son Goku (FINISHED) (PIC HEAVY)

John NotStamos

New Member
Hi, I'm posting this here so I can self motivate myself by posting the progress on a public site.
In developing a cosplay for the lead character of the Dragon Ball series

JANUARY-Early Concept
I drew up some concept art in order to define the outfit in a real world setting
Goku-cosplay-layers.png


Goku-cosplay-layers2.png


I'm working it through this way because I see a lot of Goku cosplays take a literal translation on the design, even though Akira Toriyama drew all the males in the series with wide lats, long pelivis, and short torsos., making it wonky looking in a real world setting
O1CN01EI6Pjz1wv36bU5bKd_!!6000000006369-0-tbvideo.jpg
adult-goku-costume.jpg

INSPIRATIONS
- I want to reference a lot of traditional asian garments, Doctor Strange's training outfit, Street Fighter Gis Jackie Chan's look in Drunken Master as well as making a variation of this design from an unfinished DB short film
01_sfr0540.jpg
doctor-strange-drunken-master.png
Yoshi-Sudarso-Goku.png
1593189986699.jpg

LATE JANUARY
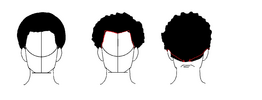
In order to visualize better, I drew myself in a style similar to Toriyama. And my conclusion was to embrace a high waist fit for the cosplay
Goku-cosplay-visualized1.png
Goku-cosplay-visualized2.png
Goku-cosplay-visualized3.png

FEBUARY
Because of(current events) I wanted to make a half mask for Goku that would make sense for the character to wear. I tried to see if I could make a thick layered 3d printed mask semi-Mortal Kombat styled. But after some thinking and budgeting, I think I'll buy a basic half mask and add a shiny layer to the top like in this Scorpion alt mask

IMG_4149.jpg
goku mask.png
scorpion-mortal-kombat-11-uhdpaper.com-4K-106.jpg

I got new shoes, turns out most martial arts shoes don't go to size 15, so I have to make a sew on pattern to Velcro onto this. Even the premade Goku costumes don't move to my size


IMG_3977.jpg

MARCH
Now in recent territory, I drew up a shoe design that I want to setup for the shoes inspired by fanart and cosplay
Goku-shoes64.png

That's it, I am pretty much preparing for the next steps, as the shoe stuff will be my biggest challenge
 
MAY
College murdered me, but I saved up all of April to buy a tang suit for the blue undershirt. Which is pretty much a thin Japanese gi/tunic. I'll have to dye it vibrant blue somehow.
IMG_5231.jpg
IMG_5233.jpg
 
JULY
At first a filler month, then in the last weeks I bought blue sports tape, asked for blue shoes for my birthday because I knew that I wouldn't have enough cash in my cosplay budget in time for my original fabric shoe plan, shin armor patterns for EVA foam and long socks as my ideal buddhists monk socks aren't made in my size.
Next
IMG_7027.JPG
IMG_7050.JPG
IMG_7055.JPG
IMG_7070.JPG

  1. Old Black jeans to cut for the logo
  2. Martial Arts Gi
  3. Blue Elastic Waistband/martial arts belt/and or Blue scarf for the belt
  4. Premade Cloth elastic hair ties for the EVA shin guards
  5. Brush Pen for Logo
  6. EVA Foam
  7. Fabric dye
  8. (MAYBE) Foam Staff
 
It’s been a while but I didn’t give up. I just procrastinated on posting
AUGUST
I got the taekwondo gi that will go alongside the pants
6368D28E-AC65-4920-B9C9-1B5F199A76FA.jpeg

I then used some old craft foam for the shin guards
CD3FB0F2-4C63-41AC-BF0A-6805A1A1432E.jpeg

Then I did barely any progression besides purchasing a blue scarf for the belt location for a few weeks, as saving money is key to this
OCTOBER
I dyed the cloth individually for two days. This is how it went
EDC13B83-D843-474E-A951-BB2B0E438C8E.jpeg

For the blues, I used Rit dye navy blue, a whole container of regular salt, not to be confused with kosher or iodized, as I heard that isn’t good for dyes


C612F279-AA96-4795-A989-87022BF21422.jpeg

Then I filled a plastic container used for laundry with boiling hot water
F86673FE-A81C-4012-992B-EF0D84B6CC17.jpeg

I started stirring for 1 hour in the very early morning, then left to do errands, and then returned 6 hours to stir from time to time for 2 hours.
10C550F8-C781-4535-A483-CCB8D6B57863.jpeg
81654E29-0850-4B4A-8496-0225CC3324B8.jpeg

After that I swapped and cleaned everything out and started again with the fabric intended to be orange with rit dye tangerine orange . I stirred for 6 hours and let it sit

F6360DBC-61B1-41AF-8E92-1BF5EF90BBD9.jpeg

Afterwards I rung out the water and left both fabrics to dry in the garage for the whole night
NOTE TO ALL LIGHTER SKINNED PEOPLE:
Wear gloves, either washing or medical, for this. My fingernail tips were blotchy blue for a week, but since I’m black it was very unnoticeable and it went away in a couple days/ but I think Caucasians, Asians, and light skinned Latinos will have more damage on their hands than I did.

For more specific things I forgot, like timing and measurements of water and salt, watch these videos
www.Youtube.com/watch?v=50h1yB6WFqo
www.Youtube.com/watch?v=ftnY_6-S2ik

C52A7B8A-5694-41AE-BD39-08B86141098F.jpeg


I then did a test wear. In the final version I cut the sleeves by a lot, but if you wanna do something like Justin Chatwin Goku or make a Goten costume for you or your kid to match with you. This is the thing I recommend thinking of
C7916E48-15FB-43F4-B3E1-BDEB319A73F5.jpeg

A learning experience was that the more salt and dye, the darker the color will be. I used 3 containers of dye for both the blue and orange fabrics. So if you dye a bright color like orange, yellow, or red, it will be a richer shade of that color. But if you do the same process with a purple, green, or blue, it will be a darker shade that a camera like an Iphone 7 will take as black compared to in real life.

A week after wringing out the water and drying, I went to my local college makerspace with a pair of old large black jeans from goodwill and cut them as the black part of the back logo. Keep in mind that jeans have a lot of pockets, so I ripped the back pockets and thankfully there was another layer of fabric under the back pocket

BF20EB23-80AF-45A8-8D35-D0FE0B84F7B7.jpeg

Because sewing is something I still need to learn, I used concrete glue to stick the circle on there
C9D68EA9-8D9C-4DEB-8A9D-D821C7EB2222.jpeg
 

Attachments

  • A3DC91F4-F26D-4E89-BDC9-27A8738D19A2.jpeg
    A3DC91F4-F26D-4E89-BDC9-27A8738D19A2.jpeg
    849 KB · Views: 103
Last edited:
Just wanna pop in to say I 100% think you're approaching the character from the right angle. Doing a 1:1 interpretation of a manga/anime character often don't end up looking right, so taking the character in a more grounded direction should result in a REALLY cool and really unique take on the character.
 
MID-LATE OCTOBER
Time to finish this up
I did a hairspray test, which is based on my hair. Why not take a wig from a cosplay artist? Because the hair texture of my ethnicity is different and I never get to have fun with my hair.
Here are some notes for my thinking process from July

Goku hair notes.png

Hair cosplay.png


I got all my help from a guy named Shaq (@black_goku on Instagram).
dent-goku2.jpg?dpr=1.jpg
79fe3e3e514e38b5cacf81fecd240592.jpg

But because I knew as a newbie to his hairstyling, and my natural hair size being medium, I had to do things differently
Here are the vids that helped

For those curious, as this is based on "coily hair" and not curly and or straight hair, I did a 1 hour conditioning session before blow drying and hair spraying where I sectioned off my hair with coconut oil, washed my hair with softener and conditioner, and left pic related (key element) in my hair for 2 hours before moving forward
35-7f05eb5008af_1.c1c0e58e0b5cfbb5f0ee5a35476debfb.jpg

I enjoyed the workflow, and even though what I got didn't get more spike sections, I got enough for the shape to look good to me.
IMG_7967.jpg
IMG_7962 (1).jpg

also here's a costume test with the front logo done
IMG_7989.jpg


days later I went back to the makerspace to glue up a white layer on the back logo by using a cheap white t shirt from the thrift store. Needed more glueing, but the basic stuff is there
IMG_8090 (1).jpg

Note: Be very careful with thick contact glue, the container might dry up over more than one uses and the harder the squeeze from the middle, the higher chances of the glue popping out from the back side. This temporarily affected my backside as I had to do 15 minutes of clean up
IMG_8089 (1).jpg

Also, another costume test. I cut the sleeves by a lot and folded them up more
IMG_8087.jpg


I finished the knee pads. I ironed and taped blue iron on vinyl onto the foam I made earlier. As a first attempt it did well, but I wasn't satisfied at how it folded onto the foam.

IMG_8136.jpg
IMG_8137.jpg

Then I tested out how it would look with 2 sets of store bought headbands. They're cheaper at dollar stores than at supermarkets or drug stores like Walmart or CVS


IMG_8165.jpg

Hours later, I finalized the suit and did my hair process again. It's slightly different from the earlier hair test, and I drew a logo on the backside
the front logo means faith and belief in Japanese and the back means righteousness and honor
1635710018343.png
IMG_8166.jpg


IMG_8141.jpg

FINALLY
After 10 months of prep, budgeting, and creating. I can finally say I made a costume that I'm more satisfied with than my past creations

IMG_8152.jpg


IMG_8153.jpg
IMG_8155.jpg

Some turnaround observations for reference
IMG_8161 (1).jpg
IMG_8162 (1).jpg

IMG_8170.jpg
IMG_8169.jpg


Went to my church today, it was pretty much a fun time.

IMG_0301.jpeg
 

Attachments

  • IMG_8168.jpg
    IMG_8168.jpg
    1.4 MB · Views: 191
  • IMG_8132.jpg
    IMG_8132.jpg
    1.2 MB · Views: 85
  • hair notes2.png
    hair notes2.png
    30 KB · Views: 124
  • IMG_8089 (1).jpg
    IMG_8089 (1).jpg
    1.5 MB · Views: 136

Your message may be considered spam for the following reasons:

If you wish to reply despite these issues, check the box below before replying.
Be aware that malicious compliance may result in more severe penalties.
Back
Top