zjunlimited
Sr Member
So after almost 2 years since joining the RPF and reading countless threads, I took the plunge and completed my first blaster build. ") So let's get started...but first a quick overview.
So let's get started...but first a quick overview.
Links:
Full Todd's ANH Kit http://www.toddscostumes.com/props-and-accessories/han-solo-dl-44-blaster-complete-gun/
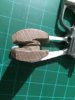
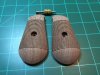
DEC Wood Grips http://darkenergycreations.com/grips-anh.aspx
Purchased the full Todd's kit around March 2017 but didn't get started on this until Nov 9, 2017....finished on Feb 9, 2018
This is what I started with. Its a newer version...without the Denix logo on the left side, and with the "Denix Made in Spain" stamp above the left grip

And ended up with this Corresponding video overview here https://youtu.be/3vuxl7y8QAQ

==============================
So you all know what the limitations of the Denix are...and I did my best to rectify them to the best of my ability.
Started by stripping the stock finish using first with a dremel wire brush followed by 120grit sanding drum, 120grit flap wheel, 250grit and 500grit sandpaper. Sharpened all lines, removed cast lines, and sanding everything trying to smooth out the finish as best as possible.


Then I decided to add the half circle cutouts in front of the sight hinge using a ball-shaped cutting attachment for my dremel. And shaved down the sight hinge nubs, countersunk the hole, and shortened the pin.


Removed the hump on the front of the sight hinge and cleaned up the "V"

Reshaped the hammer and trigger


Cleaned up the sight slider and bolt retainer including filling in the holes with JB weld and sanding smooth.


Then ran into my first issue...the firing pin. Is it always this crooked? I was able to bend it so it was more acceptable but still not happy.


So from Spoon06's excellent tutorial here (https://www.therpf.com/showthread.php?t=257410) I decided to make my own removable firing pin
I found some 1/4" OD aluminum spacers with 8-32 threads already cut and picked up a 8-32 threaded rod and went to town.
Cut 1/4-20 threads on outer of aluminum spacer...then cut down to length. Cut down the threaded rod to match the stock-ish length and removed all but 1/2" of thread.
Cut notch into threaded rod, JB weld the spacer to the rod.
Drilled out bolt hole and cut 1/4-20 threads.
AB everything afterwards.


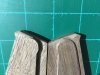
So.... another issue. Todd uses some type of adhesive to secure the bull barrel to the upper denix. After separating the two (just brute strength, no tools, still amazed it came apart) there was quite a clean up needed. Between acetone and needle files, it still wasn't enough. So after getting 1/2-28 UNEF tap & die set, I was able to clean up the threads. Now it threads on like butter.

- - - Updated - - -
So let's get started...but first a quick overview.Links:
Full Todd's ANH Kit http://www.toddscostumes.com/props-and-accessories/han-solo-dl-44-blaster-complete-gun/
DEC Wood Grips http://darkenergycreations.com/grips-anh.aspx
Purchased the full Todd's kit around March 2017 but didn't get started on this until Nov 9, 2017....finished on Feb 9, 2018
This is what I started with. Its a newer version...without the Denix logo on the left side, and with the "Denix Made in Spain" stamp above the left grip
And ended up with this
Corresponding video overview here https://youtu.be/3vuxl7y8QAQ==============================
So you all know what the limitations of the Denix are...and I did my best to rectify them to the best of my ability.
Started by stripping the stock finish using first with a dremel wire brush followed by 120grit sanding drum, 120grit flap wheel, 250grit and 500grit sandpaper. Sharpened all lines, removed cast lines, and sanding everything trying to smooth out the finish as best as possible.
Then I decided to add the half circle cutouts in front of the sight hinge using a ball-shaped cutting attachment for my dremel. And shaved down the sight hinge nubs, countersunk the hole, and shortened the pin.
Removed the hump on the front of the sight hinge and cleaned up the "V"
Reshaped the hammer and trigger
Cleaned up the sight slider and bolt retainer including filling in the holes with JB weld and sanding smooth.
Then ran into my first issue...the firing pin. Is it always this crooked? I was able to bend it so it was more acceptable but still not happy.
So from Spoon06's excellent tutorial here (https://www.therpf.com/showthread.php?t=257410) I decided to make my own removable firing pin
I found some 1/4" OD aluminum spacers with 8-32 threads already cut and picked up a 8-32 threaded rod and went to town.
Cut 1/4-20 threads on outer of aluminum spacer...then cut down to length. Cut down the threaded rod to match the stock-ish length and removed all but 1/2" of thread.
Cut notch into threaded rod, JB weld the spacer to the rod.
Drilled out bolt hole and cut 1/4-20 threads.
AB everything afterwards.
So.... another issue. Todd uses some type of adhesive to secure the bull barrel to the upper denix. After separating the two (just brute strength, no tools, still amazed it came apart) there was quite a clean up needed. Between acetone and needle files, it still wasn't enough. So after getting 1/2-28 UNEF tap & die set, I was able to clean up the threads. Now it threads on like butter.
- - - Updated - - -