You are using an out of date browser. It may not display this or other websites correctly.
You should upgrade or use an alternative browser.
You should upgrade or use an alternative browser.
Slave to a Rhythm (with no grace)
- Thread starter Guy Cowen
- Start date
- Status
- Not open for further replies.
I have not read the whole thread, but the red part on my wings are from the BT46. And I never glued all the parts for the wings together cause I could not figure out if the BT44 parts were glued head to head untrimmed or trimmed.
Have not touched my Slave 1s in about 10 years.
Tim
Have not touched my Slave 1s in about 10 years.
Tim
Last edited:
Thanks Tim, I really appreciate your input, I'm glad I was on the same track as your self.
I'm sure as this build goes on I'll start hitting many brick walls. ITs a shame you never finished though as your builds from the little I have seen look incredible. Please feel free to post anything you want in this thread Tim, your input is more than more than welcome here.
Best G
I'm sure as this build goes on I'll start hitting many brick walls. ITs a shame you never finished though as your builds from the little I have seen look incredible. Please feel free to post anything you want in this thread Tim, your input is more than more than welcome here.
Best G
Thanks.
How about you just ask me what you need to know and I can see what I can do?
edit: here's a picture of my wings.

I dunno what you guys used for the large indentations in the Porsche doors, but mine are the OMS pods from the Airfix shuttle. (I may be wrong though)
Tim
How about you just ask me what you need to know and I can see what I can do?
edit: here's a picture of my wings.
I dunno what you guys used for the large indentations in the Porsche doors, but mine are the OMS pods from the Airfix shuttle. (I may be wrong though)
Tim
Last edited:
Gorgeous work, Tim! You're the godfather of Slave 1 builders!
Thank you very much!
But my Slave 1 turned out to be a little short for a Stormtrooper
")
I built three hulls, and then noticed I did not compensate for the lens distortion enough. The parts would fit into the bottom, but not exactly like on the original.
Your hull looks great, btw.
Tim
just found these pictures. Looks like I did glue the BT44 parts together, but I had first trimmed them at a slight angle and then glued the trimmings back on. Still not sure what is right.
The checkered background is a 1cm square grid, btw.
Please keep in mind these pictures were taken 10 years ago, and the resolution is not that great.


Tim
The checkered background is a 1cm square grid, btw.
Please keep in mind these pictures were taken 10 years ago, and the resolution is not that great.
Tim
Great stuff Tim thanks for sharing them. Yeh same shuttle part on my Doors, not my own find though.
I'll try n bag some I'ds on the Hull before I jump straight into help mode but will take you up on the offer if I hit any more brick walls!
Lens distortion aside they really do look pretty damn spot on.
I'll try n bag some I'ds on the Hull before I jump straight into help mode but will take you up on the offer if I hit any more brick walls!
Lens distortion aside they really do look pretty damn spot on.
Actually one question springs to mind, what did you use for the ribbed section on the Dish. In black on the pic above, is it a solid part or single strips?
The ribbed parts are strips dark-grey t-shaped profiles.
Tim
Tim, were you building a fleet? Were they early attempts, a la Ripley clones in Alien3?
Nope, I built three Slave1s simultaneously. They are identical.
Tim
JMChladek
Sr Member
They could indeed be Airfix OMS pods. But I know that on Empire the builders used shuttle SRBs from the G-Mark/Entex 1/144 shuttle kit (currently available from Minicraft) on the Medical Frigate (I positively IDed them for one modeler), so that kit might be another possible source for parts used on Slave 1. Still, this is looking VERY good.
They could indeed be Airfix OMS pods. But I know that on Empire the builders used shuttle SRBs from the G-Mark/Entex 1/144 shuttle kit (currently available from Minicraft) on the Medical Frigate (I positively IDed them for one modeler), so that kit might be another possible source for parts used on Slave 1. Still, this is looking VERY good.
That's because the Entex kit and the Airfix kit are exactly the same. Entex was a distributor of other manufactures' kits packaged with the Entex logo. They used Airfix, BAndai, Gakken, Eidai,.... among others.
Dan
JMChladek
Sr Member
That's because the Entex kit and the Airfix kit are exactly the same. Entex was a distributor of other manufactures' kits packaged with the Entex logo. They used Airfix, BAndai, Gakken, Eidai,.... among others.
Dan
Sorry Dan, I beg to differ. I collect shuttle model kits and have done so for many years. So I can spot the differences between the toolings at a glance rather easily. I have examples of BOTH the Airfix and Entex kits (actually, Minicraft in my case, but it is the same G-Mark tooling as I have verified that by comparing it with an Entex kit) and they are different molds all together from one another.
Entex indeed distributed other kits, but from the far east, NOT Airfix stuff to my knowledge (if so, in rather small numbers and more than likely the same kits that Airfix imported into the UK as opposed to their own molds). So the Entex shuttle mold was from a Japanese company called G-Mark and it was not related to the Airfix tooling at all. Airfix was available in the USA at the time from Airfix (in somewhat small numbers, but they could be found if one looked), USAirfix (until about 1979-80) and MPC from 81 onwards until Airfix got a better US distributorship sometime in the late 1980s.
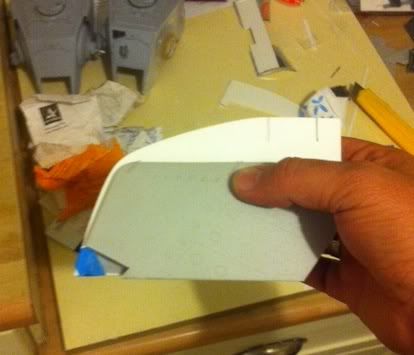
Had to take these on my phone sorry!
GEtting close to what looks like the rear section of wing 1. I've re cut a new Harrier wing section, I spotted an alignment issue that was bugging me, Even with the Door shrinkage it should ve made it easier to align like the original...head scratch time. At the same time I think I'd trimmed one side of the first harrier too much so went for the spare set I had. Thats when I noticed it aligned spot on to the original. Looking at the Harrier wings there is a slight difference in Tooling, the correct version is the Hawker. Not sure what Harrier kit the first wing was from, the only difference is on the underside of the wing anyway but I was using these points to line stuff up so, kinda glad I made a mistake now.
I would def say dont cut the Harrier wing till the door and extension parts are cut.
This is just crudely taped together and still is pretty solid just with tape.
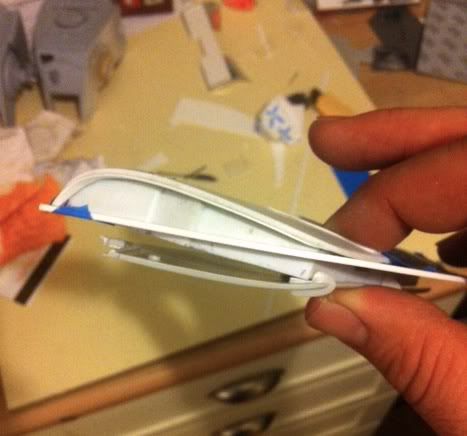
Underside
crap top view to show the Van panel in place.
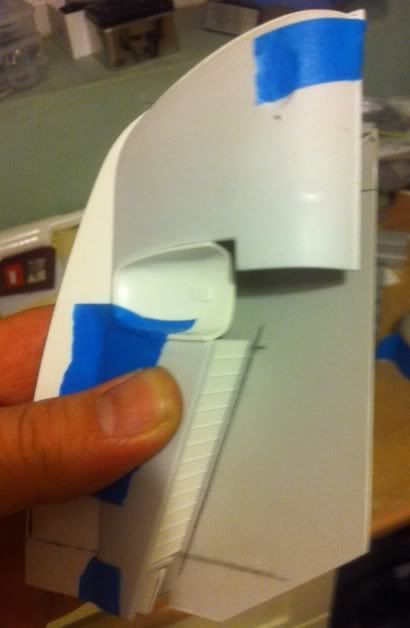
This view took a lot of fine fiddling to get right, I think I've got as close as I can without over working it. I'm really happy with the results.
I also think the BT46 part is just cut down the middle and split between the wings as opposed to 2 parts from 2 kits. It lines up perfectly to the harrier wing detail being exactly half the kit part.
GEtting close to what looks like the rear section of wing 1. I've re cut a new Harrier wing section, I spotted an alignment issue that was bugging me, Even with the Door shrinkage it should ve made it easier to align like the original...head scratch time. At the same time I think I'd trimmed one side of the first harrier too much so went for the spare set I had. Thats when I noticed it aligned spot on to the original. Looking at the Harrier wings there is a slight difference in Tooling, the correct version is the Hawker. Not sure what Harrier kit the first wing was from, the only difference is on the underside of the wing anyway but I was using these points to line stuff up so, kinda glad I made a mistake now.
I would def say dont cut the Harrier wing till the door and extension parts are cut.
This is just crudely taped together and still is pretty solid just with tape.
Underside
crap top view to show the Van panel in place.
This view took a lot of fine fiddling to get right, I think I've got as close as I can without over working it. I'm really happy with the results.
I also think the BT46 part is just cut down the middle and split between the wings as opposed to 2 parts from 2 kits. It lines up perfectly to the harrier wing detail being exactly half the kit part.
Last edited:
MonsieurTox
Master Member
That's looking great Guy, going slowly is the key for this baby !
Merci Julien. Its a shame i don't have real doors, even though these are great castings there is still some distortion to the under parts that have made it a lot harder to cut n shape the extension peace. All time wasting but fun.
Tips so far, just thoughts at best!?!?
Use real doors if possible
Stick to Hawker Harrier
Cut the Door, fit the shuttle part, make the extension then shape the Harrier wing.
BT46 part cut down the middle.
Tips so far, just thoughts at best!?!?
Use real doors if possible
Stick to Hawker Harrier
Cut the Door, fit the shuttle part, make the extension then shape the Harrier wing.
BT46 part cut down the middle.
Looking good Guy! It's interesting to see you take care of this most difficult area first.
Did you end up keeping the van panels even or is one end wider than the other? I think in your drawing of them overlaid on the photo, your drawing is a bit off and it appears the panel parts should be parallel. So is that what you ended up doing?
Did you end up keeping the van panels even or is one end wider than the other? I think in your drawing of them overlaid on the photo, your drawing is a bit off and it appears the panel parts should be parallel. So is that what you ended up doing?
HaHa, thats not a drawing, just a quick ref to point out what I meant. Its def tapered getting wider towards the centre of the wing, it physically has to be this way or its impossible to get the angle right on the Harrier wing. It will make sense when you get to it. The sad thing is I sussed exactly which part of the kit was used for the Van panel as there is a tiny logo imbedded in it but had to scrap it......very rivet counting mad but still a shame though
- Status
- Not open for further replies.
Similar threads
- Replies
- 16
- Views
- 816