Shylaah's 2012 Halloween Costume Contest Entry

Shylaah

Sr Member
Well, here we go!

Stewardess from the 2011 TV Series Pan Am


Pan%20Am%2001.jpg


I wanted to do this costume last year when the TV series debuted, but alas I ran out of time and the series ran out of shows--cancelled before it had hardly began! But I continued to collect up the needed items and decided to go ahead and give it a go this year since I had nearly everything I needed already.


Edited to add:
The Finished Costume
Just in case you want to see how everything turned out, but don't want to dig through the whole thread : )))

Pan%20Am%2024%2034%2035.jpg


Shylaah
 
Last edited:
The Hat

I'll start with the hat, since it's my favorite piece of the outfit and the only piece made entirely from scratch.

My pattern and some grabs of the original hat on which I based it.

Pan%20Am%2002.jpg


I had had the pattern drawn up for ages, but just a few weeks ago actually cut one out and sewed it up. I bought a tshirt from the thrift store to use for making mock ups of the hat.

Pan%20Am%2003.jpg


I get started on things and forget to take pictures, so this is the best pic I have of mock up #1 and this was after I had made alterations and began to de-construct it to glean pattern #2.

Pan%20Am%2004.jpg


I was way off on the size and shape of the crown, and not all that close on the band and the cockade was way too big. So I made the adjustments on the mock up and drew up another pattern

Pan%20Am%2005.jpg


The second one looked a lot closer. Here is mock up #2 constructed.

Pan%20Am%2006.jpg


And here it is just laying the raw cord around it to see how that looks in perspective and in 3D. Am happy with it and moving on to the final cut from the hat fabric.

Pan%20Am%2007.jpg


Band is still a little off--made adjustment and prepared to cut hat.

Pan%20Am%2008.jpg


Sewed some casing for the cording.

Pan%20Am%2009.jpg


Threaded the cording through the casing. (oops, forgot to use the flash!)

Pan%20Am%2010.jpg


Finished hat, front.

Pan%20Am%2011.jpg


Finished hat, side (except for the pin that holds on the cockade--will get to that later!

Pan%20Am%20%2012.jpg
 
Thanks All!!

Next item............

The Binder


I wanted to make a flight/carry-on bag like they had in the show, but time does not permit that I'm going to get that done in time for this Halloween. I had these lovely cut vinyl decals of the Pan Am logo from a member here, Rick Hanson, to use for the bag so I had to come up with something else to use it on.. I bought a blue binder and put one of the logos on it. It came out great! I was easy to do and looked so perfect--I was simply amazed!

I centered the decal on the binder cover and taped down the two corners nearest the spine.

Pan%20Am%2014.jpg


I carefully pulled back the clear sheet holding the decal and folded under a little less than half of the colored backer paper. Then even more carefully aligned and placed the tacky clear sheet and began pressing it toward the fold.

Pan%20Am%2015.jpg


Pan%20Am%2016.jpg


I removed the tape holding the other side in place, lifted up the not-yet-stuck-down part of the decal and continued to slowly pull away the backing paper and gently press the decal into place making sure it was all going down smoothly as I went.

Pan%20Am%2017.jpg


Then I used the slick side down of the backing paper and smoothed and pressed until I was sure the decal was firmly attached. ---and I didn't get a pic of this part, but I then lifted off one side of the clear sheet making sure it was unsticking from the decal and coming cleanly away. In a couple of places where there was some very slight resistance, I gave it another pressing down by rubbing over it with the backing paper. Then the other half of the clear sheet, and some just for kicks smoothing on the decal itself with the slick side of the backing paper against the decal. (I always go for overkill!?! : )))

5. And there you have it, *PERFECT!!!*

Click here to see it larger
Pan%20Am%2018.jpg


Few things ever go this well--at least for me!! And I still marvel at how beautifully it worked and how absolutely gorgeously perfect the result is!!!!!!!!!!!!


Rick also did a little bitty logo for me that I'm going to try to use to make the hat pin. I'm real excited to get that going as soon as I find a smooth round base for it. Many thanks Rick for these great vinyls! Oh, and the stencil, there's a reverse, negative cut also that we hope will work as a painting stencil. Another project I need to find some time for.
 
Last edited:
Gonna get this posted up while waiting for the glue to dry on the hat pin that I have in progress at the mo.​

The Skirt and Blouse


The skirt and blouse were just some minor alterations. Cutting off the collar of the blouse, making lapels for it and shortening the sleeves. That all went well. The skirt, however, started out with black trimming on it. I bought it because it was the right color and close enough style and thought the trimming was just applied on top and I'd take it off and be done.

But NOOOOO! The top and bottom horizontal trim was applied on top, but the darn vertical stuff was pieced into the seams, so not only was it twice as hard to get off because I had to take out all that serging as well as the straight top stitching, but there I was left with an open seams that had to be re-sewn and the waist band taken it to accommodate the now more narrow skirt!

After I'd already started the de-construct process of all the pieces. Evil skirt on the left and the open seam removing the trim left.....

Pan%20An%2019.jpg


Original skirt


Pan%20Am%2020.jpg


Finished skirt
after alterations

Pan%20Am%2021.jpg


Original blouse after I had already whacked on it some--as I've said before, I get busy with stuff and forget to take pictures!


Pan%20Am%2022.jpg


Cutting new lapels for the blouse. Really boring all that white so I thew the new jacket buttons on there for some visual interest :)


Pan%20Am%2023.jpg


Didn't take finished pic of the blouse.......--too often forget to grab those pics :facepalm
 
Last edited:
Wow, so much thought into the details, this is amazing work! Great job so far, can't wait to see what the finished costume will loom like ^__^ Best of luck to you in the contest!
 
Yep, down to the wire. Thanks O_B
Thanks Aoshi1 and Propazoid!

Moving right along.........."You could have heard a pin drop." And I did--several times :confused

The Pins

Not in my skill set to make pins and I'm gonna prove it :) But I had to try, the real deals weren't in my budget.

Made the Pan Am jacket pin a couple of weeks ago.I bought one of those plastic "Junior Flyer" Pan Am pins to mold and cast one similar to the one winged stewardess pin in the series. I used some of that Sculpey Mold Maker clay to make the mold. After I baked it, I then filled in the one wing and the words "Junior Flyer" then baked it again. Molded the pin out of Sculpey and it came out a little wonky and distorted, I pressed on with it. Baked the thing, painted it with some metallic gold acrylic and hit the letters with some powdery blue. Let the thing dry and glossed it up with some clear nail polish. Glued on a pin back and I was done, though not proud :$

Pan%20Am%2024.jpg


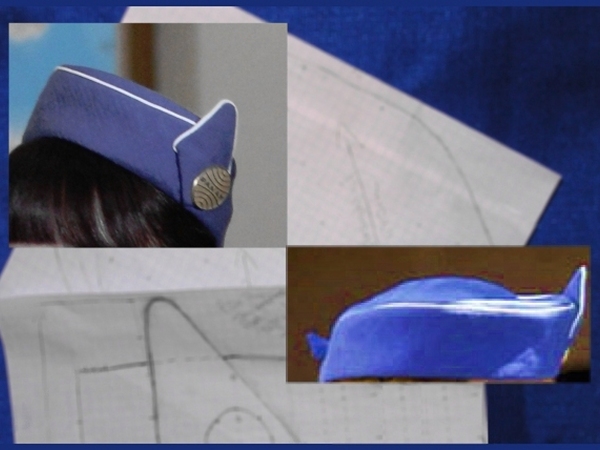
Okay, so I had the 1 1/2 inch Pan Am logo decal that Rick Hanson made for me and I needed to find something to put it on to make it into a pin. I ran up to the hardware store hoping to find a brass disk or plug of some kind, but alas there was nothing that size nor brass and I didn't have time to go running all over looking for something, so I settled for a fender washer. It had a tiny whole in the middle, so I filled it with Sculpey and ran a couple of wires though it to be the means by which I would attach the pin to the hat.

Fender Washers
Pan%20Am%2025.JPG


Clayed and Wired
Pan%20Am%2026.JPG


Baked that, then cut a circle of the blue fabric and ran it down over the wires and glued it to the back to help prevent the clay plug from dislodging. I covered the front with some gold foil I had on hand. It didn't come out as smooth as I would have liked, but it looked reasonably OK.

Fabric backed
Pan%20Am%2027.JPg


Front foiled
Pan%20Am%2028.jpg


After letting the glue dry, I stuck on the decal sticker.

Decal on
Pan%20Am%2029.jpg


I had intended to apply gold Rub-n-Buff to the entire thing, let it dry and buff it up and be done.......until another but NOOOOO! moment. The Rub-n-Buff would not stick to the decal nor the foil. Tried the gold metallic acrylic, it wouldn't stick either. Had a gold paint pen and I tried that. Nope, not sticking. So I just gave up and cleaned the whole thing off with some paint thinner. I didn't really mind how it looked the white on gold, actually. And since the hat has the white piping, it looks well enough and I'm calling the hat and hat pin DONE!

And done and done...............
Pan%20Am%2030.jpg


Thanks again, Rick, for everything!
 
Last edited:
Yeah, I could have tried a few more things if time had permitted, but alas, time is not my friend!

Okay, to wrap things up...............

The Jacket
and all the rest of the stuff and proof pic

The jacket is the first item I bought sometime last year, then tried to match everything else to its color of blue. Wow, who knew there were so many different shades of royal blue by just as many names!?! And while the color of all the pieces match pretty well to the eye, the camera and flash often shades them differently because they have a different sheen.

To make it more SA, I had to alter the jacket's lapels, shorten the sleeves, add the faux pocket flaps and change out the buttons and add one more. It was way too big, but because it was fully lined I was not about to take it apart and re-cut it piece by piece times 2--jacket and lining. So I altered it for size as much as I could without ruining the style lines by taking in some of the seams.

The "all the rest of the stuff" are thrift store finds--the purse, the shoes, the gloves. The watch belongs to a neighbor, a little dressy Elgin watch actually from the early 70s. She said they were often worn over a glove so you didn't always have to be pushing your glove back to check the time. I don't remember if anyone on the show did this, but I thought it was a nice little HA bit, so over the glove it went!

The "collection" I started with this year--jacket, skirt, blouse, gloves, tshirt for hat mock-up fodder and the first draft of the hat pattern.

Pan%20Am%2031.jpg


Patterning and cutting new lapels for the jacket, and shortening sleeve

Pan%20Am%2032.jpg


New lapels and faux pocket flaps
Pan%20Am%2033.jpg


The finished hat, skirt and jacket
Pan%20Am%2035.jpg


The finished skirt with "all the rest of the stuff"
Pan%20Am%2034.jpg


The proof pic
Pan%20Am%2037.jpg


Had a better quality pic, but liked all the weird artifacts not using a flash created on this one, so...........

Shylaah

- - - - - - - - - - - - - - - - - - - - - - - - - - - - - - - - - - - - - - - - - - -

HH%202012.jpg

Have a Good One, Ever Bodee!
 
Thanks Jodo! I don't see you in the Gallery. Are you entering the contest? If not, you'd better post pics of you in costume--on the other hand, maybe it's safer for the lovely ladies of the RPF if you don't :):love:lol

Love your proof pic. Anonymous!
.....as I shall ever remain!

Shylaah
 
This thread is more than 11 years old.

Your message may be considered spam for the following reasons:

  1. This thread hasn't been active in some time. A new post in this thread might not contribute constructively to this discussion after so long.
If you wish to reply despite these issues, check the box below before replying.
Be aware that malicious compliance may result in more severe penalties.
Back
Top