Serenity Firefly 3D Project

Star Lord

Active Member
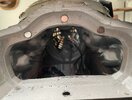
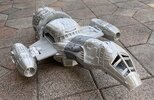
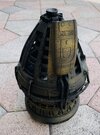
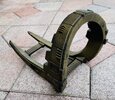
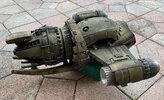
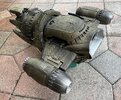
The Serenity Firefly is a unique spaceship design which captured my attention from the very beginning of this terrific but short lived sci fi series. Unfortunately, finding a suitably large, studio scale model has been next to impossible until I stumbled upon a 3D model on Gambody. The detail of the model was generally very good (in my opinion) but the overall size was way too small for my taste. However, I decided to reslice the 3D files and increase the size of the original ship by 250%! This would increase the length of the Firefly from a paltry 15 inches to over three and a half feet long (41 inches). Now we're talking some serious space craft. When starting this project I did not have an abundance of reference material which meant that I would probably offer my own preferences on final paint, engine louvers, and duct work for example. More on these features later. I opted to start with the main body and work my way towards the ship's stern or abdomen. Here goes...
IMG_1022.jpg
IMG_1021.jpg

I am using an Ender 3 V2 and an Ender 5 plus whereby the goal was to do as little surface prep as possible (which is my least favorite thing to do!) and still assemble a respectable final project.
 
The next stage begins with the two main thrusters and wings which attach directly to the main body. The original designer of the STL files provided wire channels for the LED lighting effects which were installed after printing but before final assembly. For once, I was thinking ahead.
IMG_0973.jpg
IMG_0980.jpg
IMG_0982.jpg

The engines and most of the model were printed using a silver silk filament which gives the illusion that they are made out of aluminum. This would be a big advantage when it came time to start painting. The overall quality of the prints are really pretty decent. I opted for 5mm LEDs wired to a controller that simulates a pulsing effect. Evans Designs provided all of the lighting and wiring materials. They are a great resource IMHO.
IMG_1460.jpg
 
Once the two main engines were outfitted with LEDs, they were mounted on the wings and then test fit to the main body of the Serenity. Fitment was excellent. I then focused on printing the "cradle" that surrounds the base of the ship's "abdomen" and then the abdomen base itself. One word of caution... I found out the hard way that the cradle should NOT be glued together until final assembly of the ship. More on this later.

IMG_0994.jpg
IMG_0972.jpg


IMG_0967.jpg
 
The base of the abdomen or lower fuselage took a day and a half to print but the results were worth the wait. I had already decided to install an LED strand in this part of the fuselage that would rotate when the Serenity engines were underway. I test fit this component to the main body and was pleased once again with the fitment. Printing and completing the abdomen proved to be a different story altogether.
IMG_0977.jpg

I should mention that some cleanup was necessary on the underhang of this part. I did not use supports for much of this project but the underhang had to be cleaned up and a coat of Evercoat body filler was added. This seam is not visible in the finished model.
 
The detail on the abdomen of the Serenity was really pretty impressive and the designer of the STL files gave me several options in terms of what style of louvers to use and whether to have open or closed vents. Unfortunately, this abundance of surface features like fuel conduits, pipes and tubes created a real mess for my printing skills (or lack thereof). To make matters worse, my Ender 5 started having control board issues and the print quality really plummeted. As a result, many of these aforementioned, unsupported features were removed from the print or were badly reproduced and virtually unusable.
IMG_1001.jpg

I decided to shave many of the tubes, conduits etc and reproduce them using Evergreen tubing, heat shrink tubing and various diameters of solder.
IMG_1051 (1).jpg
IMG_1082.jpg
IMG_1457.jpg

After several hours, much of the detail was restored or at least cleaned up to a point where I could feel good about moving on to the next step in the build. Once finished, any stringing or uneven surfaces were filled and everything received several coats of Vallejo flat black primer.
 
At this point, I wanted to test fit the main body components to make sure I was heading in the right direction. One issue that I ran into was that the size of the H shaped connectors was designed improperly or I was just incapable of figuring out how to make them fit. Body sections were supposed to "snap" together, perfectly aligned. This was one of the only complaints I had about the quality of the STL files and the overall design of the Serenity. I shaved the connectors, reduced their scale and finally achieved some success. Pictured below, the Serenity is finally taking shape.
IMG_1025.jpg
IMG_1027.jpg
 
Printing the upper fuselage went off without a hitch after my Ender 5 printer issues were resolved. I had originally thought about detailing the cockpit but decided against it. A resin printer would probably have done a much better job of capturing the details on this feature.
More testing fitting and more primer was needed at this point.
IMG_1083.jpg
IMG_1459.jpg

The overall length of the Serenity has surpassed 41 inches! This thing is a beast. I did not want to permanently bond the upper fuselage to the main body so I added rare earth magnets which provided a really strong grip. The Serenity's upper fuselage and rear abdomen can be easily removed for possible shipping or relocation in the future. You can also access the batter, remote receiver and LED wiring inside the main body too.
 

Attachments

  • IMG_1523.jpg
    IMG_1523.jpg
    2.1 MB · Views: 130
  • IMG_1046.jpg
    IMG_1046.jpg
    2.2 MB · Views: 197
The solar panels and engine louvers were printed next. The designer provided me with two options on how to configure the rear abdomen. I wanted the louvers mounted in the open position. The solar panels were painted with Vallejo Metallic Blue and Flat Black.
IMG_1464.jpg
IMG_1002.jpg
 
At this point, I decided to add two versions of the shuttle craft- one in the take off position and the other with it's wings fold but clearly visible inside the main body. I downscaled and resliced another Gambody offering, added flat black primer and dusted them with a light coat of steel paint. I embedded a piece of brass tubing in the seam of the wing, and drilled out the flying shuttle. This feature can easily be removed and reinstalled if needed.
IMG_1100.jpg
IMG_1099.jpg
IMG_1536.jpg
 
Final assembly is all but complete and final paint is about 90 percent complete as well. I have seen several versions of the Serenity online including movie/series clips from various sources but have to admit that I took some artistic license on my final choice of paint color. Most examples show the hull with a bare steel finish but I wanted something with more contrast. I applied Vallejo flat black to the entire spacecraft followed by a very light misting (believe it or not) of Vallejo metallic bronze. Some areas were left unpainted due to the aforementioned use of metallic silk PLA. I have also added the louvers to the abdomen in the open position and begun placement of the solar panels. The abdomen and upper fuselage are removable as previously mentioned. Please let me know what you think of the paint scheme.
 

Attachments

  • IMG_1461.jpg
    IMG_1461.jpg
    1.6 MB · Views: 118
  • IMG_1462.jpg
    IMG_1462.jpg
    2 MB · Views: 108
  • IMG_1519.jpg
    IMG_1519.jpg
    2.8 MB · Views: 112
  • IMG_1522.jpg
    IMG_1522.jpg
    3.4 MB · Views: 111
  • IMG_1534.jpg
    IMG_1534.jpg
    2.7 MB · Views: 114
I followed up with lots of dry brushing using Vallejo aluminium and flat black once again. The main engine nacelles will be painted a very light misting of transparent metallic blue and the rear thrusters will be dry brushed with smoke and gunmetal grey. Window panels were added to the cockpit as well.
IMG_1532.jpg
IMG_1531.jpg
IMG_1536.jpg
IMG_1530.jpg
 
WOW AMAZINF STELLAR!!! I have always wanted the Serenity like this for display etc etc. Thanks for sharing all the pics of your project. Tis Shiny Cap'n!!
 

Your message may be considered spam for the following reasons:

If you wish to reply despite these issues, check the box below before replying.
Be aware that malicious compliance may result in more severe penalties.
Back
Top