I finally found a seagull camera, for dnors to the macros' now just how do I dissasemble this thing? A little help please
You are using an out of date browser. It may not display this or other websites correctly.
You should upgrade or use an alternative browser.
You should upgrade or use an alternative browser.
SEagull camer dissasembly
- Thread starter chazzychaz
- Start date
I finally found a seagull camera, for dnors to the macros' now just how do I dissasemble this thing? A little help please
Well, you really only need one tool to do the job:
I seriously destroyed my Seagull, in harvesting the parts I needed for my Macros.
I just brought a seagull too. If you can wait a few days I’d be happy to post how a get on with disassembly. I’ve got some experience with camera repair so I’m fairly confident.
Maybe we can share notes?
I have a Eumig Servomatic and a Bell and Howell 252 already. FYI I’ll likely publicly release files for 3D printing the sun dial based on my own measurements.
I lack the lenses, the view finder hood and EIAJ VTR connector. I don’t think I’m going to be able to buy them unless I get stupid lucky again as I was very surprised I was able to get the seagull, medium format cameras are not common here.
I’d really like to find out the diameter of the lenses if any would care to share that. And dimensions for the hood and transition box. I’m planning to design and 3D print any of the parts I can’t obtain or substitute.
Thank you, Yes I would love to collaberate. I had thought of cutting the body up with a dremel to get the knobs and dial off. I mean I don't need anything else from it. As for the lenses I am using a pair of Japanese lenes from the late seventies. I for get the brand. I will never find a calimar hood either I am using the seagull hood. But will have to toy around with making a transition box for it. I have everything else.I just brought a seagull too. If you can wait a few days I’d be happy to post how a get on with disassembly. I’ve got some experience with camera repair so I’m fairly confident.
Maybe we can share notes?
I have a Eumig Servomatic and a Bell and Howell 252 already. FYI I’ll likely publicly release files for 3D printing the sun dial based on my own measurements.
I lack the lenses, the view finder hood and EIAJ VTR connector. I don’t think I’m going to be able to buy them unless I get stupid lucky again as I was very surprised I was able to get the seagull, medium format cameras are not common here.
I’d really like to find out the diameter of the lenses if any would care to share that. And dimensions for the hood and transition box. I’m planning to design and 3D print any of the parts I can’t obtain or substitute.
This is what I have so far. I know its the wrong eumig, but I'm going with it. I need the slanted part that goes on the front. I am using petri lenses. I'm cheap the lens plate is 3d printed as it the connector for the side. My 3d seagul knobs are pretty darned close. But now that I have the real thing. these will be a back up.
Attachments
Probe Droid
Master Member
First thing is to peel off all the fake coverings on the body and the little center of the focusing knob. Screws are under there. This might help
Go slow.
Go slow.
I've made 3D print files for the sun dial, I will likely release publicly once I've created a modified version to fit the seagull knob.
I just tweaked the taper on the bar to increase the width by 0.4mm, but the visual difference is mostly due to the black filament.
I also have a version without the dial text, which just doesn't print cleanly on an FDM printer, but I suspect will on a resin printer. For the text I used Futura which is a close but not an exact font match. (I will update if anyone wants to hunt down a more exact match)")

I just tweaked the taper on the bar to increase the width by 0.4mm, but the visual difference is mostly due to the black filament.
I also have a version without the dial text, which just doesn't print cleanly on an FDM printer, but I suspect will on a resin printer. For the text I used Futura which is a close but not an exact font match. (I will update if anyone wants to hunt down a more exact match)
Last edited:
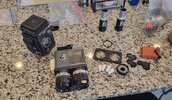
Picked my seagull today, better condition than I expected.
To get the focus knob off:
Starting on the knob side.
undo the two screw on the silver bar at the top and remove, there is a small brass washer underneath.
Peel off the leather, mine was already peeling but some isopropyl or rubbing alcohol will help soften the adhesive. Do this cleanly as you can even if you don’t care much about the camera, it will make finding the screws later easier.
Unscrew the black inner ring on the focus knob, I used a small flat head screw driver in the grooves, try not the scratch the ring or the clear plastic! Remove ring, clear plastic and black ring below.
Use your fingernail or something plastic to pry out the black plate above the zebra stripe disk. It’s glued in but the glue is hopefully so old it gives easy.
Same for the zebra disk and the pink disk below it.
Unscrew the nut in the center of the knob with a flat head screw driver (or forked one if you have it)
There’s a small weird brass bushing underneath should just come out.
Undo the 6 tiny screws on the plate around the knob. Some are hard to find, I missed the one to the top right on my first attempt.
Knob and the plate should now be free and you should be able to slide it down and to the right to separate from the camera.
The little arm can just be pulled off, it’s friction fit.
Unscrew the center of the knob to separate it from the plate. This needs a lens wrench to be done correctly, so you might need to get creative or destructive.
I’ll try add some photos when I get a chance.
I’ve not figured out the spring plungers yet, I’m hoping they screw out … but no luck yet.
woodywaverider
Sr Member
I might me a bit late to the game now
When I took mine apart I’d found a really helpful guild on learn camera repair.com it was free at the time but when I went to grab the link unfortunately they have put it behind a $1 pay wall
This is the new link: Seagull 4 Restoration
It’s possible it may be up on the Facebook group?

When I took mine apart I’d found a really helpful guild on learn camera repair.com it was free at the time but when I went to grab the link unfortunately they have put it behind a $1 pay wall
This is the new link: Seagull 4 Restoration
It’s possible it may be up on the Facebook group?
woodywaverider
Sr Member
It is up on the Facebook group,
 www.facebook.com


Log into Facebook
Log into Facebook to start sharing and connecting with your friends, family, and people you know.
www.facebook.com
woodywaverider
Sr Member
There was a lot of gunk in mine but it came off pretty easy with some light persuasion, I didn’t need to use a lens spaner. If you have a set of manual callipers they would probably work instead.Thanks, I still haven't been able to separated the knob from the plate, looks like to need to fashion myself a lens spanner. I was also not sure if the glue was in the threads or just to secure the scale on top, so that's helpful information.
Thank you, Well now I need to get a lens spanner and another seagull camera, I forgot there are 4 small knobs used.
Mine had a bunch of glue on the threads, no acetone on hand so I resorted to paint stripper (I can’t recommend but it worked) After that I was able to unscrew with my vernier callipers, thanks for that tip woodywaverider
Small warning, have rags or paper towels on hand, I discovered the most wonderful snot green grease inside!
Small warning, have rags or paper towels on hand, I discovered the most wonderful snot green grease inside!
Similar threads
- Replies
- 11
- Views
- 1,230
- Replies
- 0
- Views
- 514
- Replies
- 1
- Views
- 332