You are using an out of date browser. It may not display this or other websites correctly.
You should upgrade or use an alternative browser.
You should upgrade or use an alternative browser.
Love it!
Amazing work!
Aerie
New Member
Slow on update for a while, but work has not been idle.
Some weeks ago I took the 3 different scans I've been able to make. And lined them all up as best I could with each other, as well as my original model I made prior to this. Then used the areas from each that looked accurate and reliable. Deleted everything from my on original model that overlapped and the merged it all together.
I'm very satisfied with the result, the new model is much more accurate than my first model. I'm under no illusion that is perfect, but I think its as accurate as I can make it.

Next up I modeled the mouth area, where there are lots of tiny hole. And this part is not mirrored, so I had to model each of the separately. This make the scene much more complicated, since I wish to keep the rest of the model mirrored for as long as possible. So this area is sort of cut out from the rest.

I also modeled all of the inside. I had previously made a bust of myself. On top of which I then made a paper mache mask that covered my entire head. This one i can easily take on and off, so it a great references for the inside of the helmet. So I scanned that, and make a clean model out of it, I can be pretty certain that the helmet will fit me once I print it.

I also added some rectangular cavities on the inside where I intend to put some foam, so that it fits snug on my head and hopefully will not slide around. I made the inside slightly larger than it needs to be, so I get a little bit of a gap. I'm hoping to get at least a little bit of airflow.
So after this the base model is complete. Next up was all the details. So here I needed to learn some new things. I may be a veteran 3D artist, but I'm new to blender, so time to learn UV mapping again. Pretty straight forward. Once UV mapped I textured it cutting out reference from photos, mostly for the areas in the front where there are patterns.
Traced those patterns. Not that easy since there is a lot of weathering in the helmet, the details are intentionally worn away. So I have to interpret the intent behind the detail, and then add my own damage on top, so the damage is consistent across the helmet.
And here is where things slowed down. What to do with the worn look?
Originally I was actually intending to do the entire armor in a more pristine state. So that all the details would be there, even stuff that is completely worn away on the movie armor. But this started to feel wrong, a completely smooth perfect armor will look odd. Sure Sauron was a master smith, and like beauty, but I want the armor to feel mostly like the one in the movie. So damage it is.
Thing is, whatever type of damage I add to the helmet, is probably going to be what I will also add to the rest of the armor. So its a big decision. That, and the tools of how to do it slowed down things a lot too. Should I do it in Photoshop? no its too limiting in creating the texture? Substance designer? I would prefer to keep down the amount of tools i used to keep the pipeline simpler. So I made a shader in blender, and rendered to texture.
The amount of damage is also a question, the replica helmet is very uneven, with multiple layer sand scale of damage. If I were to do that, then the model would be 20 or 40 million triangles, and it cant really be optimized without removing lots of detail. I would also probably be forced to work in Z-brush to even handle it. And trying to import a 17 million triangle model into the slicer, took 20 minutes, and it often crashed when trying to cut it up. So I'm going to have to limit the amount of detail in the printed model a bit. If I want more detail I will have to add after i print it, which I am considering.
So to test if the patterns will turn out well, i made some test prints, doing different amount of depth. 0.5, 0.7, 1.0, 1.3 mm depth. In the end I went with 1.0 depth.

Becasue the model is so heavy, I use a decimate modifier, which persevere most of the details I want, while going from 17 million triangles to about 1,5 million, much more manageable. I also decided to cut up the model in blender instead of the slicer. The displacement and optimization and cut up was not without flaws though, and i've probably spent a good 20 hours cleaning it up and making it ready for print. So if for whatever reason something is really off, its going to be big setback. The prusa Mk3 has a printbed of 21x25cm. Which is a very tight fit for me. I could of course cut it up more, but i really dont want to.


The helmet will take 8 days to print, baring any failed prints. I guess time will tell.
Some weeks ago I took the 3 different scans I've been able to make. And lined them all up as best I could with each other, as well as my original model I made prior to this. Then used the areas from each that looked accurate and reliable. Deleted everything from my on original model that overlapped and the merged it all together.
I'm very satisfied with the result, the new model is much more accurate than my first model. I'm under no illusion that is perfect, but I think its as accurate as I can make it.
Next up I modeled the mouth area, where there are lots of tiny hole. And this part is not mirrored, so I had to model each of the separately. This make the scene much more complicated, since I wish to keep the rest of the model mirrored for as long as possible. So this area is sort of cut out from the rest.
I also modeled all of the inside. I had previously made a bust of myself. On top of which I then made a paper mache mask that covered my entire head. This one i can easily take on and off, so it a great references for the inside of the helmet. So I scanned that, and make a clean model out of it, I can be pretty certain that the helmet will fit me once I print it.
I also added some rectangular cavities on the inside where I intend to put some foam, so that it fits snug on my head and hopefully will not slide around. I made the inside slightly larger than it needs to be, so I get a little bit of a gap. I'm hoping to get at least a little bit of airflow.
So after this the base model is complete. Next up was all the details. So here I needed to learn some new things. I may be a veteran 3D artist, but I'm new to blender, so time to learn UV mapping again. Pretty straight forward. Once UV mapped I textured it cutting out reference from photos, mostly for the areas in the front where there are patterns.
Traced those patterns. Not that easy since there is a lot of weathering in the helmet, the details are intentionally worn away. So I have to interpret the intent behind the detail, and then add my own damage on top, so the damage is consistent across the helmet.
And here is where things slowed down. What to do with the worn look?
Originally I was actually intending to do the entire armor in a more pristine state. So that all the details would be there, even stuff that is completely worn away on the movie armor. But this started to feel wrong, a completely smooth perfect armor will look odd. Sure Sauron was a master smith, and like beauty, but I want the armor to feel mostly like the one in the movie. So damage it is.
Thing is, whatever type of damage I add to the helmet, is probably going to be what I will also add to the rest of the armor. So its a big decision. That, and the tools of how to do it slowed down things a lot too. Should I do it in Photoshop? no its too limiting in creating the texture? Substance designer? I would prefer to keep down the amount of tools i used to keep the pipeline simpler. So I made a shader in blender, and rendered to texture.
The amount of damage is also a question, the replica helmet is very uneven, with multiple layer sand scale of damage. If I were to do that, then the model would be 20 or 40 million triangles, and it cant really be optimized without removing lots of detail. I would also probably be forced to work in Z-brush to even handle it. And trying to import a 17 million triangle model into the slicer, took 20 minutes, and it often crashed when trying to cut it up. So I'm going to have to limit the amount of detail in the printed model a bit. If I want more detail I will have to add after i print it, which I am considering.
So to test if the patterns will turn out well, i made some test prints, doing different amount of depth. 0.5, 0.7, 1.0, 1.3 mm depth. In the end I went with 1.0 depth.
Becasue the model is so heavy, I use a decimate modifier, which persevere most of the details I want, while going from 17 million triangles to about 1,5 million, much more manageable. I also decided to cut up the model in blender instead of the slicer. The displacement and optimization and cut up was not without flaws though, and i've probably spent a good 20 hours cleaning it up and making it ready for print. So if for whatever reason something is really off, its going to be big setback. The prusa Mk3 has a printbed of 21x25cm. Which is a very tight fit for me. I could of course cut it up more, but i really dont want to.
The helmet will take 8 days to print, baring any failed prints. I guess time will tell.
George
Master Member
Please don't be discouraged by these small setbacks ! The project is already perfect so far and it's a great concept to craft.Personally I can't wait to see more.
Being a perfectionist can be hard from time to time, but it does enable you to make art that leaves an impression.
Compromise where you have to, and where you can't : don't.I heard that quote in a movie once and it made good sense to me.For your consideration.Good luck and keep it up !
Being a perfectionist can be hard from time to time, but it does enable you to make art that leaves an impression.
Compromise where you have to, and where you can't : don't.I heard that quote in a movie once and it made good sense to me.For your consideration.Good luck and keep it up !
N2darkness
Sr Member
Amazing amount of work. One suggestion about weathering, it would much easier to do it on the entire piece after it is assembled and all the clean up of the print it done. I'm afraid some of you hard work modelling it in will be covered up with the sanding and blending of the seams, and print layer lines or even filler primer. So model everything pristine and weather afterwards with a rotary tool.
Also, the Weta helmet does not have the additional holes near the nose. Maybe a United Cutlery thing since it can be wearable.


Also, the Weta helmet does not have the additional holes near the nose. Maybe a United Cutlery thing since it can be wearable.
Last edited:
Aerie
New Member
Please don't be discouraged by these small setbacks ! The project is already perfect so far and it's a great concept to craft.Personally I can't wait to see more.
Being a perfectionist can be hard from time to time, but it does enable you to make art that leaves an impression.
Compromise where you have to, and where you can't : don't.I heard that quote in a movie once and it made good sense to me.For your consideration.Good luck and keep it up !
No setbacks yet.. so far either it will turn out amazing or it will be a big thing. Then I'll just have to sit down.. take a few deep breaths and lift that heavy rock. I've spend so many hundreds of hours on this that I am going to finish this, even if its a couple of hundred hours left.
That said, I think I have passed an important milestone with the project now that I have started printing. And things will be smoother from here on. So far so good.
All around good tips, thanks you!
Amazing amount of work. One suggestion about weathering, it would much easier to do it on the entire piece after it is assembled and all the clean up of the print it done. I'm afraid some of you hard work modelling it in will be covered up with the sanding and blending of the seams, and print layer lines or even filler primer. So model everything pristine and weather afterwards with a rotary tool.
Also, the Weta helmet does not have the additional holes near the nose. Maybe a United Cutlery thing since it can be wearable.
View attachment 1321876View attachment 1321877
Yeah, once all the pieces are printed glued together, I'll fill in the seams, then there is going to be several layers of filler primer, and that will remove a lot of the weathering for sure. But I made the impression slightly deeper to compensate, so they should still cause some interruptions to the smooth surface. And going forward it will be pretty easy to add to all of them.
As for the additional holes near the nose, if you mean the tiny holes near mouth... they are indeed not to be seen in the first image. But I believe i see them in the second. As well as some other images that Im pretty sure is the real helmet.
It might be that they are present in the resin helmet, but not in the metal helmet. This is actually a bit of a problem, there are 2 different versions, and they are not the same in many ways, so which one is the real one?

I believe these images are all of the real armor.
N2darkness
Sr Member
Honestly, you could go either way and you would still be fine and will look amazing. Since you have already gone through the trouble of modeling them, keep them unless clean up becomes a major pain.Yeah, once all the pieces are printed glued together, I'll fill in the seams, then there is going to be several layers of filler primer, and that will remove a lot of the weathering for sure. But I made the impression slightly deeper to compensate, so they should still cause some interruptions to the smooth surface. And going forward it will be pretty easy to add to all of them.
As for the additional holes near the nose, if you mean the tiny holes near mouth... they are indeed not to be seen in the first image. But I believe i see them in the second. As well as some other images that Im pretty sure is the real helmet.
It might be that they are present in the resin helmet, but not in the metal helmet. This is actually a bit of a problem, there are 2 different versions, and they are not the same in many ways, so which one is the real one?
Aerie
New Member
Indeed, I'm pretty committed to the one with the holes (lets call this the resin version from now on). And there are way more reference for the resin version. Which is the one i think they have used the most during filming. My theory is they created the metal one first then realized it weighed way too much to act in, then created the resin one from this. If the created a metal one just to get a good thing to cast from, and to get it "right", they went through an awful lot of work just to get something to cast from.
Last edited:
Aerie
New Member
Finally back working on the project. After getting of to a great start with a great print on the first try, the project hit a brick wall when the printer started acting up.
So what happened was, the helmet was all ready to print, 4 major parts for the helmet, left right, and upper lower, and some smaller pieces for the spikes. The lower parts take about 37 hours, and the top art 58 hours. So i print out the lower part for the left side, comes out perfect on the first try.
Put on a the next print, come back some time later, the printer has just stopped, seems to have printed for about 6 hours. I believe it had an error on the display which i had never encountered before, so I try again. This time, it only makes it about 2 hours. Same error, MINTEMP BED error. ok, google it try to check the various tips, nothing seems to be wrong. Try again, this time it makes it about 10 hours, but ultimately the same problem.
After this I print some other stuff for a friend, 2 hour prints, 10 of them, all turn out fine. After this i try again, but alas, fails twice in rapid succession, making only about an hour. So, for whatever reasons, the temperature sensor gets a faulty reading which causes the printer to stop the print, with no possibility to recover. So, it seems i will have to get some new parts, most likely a bed thermistor.
Which really sucked, id worked really hard recently to get the parts ready to print, the first major parts of the armor. First part is out really picking up velocity on the project, then BAM, brick wall!

So I get around to ordering parts, next wall, payment does not work. Try again later again, no better lock, payment fails. So I talk to my bank some time later, and they basically say, Yeah, they don't meet our security standard so you cant use your credit card with them. So I have to use a direct wire transfer, then waiting (there was also extra waiting because Covid causes delay and shortages). Then more waiting for shipping.
But eventually I got the parts. Followed the guide for replacing the part. Really good documentation. Was a lot simpler than I had expected. Do a test print and it works fine. Can only hope that its reliable, since even 99.99% reliability is not good enough. With 40 hour prints, if there problem is not fixed, its bound to happen again with many of these prints coming up. Time will tell.
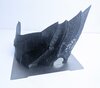
So far though, ive completed a 37 hour print and a 58 hour print without issue, the last major part is on its way, then just the spike part. Feels great to be back on track. Also, the helmet fits, Its a very tight fit, but I will work.

So what happened was, the helmet was all ready to print, 4 major parts for the helmet, left right, and upper lower, and some smaller pieces for the spikes. The lower parts take about 37 hours, and the top art 58 hours. So i print out the lower part for the left side, comes out perfect on the first try.
Put on a the next print, come back some time later, the printer has just stopped, seems to have printed for about 6 hours. I believe it had an error on the display which i had never encountered before, so I try again. This time, it only makes it about 2 hours. Same error, MINTEMP BED error. ok, google it try to check the various tips, nothing seems to be wrong. Try again, this time it makes it about 10 hours, but ultimately the same problem.
After this I print some other stuff for a friend, 2 hour prints, 10 of them, all turn out fine. After this i try again, but alas, fails twice in rapid succession, making only about an hour. So, for whatever reasons, the temperature sensor gets a faulty reading which causes the printer to stop the print, with no possibility to recover. So, it seems i will have to get some new parts, most likely a bed thermistor.
Which really sucked, id worked really hard recently to get the parts ready to print, the first major parts of the armor. First part is out really picking up velocity on the project, then BAM, brick wall!
So I get around to ordering parts, next wall, payment does not work. Try again later again, no better lock, payment fails. So I talk to my bank some time later, and they basically say, Yeah, they don't meet our security standard so you cant use your credit card with them. So I have to use a direct wire transfer, then waiting (there was also extra waiting because Covid causes delay and shortages). Then more waiting for shipping.
But eventually I got the parts. Followed the guide for replacing the part. Really good documentation. Was a lot simpler than I had expected. Do a test print and it works fine. Can only hope that its reliable, since even 99.99% reliability is not good enough. With 40 hour prints, if there problem is not fixed, its bound to happen again with many of these prints coming up. Time will tell.
So far though, ive completed a 37 hour print and a 58 hour print without issue, the last major part is on its way, then just the spike part. Feels great to be back on track. Also, the helmet fits, Its a very tight fit, but I will work.
presleysprops
New Member
wow, i love it!! would you be willing to 3d print the helmet for me?")
GealicWolf
New Member
Waiting with baited breath for an update....this project is AWESOME!
Dr Jones Sr
Sr Member
Oh wow that helmet is amazing!
SofkorForge
New Member
this is amazing work, ive been looking everywhere for an accurate stl file of the mace to print, would you consider selling the files for this?Mace prototype fully printed. Really happy with it.
Size is very appropriate, might do some minor adjustments for the final one, but for now I'm going to let it sink in a bit and probably do most of the rest of the armor before i print that.
View attachment 1303807View attachment 1303808
Similar threads
- Replies
- 0
- Views
- 166