Aerie
New Member
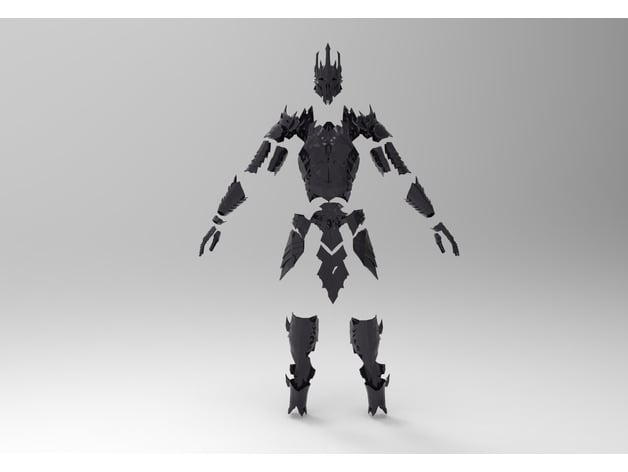
So, I've decided to try to make a full body armor of Sauron.
The entire armor will be 3D printed. With this I will be able to iterate on the design a lot, until it's as good as I can make it. It also enables me to put in incredible amount of detail and precision into it. The idea is it will not just be the general shapes, but will include all the detailed patterns which covers large portions of the armor.

Sauron's armor is pretty weathered, I'm considering making mine slightly more pristine. As if it was closer to being newly forged.
The entire armor will obviously take a lot of time to print, but, I can do things in parallel. I can print a part while im working on the next one.
Given the limited amount of time he is even visible on screen there is not a lot to go on. Even photos of the armor from exhibits are surprisingly few. And there is only so much visible in the extra material footage.
Another challenge is making the armor fit my actual body, It obviously it has to be big enough that I can get it on, but not so big that is slides around, so the precision has to be quite precis. Will likely need to print many parts several times for a perfect fit. But I want to keep this down as much as possible, feel bad about wasting plastic.
So, I've already finished the first pass of the entire armor, so I could essentially start printing if I wanted to. But I want to achieve as high accuracy as possible. So this is where you come in. I would be very much appreciate ANY FEEDBACK anyone might have as to any inaccuracies the armor has, or even more so, if anyone has any photos of the actual armor. I believe it has been shown on various exhibits throughout the years. If anyone has any photos, please post some.
I know of 2 pieces that are missing here. There is a elbow guard and a piece in the inside of the knee, not sure I will include those.


Some of the best references I've found are the large status that exists and from what I can tell, and they are pretty accurate, I have found only a few errors, but it gives you a lot of indication of what it looks like from many angles.
I've done a whole bunch of print for the gauntlets. Getting the fingers to move just right is a real challenge, but i think I have it mostly figured out. The fingers are easily some of the most challenging parts, since the margins are so thin.
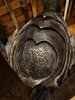
Beyond just using photos, I have used photo scanning whenever I can. For the helmet, I've actually been able to do this from Youtube videos, with varying results. I can't get the entire helmet, and, they are hardly smooth but it still helps to improve the accuracy. I trust that United cutlery has got the basic shapes very accurate with better access to the source material. Here are the result of 2 different scans. I believe it's 2 different version of the helmet.

Since the first pass on the entire armor is done.
Next up:
* Hope for helpful feedback
* Photo scanning and measuring myself to try to make sure it the armors will actually fit nicely on my body.
* Vectorizing pattern for the textures to be used on the armor.
* Modelling the entire inside of the armor
* Test printing thing to make sure joints and mechanics work.
* Cutting up the model various places, adding hinges and figuring out places where i can put leather straps etc so you can actually get into the armor.
* UV mapping all the armor
* Model the mace. (im not worried about this, its almost is own side project and can be finished quickly, since its so well documented.
Again, If anyone has photos from exhibits or other occasion where the actual armor has been on display this would be very useful. Especially the patterns that will be on the armor.
The entire armor will be 3D printed. With this I will be able to iterate on the design a lot, until it's as good as I can make it. It also enables me to put in incredible amount of detail and precision into it. The idea is it will not just be the general shapes, but will include all the detailed patterns which covers large portions of the armor.
Sauron's armor is pretty weathered, I'm considering making mine slightly more pristine. As if it was closer to being newly forged.
The entire armor will obviously take a lot of time to print, but, I can do things in parallel. I can print a part while im working on the next one.
Given the limited amount of time he is even visible on screen there is not a lot to go on. Even photos of the armor from exhibits are surprisingly few. And there is only so much visible in the extra material footage.
Another challenge is making the armor fit my actual body, It obviously it has to be big enough that I can get it on, but not so big that is slides around, so the precision has to be quite precis. Will likely need to print many parts several times for a perfect fit. But I want to keep this down as much as possible, feel bad about wasting plastic.
So, I've already finished the first pass of the entire armor, so I could essentially start printing if I wanted to. But I want to achieve as high accuracy as possible. So this is where you come in. I would be very much appreciate ANY FEEDBACK anyone might have as to any inaccuracies the armor has, or even more so, if anyone has any photos of the actual armor. I believe it has been shown on various exhibits throughout the years. If anyone has any photos, please post some.
I know of 2 pieces that are missing here. There is a elbow guard and a piece in the inside of the knee, not sure I will include those.
Some of the best references I've found are the large status that exists and from what I can tell, and they are pretty accurate, I have found only a few errors, but it gives you a lot of indication of what it looks like from many angles.
I've done a whole bunch of print for the gauntlets. Getting the fingers to move just right is a real challenge, but i think I have it mostly figured out. The fingers are easily some of the most challenging parts, since the margins are so thin.
Beyond just using photos, I have used photo scanning whenever I can. For the helmet, I've actually been able to do this from Youtube videos, with varying results. I can't get the entire helmet, and, they are hardly smooth but it still helps to improve the accuracy. I trust that United cutlery has got the basic shapes very accurate with better access to the source material. Here are the result of 2 different scans. I believe it's 2 different version of the helmet.
Since the first pass on the entire armor is done.
Next up:
* Hope for helpful feedback
* Photo scanning and measuring myself to try to make sure it the armors will actually fit nicely on my body.
* Vectorizing pattern for the textures to be used on the armor.
* Modelling the entire inside of the armor
* Test printing thing to make sure joints and mechanics work.
* Cutting up the model various places, adding hinges and figuring out places where i can put leather straps etc so you can actually get into the armor.
* UV mapping all the armor
* Model the mace. (im not worried about this, its almost is own side project and can be finished quickly, since its so well documented.
Again, If anyone has photos from exhibits or other occasion where the actual armor has been on display this would be very useful. Especially the patterns that will be on the armor.


")