I was fortunate to get one of Markus's Hoth binocular kits from Germany! I wanted to build them as Sandtrooper Binocs. The pieces from ObiWan72 are brilliant with little prep needed. After a soapy bath I used lacquer based sandable black primer on all the parts so when they were distressed the base would be black like on screen. I've been slowly working on these for the last few weeks. Here's the kit and a few progress pics -

The mail was good this day!

Primer


Light filler was all that was needed - it's a beautiful kit!

After running the main body and "lid" on the table sander, I installed the threaded inserts supplied in the kit

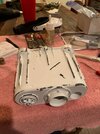
White, White, and more white


I painted the front recess black before adding the "peace" sign and "star" piece

Started on the red detail on the front lens ring

So here's where I'm at for the weekend - main body is just about done, weathered, and grey & red details painted


I'm going to make this piece up in metal and use a vintage PL-259 connector outer

Lens plate is filled, primed, holes are drilled, and it's drying. I'll shoot it with another few coats of white paint. In a few of the first photos there's shots of the vintage leather strap it will get. I'd like to put a similar slide inside these like I used for my Luke Macros. There wasn't any screen shot of a Sandtrooper looking through the binocs from his viewpoint, but I'll take the shot from the Hoth binocs, use the animation around the scene, and add a cool Tatooine pic, maybe of the droids with the skeleton of the great dragon? We'll see! I need to go to the electronics store and see if I can find a rotary switch that will work with the V8 engine camshaft
The mail was good this day!
Primer
Light filler was all that was needed - it's a beautiful kit!
After running the main body and "lid" on the table sander, I installed the threaded inserts supplied in the kit
White, White, and more white
I painted the front recess black before adding the "peace" sign and "star" piece
Started on the red detail on the front lens ring
So here's where I'm at for the weekend - main body is just about done, weathered, and grey & red details painted
I'm going to make this piece up in metal and use a vintage PL-259 connector outer
Lens plate is filled, primed, holes are drilled, and it's drying. I'll shoot it with another few coats of white paint. In a few of the first photos there's shots of the vintage leather strap it will get. I'd like to put a similar slide inside these like I used for my Luke Macros. There wasn't any screen shot of a Sandtrooper looking through the binocs from his viewpoint, but I'll take the shot from the Hoth binocs, use the animation around the scene, and add a cool Tatooine pic, maybe of the droids with the skeleton of the great dragon? We'll see! I need to go to the electronics store and see if I can find a rotary switch that will work with the V8 engine camshaft
Attachments
Last edited:
