Salzo V4 X-Wing Build – Landing Gear Version

Avanaut

Well-Known Member
I think this could be on the other side as well, after all I am building a studioscale Salzo V4 pretty much oob. There are some changes, however, and I'm not building it to exactly represent a pre-existing model to the last detail. Maybe I'm too strict with this, you tell me.

Anyway, I started a while ago, I think I was #1 on Mike Salzo's order list and I got mine weeks ago. This is my first X-wing build and it takes time to get to knowing the kit. First, I was blown away by the size of it, it's huge! And heavy! It took me days just to look at it. :D

Some work has been done by now, wings, cannons and the Saturn engine cans are in place, all aligned and attached to the lower hull. I'll go through the build as I get more done. At this point I'd like to start with the landing gear, from the ground up, so to speak.

The gear that came with the kit are simple and generic, to my eye they look a bit thick and are perhaps a little too tall. There were also parts I did not know what to do with. In the end, I wanted something that would look more like the full scale mock-up from episodes IV and V.

I used the landing gear pads that came with the kit, they are excellent, the rest of the arrangement is replaced with brass piping and styrene bits. I did not follow the exact pattern of the full size X-wing, I went after a general feel, eyeballing it, not anything dashingly accurate. For example, I did not dare to make the "ankle" as thin as it actually should be. I feared it would budge under the weight of the model.

The height is still adjustable and will change to a bit taller than it is in the photo.

Landing-Gear-Front-Brass.jpg

Next: the rear landing gear and some hydraulic piping along the gear shafts.
 
Last edited:
Thanks! There is still a lot of work to do and I initially thought I wouldn't add to it by posting a thread, but I couldn't help it. :D I still may leave the obvious out and post more about the little changes and additions to the model.

Very clean work. Are you going to paint those parts or leave them raw metal?
It'll all be painted in the end, painted and weathered.

Amazing details here. Those are some nice clean cuts on the brass piping.
Someone here mentioned earlier that mini pipe cutters exist and are great help with the small pipes. I googled it and found one on eBay for € 3,55. Cutting pipe with that is indeed easy, it leaves the cut a bit rough but a gentle touch with a file makes it clean in a jiffy.
 
Someone here mentioned earlier that mini pipe cutters exist and are great help with the small pipes. I googled it and found one on eBay for € 3,55. Cutting pipe with that is indeed easy, it leaves the cut a bit rough but a gentle touch with a file makes it clean in a jiffy.

I bought a mini pipe cutter a while back, I think I paid $6 USD. I use an old exacto blade to clean up the rough edge. I set the blade so it scrapes the inside edge and spin the tube around a couple times.
 
I bought a mini pipe cutter a while back, I think I paid $6 USD. I use an old exacto blade to clean up the rough edge. I set the blade so it scrapes the inside edge and spin the tube around a couple times.
I use a small round needle file for cleaning the inside edges. Gotta try Exacto for the job, it's probably faster.
 
She's standing on her own feet now. The rear landing gear struts are in place, I still need to make the support structure on the landing pad to hide the ends of the cut pipes. The pipes should end in a link joint but I'll make this simpler and just cover the area with sheet styrene bits. It's not far off from the full size X-wing anyway.

The landing gear well is the thing that always bugged me with the X-wing. The big cavity takes all the room from the engine and, as such, doesn't make sense. This is the part I took most liberties with, I added some plumbing to the wells to fill them up just a bit. As an amusing little detail I added two 8rad parts to each end of the well. It's the same part that is used on the buttplate. In the wells the parts are not easy to spot but it makes the wells a bit busier.

Rear-Gear-Brass.jpg

I was planning to adding hydraulic hoses à la fighter jet to the gear struts to add some depth to the details. I know the new X-wing from the upcoming The Force Awakens has all kinds of interesting piping on it's landing gear but the classic design has very clean struts. I left them out as well.


Attachments

  • jj-abrams-x-wing.jpg
    jj-abrams-x-wing.jpg
    528 KB · Views: 614
Last edited:
I am building this thing pretty fast, faster than my Y-wing, and waaaay more simpler, I am not researching every damn piece ten times over. :D

Still, a model occasionally benefits from some bells and whistles: enter the electronics. I am inserting a few leds here and there and run some fiber optics to the cockpit. All electrics will be behind four switches which are concealed under the droid strip. The droid strip will be detachable by magnets and underneath it there will also be access to the power source, a 9 volt battery. There will be three separate connection points on the hull for external power source as well, this is in case the model will some day be displayed and the lighting will have to be switched on/off externally.

The landing gear version of the Salzo V4 X-wing has no support rod between the wings, so there is plenty of room to do all kinds of things. First, in order to make sure the wings are straight and will stay that way during and after construction, I made a support box between them from sheet styrene. Inside the box it was easy to make space for the battery, the switches fit in nicely as well.

It's a bit messy with the wires, though, I haven't soldered the resistors on yet and I made the wires go an extra loop under the cockpit to solder them on later. Plenty of room for that, though, this is not a problem at all.

Switchbox2.jpg
 
Your landing gear looks awesome, i know the gear that comes with the kit is a bit thick, but i wanted to get that 3/16 brass in the resin for support of something this heavy. Looks like anyone who can make the gear as good as you with metal can really enhance the kit. Great work.
mike
 
Your landing gear looks awesome, i know the gear that comes with the kit is a bit thick, but i wanted to get that 3/16 brass in the resin for support of something this heavy. Looks like anyone who can make the gear as good as you with metal can really enhance the kit. Great work.
mike
A comment from the maker is an honor, thanks Mike! I gotta say this is a marvelous kit!

The landing gear is easy to update if you have access to brass pipes, I am lucky to live quite near to a hobby shop that has a wide variety of this stuff. I did not need to do much more than to dress the base supporting rod up a bit, it is really sturdy as it is and bears the weight of the model well.

I didn't have very good reference of the landing gear at hand and I just made some of it up as I built it. This led to rebuilding some of the rear struts after realizing that the angle of the supporting strut was off a little too much, it was also way too thick. It. I took it out and rebuilt it. Still too thick but much better now.

Some work remains to be done with the connecting supports on the pad, it is light on details and perhaps some size issues need to be resolved. Also, there is a chip on the pad that needs to be fixed.

Rear-Gear-Fix.jpg
 
The cocpit of this the X-wing is tricky. The sidewalls are thick and inner details of the canopy are not very precise. It is perfect for a pyro model, which this is, nothing to it, but I need something a bit sharper. So, instead of trying to carve and build on the existing canopy, I cut it off entirely and made a new one from styrene. It's crisper on the inside and once it's made separately, I can make it open by adding some sort of hinges to it later on.

The rear pylons of the canopy piece are too thick for now, I know, making them thinner worries me because I fear the structure is too fragile and might break if I work on them more.

The cockpit tub itself turned out to be too narrow after I'd cleaned the hull from the remains of the old canopy. It just didn't fit well anymore. So, I am constructing a new one. The cockpit doesn't have to be super accurate, but I'd like the top of the dashboard to look nice. With styrene sheet construction and some optic wire I think I can get it to pass as decent.

Shamelessly, I used references from Moska's incredible X-wing project, but I'm not going to go for anything as accurate as he has. It's not that I wouldn't want to, it's because detailing on Moska's level is something I am not able to do.

My approach to the cockpit is perhaps a little unorthodox as I am building the front directly on the hull for best possible fit and the rear part separately for easier painting & detailing.

Cockpit-First.jpg
 
Beautiful!! This will be a perfect guide for me when I get my V4. Though I don't think I'll have the fortitude to scratch a cockpit together. Nice!
 
The X-wing cockpit proved to be a bit more demanding than I'd thought. Not really surprising. The front end went together relatively easy but I ended up building five different versions of the rear. I'm still not sure if I got it right. Well, right enough, that is, I'm not going for anything too accurate but the overall feel and volumes must be about right.


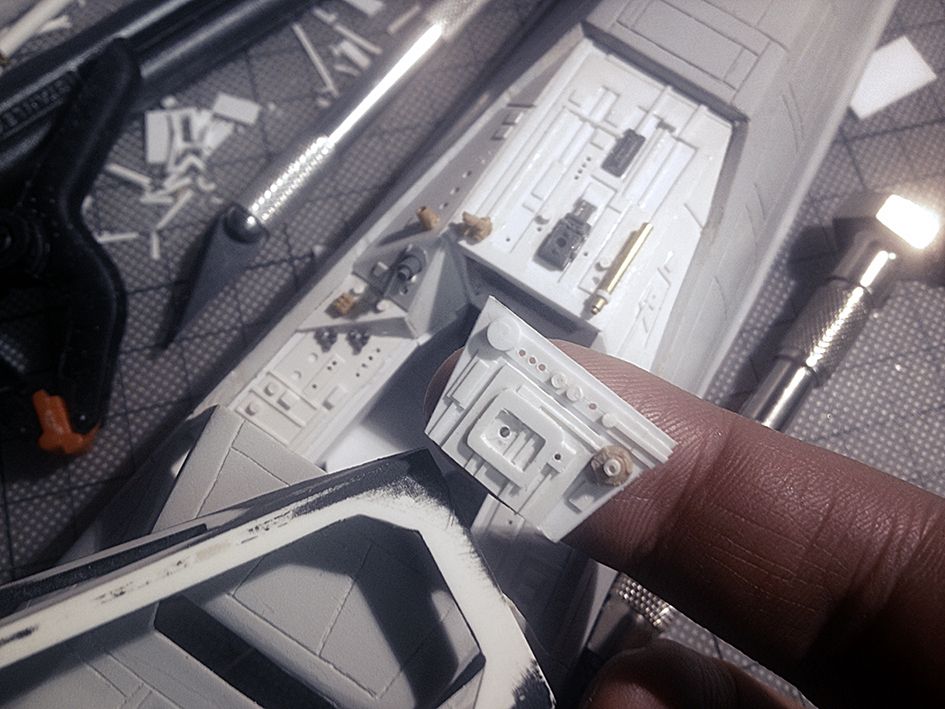
In the picture the front and the still separate dashboard element. I took reference from Moska's incredible thread (and everything else I found online) but I did not go as far as he did. I am still considering redoing the dashboard because this is from The Empire Strikes Back and I'm thinking more the first appearence on screen. Then again, with the canopy on, this is barely distinguishable.

Maybe I'll just shoot primer on it and move on.

By the way, I've been thinking whether there are any tricks I should know of when joining the top and bottom of the fuselage. The way I see it, adding to the gluing surface area might be a good thing as the edges of the fuselage pieces feel a bit narrow. Any tips?
 
I dont know if the size of the gluing surfaces is different on the V4 but on the V3 it was unnecessary to add more material, do you have a pic ?

Great job on the landing gears and cockpit !
 
COOL mods! I love the brass work!

Thank you! I am glad you like the brass, I hope I can do it justice when painting it.

I dont know if the size of the gluing surfaces is different on the V4 but on the V3 it was unnecessary to add more material, do you have a pic ?

Great job on the landing gears and cockpit !

Thank you for the kind comment Julien. I am on a steep learning curve with this and the brass was a success. So far so good. I do not have pics of the fuselage at hand. It just occurred to me that the contact is a bit slim and everybody else knows that it gets better by adding more surface or something. I don't know, just thinking out loud, I guess. :D

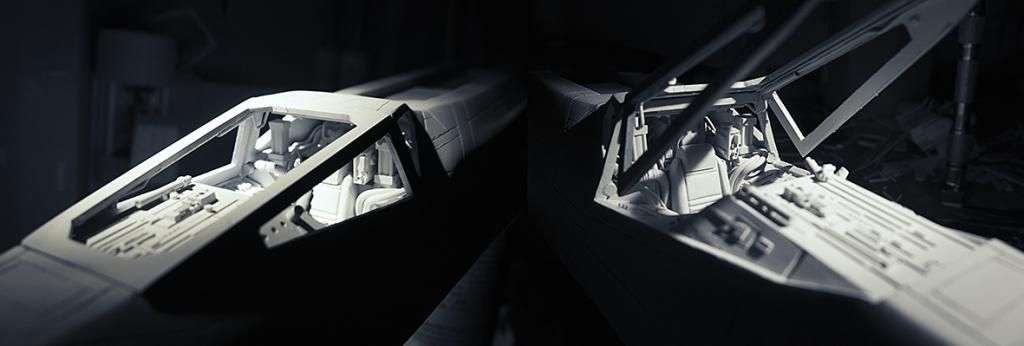
Anyway, I gotta rush forward with this and I shot primer on the cockpit to see if it's done. Pretty close. Some tidying here and there but it's close to where I want it to be. Before painting, of course, that'll be pretty unnerving. I'll paint first and install optic fiber afterwards to get clean ends for the threads.


As I said in my earlier post, I built that damn rear piece (rear wall with seat) five times before getting it this close to what is acceptable. The canopy pumps, or whatever those are behind the seat, are functional, hence the big-ish size, but I could not get them to align properly with the canopy, so they will remain non functional. Some optic fibers will go up there in the back too.

The seat is from a very old 1/24 Pontiac Trans Am I had around, I shaped the headrest a bit closer to the full size prop seat. It's not exactly like it but it'll do.

The canopy can be opened and closed. It stays put with a magnet on the front edge and when opened, it'll stay up on brass hinges. Now, I know you can not build hinges like that exactly. Having the axle of the pivoting hinge element below roof surface leads to the roof frame edge to obstruct the movement of the canopy. So, I have a cheat on it, the canopy slides up and down on the hinges and is thus able to move. Simple and effective.

Oh, and there will be glass windows on the cockpit. I am still figuring out whether to install the lips to the window openings and place the glass there, or simply just glue them on the inside of frames.
 
Sheess! I'm having problems with primer. I was going to use black Vallejo primer with Humbrol enamels on top for the fuselage and wings (I'm old school, I did Humbrol as a kid, I do Humbrol now), but the damn primer does not bite to the resin. It comes off from the lightest touch even if the resin has been washed with dish washer detergent and alcohol and it has left to dry for days. I've made some tests on resin pieces after running into the problem with the grey base for the cockpit, thinner layers, shot from various distances, etc. That stuff is horrible with an airbrush (Paasche V1 with new needle and nozzle). How can a paint stick to the model if there's a layer of non-sticking primer inbetween?

I know this is an issue that has been discussed here from time to time, I probably should try Testors or Tamiya or something, but at the moment I am seriously considering going commando and shooting a black Humbrol enamel basecoat directly on to the resin and just build on that.

Do enamels need primer anyway?
 
I've mentioned this in a few other threads, but should repeat it here, I do not use mold release so washing the parts with detergent is not really needed. This goes for any of my kits. I never clean any of my own parts (ones that i have cast) and ever had an issue with primer sticking. I usually have a fear that using soap on parts with no mold release actually makes things worse because your depositing soap on the surface, sounds like you had that covered with the alcohol but still the above is worth mentioning for others.

I use Rustoluem auto primer and have never had an issue with adhesion on my own parts. Do light coats just so you don't wipe out details. Heating the can a bit in the winter helps with this primer because it has a lot of "fill" and the heat helps to thin it out a bit.
 
This thread is more than 8 years old.

Your message may be considered spam for the following reasons:

  1. This thread hasn't been active in some time. A new post in this thread might not contribute constructively to this discussion after so long.
If you wish to reply despite these issues, check the box below before replying.
Be aware that malicious compliance may result in more severe penalties.
Back
Top