Salzo V4 X-Wing Build – Landing Gear Version

I've mentioned this in a few other threads, but should repeat it here, I do not use mold release so washing the parts with detergent is not really needed. This goes for any of my kits. I never clean any of my own parts (ones that i have cast) and ever had an issue with primer sticking. I usually have a fear that using soap on parts with no mold release actually makes things worse because your depositing soap on the surface, sounds like you had that covered with the alcohol but still the above is worth mentioning for others.

I use Rustoluem auto primer and have never had an issue with adhesion on my own parts. Do light coats just so you don't wipe out details. Heating the can a bit in the winter helps with this primer because it has a lot of "fill" and the heat helps to thin it out a bit.
Thank you Mike. I should've mentioned that the Vallejo primer acts the same on styrene as well, it's not just the resin. It may act as it's supposed to, it just feels weird because I'm not used to working with acrylics, I was expecting a far better adhesion and I really don't like the way it acts with my airbrush. I will check if I can find Rustoleum primer from here.
 
New to the thread, found it while searching for landing gear references of my own, and just wanted to say awesome work! I'd previously seen the resin kit that you were using, and while it's got some great detail it wasn't very accurate to the film. You've done an awesome job with it!

Incidentally, in regards to this:

The landing gear well is the thing that always bugged me with the X-wing. The big cavity takes all the room from the engine and, as such, doesn't make sense.

I've done a lot of study of my own both out of general interest in the X-wing (aside from the 1701-A, my favorite movie spacecraft), and for 3D model work, and based on the dimensions of the cowling and engine, I don't think the engine actually occupies the full cowling. In fact it looks to be close to half the diameter of the cowling. I've been trying to come up with a workable blueprint for the X-wing's internal components, and my personal theory (partially based on Joe Johnston's productions sketches) moves the hyperdrive to the upper engine cowling, and the "power converter" tube the old West End Games and derivative materials show running along the "spine" of the engines is a specific component of the hyperdrive system (not unprecedented, some sources put parts of the hyperdrive in the engine cowlings). The lower engines use the same space for the landing gear bays. So, that actually solves that problem quite neatly: Engines only occupy the inner half of each cowl, with the hyperdrives in the upper cowl and landing gear in the lower.

ANYway, like I said, great work.

Also, do you by chance have some other good references of the landing gear? I've been going crazy trying to find anything that shows them clearly.
 
Thank you Ambaryerno! Welcome aboard.

I have seen really nice landing gear reference images even here in the RPF, if I remember correctly, but I didn't find them as I was looking for references for this project. I recall an image where you could see the front gear in great detail with the gear well lights on and all. It was from the Hoth hangar set. Didn't find it. I got close enough to move forward, however, and I'm happy with how the gear struts turned out.

If I run into better reference, I'll post it here. I still need to nail the paint job on those.

The engine cowls are indeed somewhat odd with how they accomodate the landing gear, but like you said, it can be explained to a reasonable degree. I just figured too much free space would remain and filled it a bit with the piping. The cowl covers will obscure most of it but I'm counting on just seeing a hint that there's something in there, more than one would expect.

As for the accuracy of the Salzo V4 kit, I am no expert by all means, but to me it looks great. Except for the landing gear struts, of course, but they were not intended to be accurate to begin with, just something that works well enough to look nice.

New to the thread, found it while searching for landing gear references of my own, and just wanted to say awesome work! I'd previously seen the resin kit that you were using, and while it's got some great detail it wasn't very accurate to the film. You've done an awesome job with it!

Incidentally, in regards to this:


I've done a lot of study of my own both out of general interest in the X-wing (aside from the 1701-A, my favorite movie spacecraft), and for 3D model work, and based on the dimensions of the cowling and engine, I don't think the engine actually occupies the full cowling. In fact it looks to be close to half the diameter of the cowling. I've been trying to come up with a workable blueprint for the X-wing's internal components, and my personal theory (partially based on Joe Johnston's productions sketches) moves the hyperdrive to the upper engine cowling, and the "power converter" tube the old West End Games and derivative materials show running along the "spine" of the engines is a specific component of the hyperdrive system (not unprecedented, some sources put parts of the hyperdrive in the engine cowlings). The lower engines use the same space for the landing gear bays. So, that actually solves that problem quite neatly: Engines only occupy the inner half of each cowl, with the hyperdrives in the upper cowl and landing gear in the lower.

ANYway, like I said, great work.

Also, do you by chance have some other good references of the landing gear? I've been going crazy trying to find anything that shows them clearly.
 
Here is my only landing gear reference photo. I've never looked out for the landing gear photos.

fullscale.jpg
 
Here is my only landing gear reference photo. I've never looked out for the landing gear photos.

View attachment 435381

Thanks!

I presume some frames showing the landing gear could be found from the blurays. I am not able to make screengrabs from blurays, though. Other than that, there are surprisingly few images showing the full size landing gear.

The nice frame taken of one of the X-wings I mentioned earlier was of one parked in the stables of the Echo base set. I'd like to find it but spending the day looking for it I gave up. If anyone knows wheret to find it, please let us know.

I found one image that had an interesting detail I hadn't noticed before: if you look closely at the fronts of the rear landing pads, you see there are big yellow triangular markings on them. I'll include this detail to my build.

IMG_0632.JPG
 
Kind of hard to tell exactly where the marking begins and weathering ends, tho. It's a great angle, but too bad the image isn't sharper, it would probably be easier to tell that way.

Looking at this one it almost looks like the oleos on the main gear are actually offset to either side rather than arranged one directly in front of the other. This would actually solve a major issue with retracting the gear without the oleos interfering with each other (this so far is my biggest challenge with the forward gear: getting it to retract in such a way that it actually fits AND the various parts actually mechanically fit in both their extended and retracted states).

Figuring out the functions of the X-wing according to limits of real world physics and dimensions is something I decided early on not to pursue. Not with this one. It might be great fun later with another build but now, I just want this to look good. As for the struts, oleos, being offset, at least in the TESB model they are neatly in line with each other. An image from the Rinzler Making of TESB book (borrowed from Geektyrant for the occasion).

esb05.jpg
 
Figuring out the functions of the X-wing according to limits of real world physics and dimensions is something I decided early on not to pursue. Not with this one. It might be great fun later with another build but now, I just want this to look good. As for the struts, oleos, being offset, at least in the TESB model they are neatly in line with each other. An image from the Rinzler Making of TESB book (borrowed from Geektyrant for the occasion).

View attachment 435694

Yeah, I see it, and in the link Keiko posted as well.

Unfortunately, for what I'm doing (fully functional model -- cockpit, landing gear, cargo bay hatch, etc. -- for Star Citizen) I kind of need the landing gear to be properly functional, otherwise it would be REALLY obvious and look pretty bad in the game.


Yes, but this has better resolution, the red/yellow stripes on struts can be seen here really well. Thank you very much!

Yeah, I'm liking what I see at this website. At least as far as clarity, there's still a lot of areas it's difficult to see clearly because of angles (IE into the gear bays themselves).

Because of the way the effects shots were composited (IE some shots of Luke's trench run show Red One on his wing) it's also hard to find information on specific ships from screenshots (IE, I can do both the upper and lower cowlings for Red Two with reasonable accuracy, but I only have good references of the upper cowlings for Reds 1, 3 and 5, and the lower cowlings for Red 12). God forbid you're trying to use the special edition, which makes every X-wing either Red 2 or Red 5...
 
Unfortunately, for what I'm doing (fully functional model -- cockpit, landing gear, cargo bay hatch, etc. -- for Star Citizen) I kind of need the landing gear to be properly functional, otherwise it would be REALLY obvious and look pretty bad in the game.
Star Citizen, so you're working on a 3D version of the X-wing, right? It would be great to see a thoroughly researched landing gear construction in a clean 3D render, with measurements and all. That alone is worth a thread of it's own.
 
Star Citizen, so you're working on a 3D version of the X-wing, right? It would be great to see a thoroughly researched landing gear construction in a clean 3D render, with measurements and all. That alone is worth a thread of it's own.

Measurements, you're funny. ;) Most of what I've been doing has been via Mk. I Eyeball because finding consistent (and clear) references has been frustrating, there's few if any elevation drawings I actually trust (the official stuff is NOTORIOUSLY inaccurate), and as I'm sure you'd agree, the fact ILM couldn't be consistent themselves (I've modeled the six different engine cowlings I've been able to identify myself so far. I'm considering using Star Citizen's component system to actually make use of them, too, so each ship would look a little different) doesn't make it any easier with a 3D model than it is for working with resin kits and scratchbuilds. And then the more I learn the more I have to stop and start over again. :p

This is where I am right now, though:

X-WingCurrent.png
 
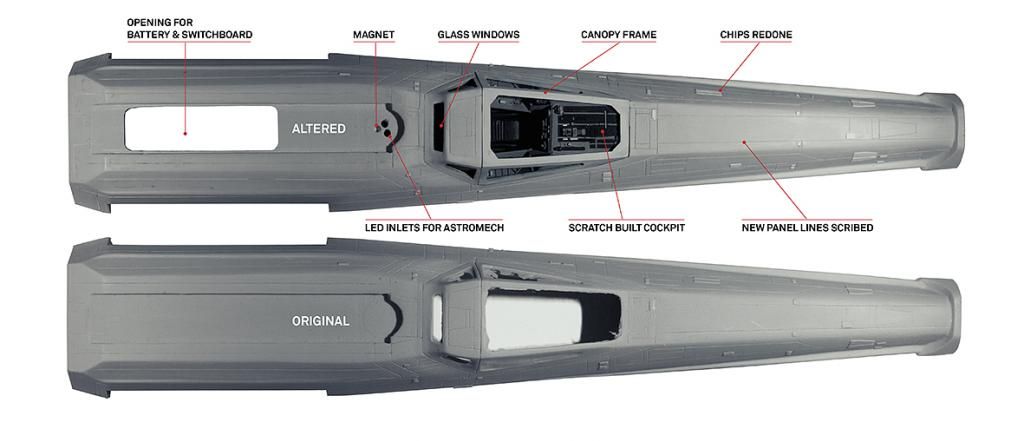
The upper half of the X-wing fuselage is almost ready for primer, some minor details still need fixing but it's close. I'll marry the fuselage halves first, though, and prime the whole thing while at it.

Here are the changes I did to the upper fuselage:


There was some softness in the panel lines and the chips, I redid those. I don't know if the details were improved much but I tried. Bottom half cast was very nice, I didn't feel the need to rescribe it.

The Astromech sits in place with two tubes running through the base. There are two leds inside the fuselage and optic wire runs down the tubes from the droid to meet the leds. This allows me to change the droid if I want later and still have it light up. Magnet secures the deal. There will also be magnets that will hold the droid strip in place, I need it to be removable to be able to access battery compartment and swithces which control the various lighting configurations of the model.

The only thing that I am not happy about so far is the width of the canopy frame I made. It should be narrower on top but I was afraid that on removable canopy it would be too thin and fragile. There will be glass windows, the rear ones are in place already, canopy will follow. The glass is clear thin styrene sheed tinted with Tamiya smoke and sealed with floor polish. I left the window "lip" out, it was too small a detail for me to add at this point, it wouldn't have looked clean enough.

In retrospect, it might have been a good idea to build the canopy base from clear styrene and add the frames on top of that. It might have worked well and allowed the narrow canopy frame without being fragile at all.

Oh well, laser cut brass or something like that next time. :D
 
Last edited:
That nose cone is based off the original die line sketches for the x-wing.

View attachment 436800
That's a nice sketch, I'm not sure if I'd seen it before. Didn't remember it anyway. Thanks! I hadn't registered the details on the model in the photo even though I'd seen it before many times. The fuselage looks correct at first but there seems to be differences in the side window line. I wonder if there's any more info on this particular model, what became of it? Is this the only photo of it?
 
I remember reading in the Making of book that the nose looked too sexy, so that's why they ended up squaring it up in the end.
 
Avanaut,

This thread is ridiculously cool!!! Thanks for everything you've posted!
It's a big help, but it makes me feel silly to even continue posting on my thread!!!
 
Avanaut,

This thread is ridiculously cool!!! Thanks for everything you've posted!
It's a big help, but it makes me feel silly to even continue posting on my thread!!!
WOOT?! I just checked your post on the wing cannons with feelings of envy. :D
 
Back
Top