Rumplestiltskin's Dagger (Once upon a time) Letter opener - FINISHED

MadMike

Well-Known Member
EDIT: Originally planned as simply a "help-thread" on salt water etching and how to get the design onto the metal, but I thought I could turn this thing into a progress-thread since it will cover the method of salt water etching and might be helpful for some other members.
The progress starts with post number 9

____________


Hello everybody,

I know, the title sounds strange, but I will do my best to explain what I have in mind.

Some time ago, I stumbled across a video that shows how to transfer a picture onto wood by printing the picture on this plastic-coated sheet of paper self-adhesive labels come on.

Later I discovered the method of salt water etching (where you use salt water and electricity to etch something into metal) and thought I'd give it a try.

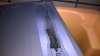
I wanted to combine these two methods by transferring the outlines onto the metal, cover everything around that (i.e., the parts I didn't want to etch) with enemal color, and wash away the ink from the print (as I tried to show in the picture attached, which is not the design i wanted to etch).

brumm.png

The reason to do so was that I didn't want to cut out something of use a dremel for all the itsy bitsy tiny things of the design.

Of course I was way too optimistic and of course I failed, leaving me with nothing but smeared ink on my piece of metal.


I don't know if anyone here has ever tried something like this before, but perhaps someone can come up with a solution on how I can make the ink attach on the metal. Is there any kind of surface treatment I could try (besides cleaning and sanding the metal to give it more of a rouch texture the ink can stick to). The easiest solution to get the ink onto the metal would probably be to prime it, but then i would have the problem of getting rid of the primer before etching :D

So, does anybody have an idea?
 
Last edited:
Re: Printing/Transferring a picture on metal - any ideas?

First question is how deep do you want the results? If not very deep then you have a good basic idea. I would try something like a silk screen and then the appropriate reactant. Muratic acid can be had at any pool supply and will etch most steels. Muratic acid is slow and would need multiple runs to work in most cases, but this is good. I looked up the Salt Water method and it looks good. You might try it again with a different stencil.

For the stencil ink,look at paint. There are a number of paint options that could be silk screened on. Most of them could be had in spay cans. Automotive restoration pains come to mind. Something for engines. The thing is with steel, it may have oils that were from manufacturing or as a rust preventative. Sanding might not have removed all of it and that would cause anything to have trouble sticking. There are pain preps that almost any department store would have. I purchased an assortment of the pint sized containers for testing. After I found what worked really well on a project, I then purchased gallons of that one.

Bobby
 
Re: Printing/Transferring a picture on metal - any ideas?

Go to a print shop that specializes in signs. A large shop should have a flatbed printer that can print on metal.

TazMan2000
 
Re: Printing/Transferring a picture on metal - any ideas?

One option would be to have the image made as a vinyl sticker and then use acid etching or saltwater etching. Another option it to create a stencil and use spray paint. Once done etching, you could use acetone to remove the paint. Yet another option would be to do it the way it is commonly done for making homemade PCBs (circuit boards). To do it that way you would print the image out on a page torn from a magazine using a monochrome laser printer (not the Brother name brand of printers though as they won't work). Then you use a clothes iron at it's highest heat setting (no steam) to transfer the image from the paper to the metal. It does not matter what images or text is already on the magazine page as those images will not transfer, only what you print on it from the laser printer will transfer. There are plenty of tutorials on the net for making PCBs via saltwater etching and they work great for custom images that have nothing to do with PCBs. Of course there's always CNC or laser etching but those can be quite expensive. I hope that helps.
 
Re: Printing/Transferring a picture on metal - any ideas?

Could you use a water slide transfer? You can get them clear and designed for inkjet printers. It wouldn't be printed 'on' the metal but if you use the clear ones instead of white it should give you that effect.
 
Re: Printing/Transferring a picture on metal - any ideas?

Assuming the metal is flat. Make sure it is scrupulously clean. If you have access to a laser printer and some laser compatible paper, print the image you want to transfer, in reverse onto the paper. then iron the image onto the metal by securing the paper to the metal and dry ironing it. the toner will stick to the metal. When the metal has cooled, gently soak the paper and rub it off, this will leave the toner stuck to the metal. Touch up any gaps with a sharpie and etch the image into the metal. Toner is basically a plastic and resistant to most etching agents, but try it first on some scrap. This method is often used to etch printed circuit boards. If the metal is thin then you might be able to use a cheap laminator instead of ironing.

I hope this helps.
 
Re: Printing/Transferring a picture on metal - any ideas?

Just a note, from my personal experience, Sharpies don't make for a very good resist when etching deeper than the depth that PCBs are usually etched at. Paint and laser printer toner work better. Clear tape, vinyl tape and vinyl stickers work even better than that.
 
Re: Printing/Transferring a picture on metal - any ideas?

Okay, first of all a huge thank you for all of you providing me with ideas. That being said, I didn't use any of those :D

But seriously, the basic idea was to get the design directly onto directly the metal was because I didnt want to cut out all the tiney pieces and then trace it on the metal, as it would probably result in misalignment or something similar.
Unfortunately I couldn't find any print shops that can print on metal (like TazMan2000 said), and neither do I have a vinyl cutter nor do I know anybody who has one.

While further researching salt water etching, I stumbled across a method that sounded quite promising: you print the design on a piece of paper (with a laser printer, very important), take a strip of transparent packeging tape, put it on the printout and lay it in some warm water. After a while you can rub away the paper, but the print is still on the tape. Then you put another piece of tape on the metal, put the first strip (with the print on it) on top and cut out the design, leaving you with a low-cost self-adhesive stencil
(note: if you wanna test this method, I would recommend glueing some colored tape on the metal; if you use two pieces of transparent tape - like me - it is fairly hard to see where you already removed the paper and where you didn't)

It didn't work perfectly (some of the really small pieces went missing), but for the first try, it was good enough.

WP_20150725_16_02_49_Pro.jpg
(in this picture, the parts on the left side are already cut out, the rest was still to go. I didn't cut out neither the stripes on the right side (since my blade wasn't the sharpest anymore when I reached that point) nor the name as I'm still thinking about putting the original Rumplestiltskin or another name, since this will be a birthday present)


After I finished cutting out the pattern, I hooked some aligator-clips to an old 12 volt transformer, clipped the positive pole to the sheet of metal, drenched some Q-Tips in salt water, clipped the negative pole to the wool and started etching. And as you can see...

WP_20150725_17_07_30_Pro.jpg

you see nothing :D Well, I can tell you that it worked (at least somehow), since the negative started bubbling and the q-tips turned brown from the removed material.I only tried it for like 5 minutes so I already knew that there wouldn't be any huge results to see.

Next up: put it in a large container with saltwater to avoid using q-tips :D
 
Last edited:
Rumplestiltskin's Dagger (Once upon a time) Letter opener - salt water etching

Great Success!

...well, partially :D I put my metal sheet in the saltwater, hooked up the electricity and it looked something like this (I used a bullet shell as my negative pole, as it is made out of copper; you can see that the method is working as it starts bubbling)

WP_20150726_18_44_58_Pro.jpg WP_20150726_18_45_10_Pro.jpg

after...idk, 20 minutes perhaps, it looked like this, showing that some metal (and probably the toner ink) were dissolving

WP_20150726_19_16_00_Pro.jpg

an hour later, the transformer got really hot and I decided to have a look at my workpiece. It worked well...a little two well, as some of the smaller details have been etched away completely. But for a first try, I am more than happy.

WP_20150726_20_38_35_Pro.jpgWP_20150726_20_39_02_Pro.jpg


Since the left side was not etched away as deep as the right side, I decided to put some tape on the right side and put it in the tank again for some time (happening right now actually). I also cut out the outer shape of the dagger, hopefully giving me a crisp line I can cut and sand along.


Update:
pretty happy with the outcome

WP_20150726_21_43_04_Pro.jpgWP_20150726_21_43_10_Pro.jpgWP_20150726_21_43_16_Pro.jpg
 

Attachments

  • WP_20150726_20_38_39_Pro.jpg
    WP_20150726_20_38_39_Pro.jpg
    1.3 MB · Views: 119
Last edited:
Okay, for the few people interested in the result, I wanted to present the finished product (as well as the long and sometimes stoney road ;D )

After some details were etched away during my first try, I started over with a new approach. This time, I put some vinyl on the metal and cut out the parts that should stay

WP_20150728_14_53_43_Pro.jpg

gave them a protective coat of enemal paint and removed the viny, giving me a (more or less) perfect stencil for etching.


WP_20150728_20_25_52_Pro.jpg

After the first etching, I got my Proxxon engraver and removed the smaller details from the paint, like the name and those thin stripes near the tip of the blade (which probably would have been a pain in the butt to cut them out of the vinyl by hand). After anouther round in the etching tank, I received this (as said before, this will be a birthday present, that's why it says Johanna instead of Rumplestiltskin)

WP_20150801_17_08_35_Pro.jpg

I was pretty happy with how the name was etched, but thought that the the other details (especially on the left) could be a bit deeper, so I protected the name with some packeging tape and etched it again (which lead to some ugly surface spots, but most of them could be sanded away afterwards).

WP_20150804_10_26_51_Pro.jpgWP_20150804_10_26_58_Pro.jpgWP_20150804_10_27_06_Pro.jpg

After that I grinded the edges, gave the blade some slight bevels and painted it black completely, which I would sand off afterwards to only leave paint in the recessed areas.
In the meantime (and unfortunately I didnt take any pictures of that) I took care of the handle, the guards and the pommel, all made out of wood. It doesn't match the original 100%, but for the limited time I had, it was good enough for me.

WP_20150811_17_01_41_Pro.jpg

After lots and lots and lots of sanding, the final product:

WP_20150816_21_42_12_Pro.jpg

WP_20150816_21_42_03_Pro.jpgWP_20150816_21_41_48_Pro.jpgWP_20150816_21_41_55_Pro.jpg
 
Just wanted to share a different technique. Here's one I did for a friend last year.

IMG_2400.jpg

I shaped the blade from .25" aluminum stock, polished it, and covered it with electrical tape. I printed out the design and spray-glued it over the tape and carefully cut the design out with an x-acto knife. I sandblasted it as much as I could until the edges started to be eaten away. I cleaned the mask off and coated it with black ink and carefully re-polished the blade. The blasting didn't go as deep as I would have liked, and the ink became more of a dark grey, but my friend was thrilled with it.
 
This thread is more than 8 years old.

Your message may be considered spam for the following reasons:

  1. This thread hasn't been active in some time. A new post in this thread might not contribute constructively to this discussion after so long.
If you wish to reply despite these issues, check the box below before replying.
Be aware that malicious compliance may result in more severe penalties.
Back
Top