You are using an out of date browser. It may not display this or other websites correctly.
You should upgrade or use an alternative browser.
You should upgrade or use an alternative browser.
Rocketeer “Veepy” Jetpack 3D printable kit project.
Joberg,
Check your area for a local Maker Space.
Its a good way to learn how to use one, before committing to a big investment.
It is cheaper than using a service bureau, even more so if you supply your own filament / resin/material etc)
Check your area for a local Maker Space.
Its a good way to learn how to use one, before committing to a big investment.
It is cheaper than using a service bureau, even more so if you supply your own filament / resin/material etc)
I'm so excited for this!
Judging by the progress the biggest cost to us will be the rocket fuelWill be available on or before Jan 1, for free for personal prints only. I won’t make any money from this project.
")
joberg
Legendary Member
Yep, looked at that route before and it`s been an ordeal trying to reserve the space and the time slot...not easy and quite frustrating. I wish someone could print that prop for me actually.Joberg,
Check your area for a local Maker Space.
Its a good way to learn how to use one, before committing to a big investment.
It is cheaper than using a service bureau, even more so if you supply your own filament / resin/material etc)
morganfeldon
New Member
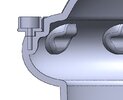
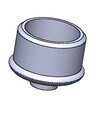
This project is simply fantastic. So much love and accuracy going into it. May I ask the inside dimensions of the engine nozzle?I decided to tackle the Engines, which will be included with the kit. Made a lot of progress...
View attachment 1355485
Also could you please share what size fan / fan blades fit inside the upper body?
I found past threads here with pictures and dimensions but those photos are long gone so the dimensions don't line up to anything.
Last edited:
This thread may finally push me over the edge to buy a 3d printer! Keep up the great work!
gnolivos
Sr Member
This thread may finally push me over the edge to buy a 3d printer! Keep up the great work!
Woah. I’m honored!
morganfeldon
New Member
My apologies. I will reread the previous thread. I was referring to the engine nozzle which you've started modeling. Thank you kindly.I will provide this info at its due time. If you search for my other thread you will find a link to the exact fan that is that is to be used. Motor also.
Oh and what nozzle are you referring to?
gnolivos If you want to partner up with anyone for electronics integration, it's morganfeldon of cosplay light and sound. Take a look at the electronics he did for my Quantum Leap Handlink.
gnolivos
Sr Member
The opening at the bottom of the rocket engines is 108mm diameterMy apologies. I will reread the previous thread. I was referring to the engine nozzle which you've started modeling. Thank you kindly.
gnolivos
Sr Member
I partnered with Valor replicas to integrate mounting points for his lights and sound kit.gnolivos If you want to partner up with anyone for electronics integration, it's morganfeldon of cosplay light and sound. Take a look at the electronics he did for my Quantum Leap Handlink.
Ah, well, maybe Morgan can make it better.I partnered with Valor replicas to integrate mounting points for his lights and sound kit.
gnolivos
Sr Member
Ah, well, maybe Morgan can make it better.
I’ll reach out thanks.
gnolivos
Sr Member
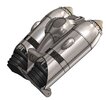
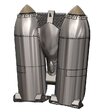
Almost done with the engines.
There will be mounts for a Light and Sound kit, and also a dedicated mount location for speakers at the top facing downwards.
There are individual injectors to attach the hoses, and dedicated insert spots at the top for ultimate ease of installation. We're shooting for perfection here!

There will be mounts for a Light and Sound kit, and also a dedicated mount location for speakers at the top facing downwards.
There are individual injectors to attach the hoses, and dedicated insert spots at the top for ultimate ease of installation. We're shooting for perfection here!
Attachments


Similar threads
- Replies
- 14
- Views
- 2,829
- Replies
- 25
- Views
- 4,720
- Replies
- 26
- Views
- 2,162
- Replies
- 62
- Views
- 20,105