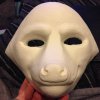
rocket raccoon WIP

Awesome! It looks absolutely amazing. Thank you for sharing, and I can't wait to see the finished build. I'm also working on a Rocket build for myself, for the film premier so this has been really useful in working out the way to go for the head (whether I purchase a resin blank or if it's something I can do myself). How was the latex to use as a mould? I'm also trying to keep costs down. (just to check, you brushed on latex over the sculpt and then covered that in plaster for the mother mould, is that correct?). Your furring also looks incredible. Great job!
 
Awesome! It looks absolutely amazing. Thank you for sharing, and I can't wait to see the finished build. I'm also working on a Rocket build for myself, for the film premier so this has been really useful in working out the way to go for the head (whether I purchase a resin blank or if it's something I can do myself). How was the latex to use as a mould? I'm also trying to keep costs down. (just to check, you brushed on latex over the sculpt and then covered that in plaster for the mother mould, is that correct?). Your furring also looks incredible. Great job!

Thank you!!! Yup. Took the latex rubber and brushed an initial thin coat for details. Then i used roughly 5 coats after, letting each coat dry. After that 24 hours of drying. I didnt let it set in the plaster mould too long because it had initially made my latex react to it and become miscolored, so i set it back on my clay mould till it returned to normal. I think it was the fact the plaster was still technically curing, so wait 24 hours for the mother mould to dry before placing it back in it :) they say pottery plaster is cheap and great for mother moulds too. Good luck and let me know if you need any more info :)
 
Thank you!!! Yup. Took the latex rubber and brushed an initial thin coat for details. Then i used roughly 5 coats after, letting each coat dry. After that 24 hours of drying. I didnt let it set in the plaster mould too long because it had initially made my latex react to it and become miscolored, so i set it back on my clay mould till it returned to normal. I think it was the fact the plaster was still technically curing, so wait 24 hours for the mother mould to dry before placing it back in it :) they say pottery plaster is cheap and great for mother moulds too. Good luck and let me know if you need any more info :)

Thank you so much for the info! I really appreciate it :)
 
This is an inspiring build

thank you so much! I hit a snag for a bit because the pictures I took of my template my phone literally deleted on its own along with 100 other ones, so now Im at the end of the back of the hood for the mask and can't figure out how it goes together. hahaha. wish me luck!

- - - Updated - - -

This is brilliant!!! Good luck with the rest of the progress! :)
lol thanks Ill need it. :) have to finish this one then start working on a groot, starlord, gamora, nebula, yondu, and drax costume too. hahaha
 
Last edited:
so a week ago I was adjusting the mask when I noticed one of his eyes wasn't even, it was sitting farthur back then the other one, and of course I had to mess with it and cracked the eye. I ended up removing both eyes because I'm going to upgrade them to a pair I hope are better. Totally bummed. 20140723_094822.jpg
 
I am disappointed you ran into trouble while building this.
The mask is looking very promising/ believable.
I am looking forward to seeing this completed.
Your kiddo is going to be dressed awesome.
 
Sorry to hear of your setback. Nothing more frustrating, especially against a deadline. It is looking great though :)

Odd question, but how will he see out of it? Most fursuit heads I've seen have eye holes in the inner part of the 'eye' but I'm curious how you're tackling it.
 
I am disappointed you ran into trouble while building this.
The mask is looking very promising/ believable.
I am looking forward to seeing this completed.
Your kiddo is going to be dressed awesome.

Thank you! ya, it is hard. I got the new eyes in and redid the lids. I also decided to trim his nose thinner and change his nose, there are more photo references now that its coming out in a few days, it really helps. Hopefully can take pics soon and post them :) He is really excited.

- - - Updated - - -

Sorry to hear of your setback. Nothing more frustrating, especially against a deadline. It is looking great though :)

Odd question, but how will he see out of it? Most fursuit heads I've seen have eye holes in the inner part of the 'eye' but I'm curious how you're tackling it.

Its funny, there are inner duct holes, but because the angle of the picture you can't see them. Ill try and get a close up after he is refurred :)
 
I'm going to attempt to make a Rocket Raccoon for my Nephew. I have a couple of questions that I may have missed on this thread

1) After you made your mold did you mold the mask in fiberglass?
2) Is the hard mask part of it only covering the front of the face with extra fur falling to cover the back of the head?
3) Did you do anything to keep it cool? We live in Florida and even at Halloween time the nights can be hot.

Thanks a lot and your build looks killer!

Thanks!!! Ok here goes:


1. Yes, I coated my mold in a release and then did a slush cast with resin, here is the one I used.
20140728_090408 (1).jpg


2. Yup, the mask in the front is the only hard part, the rest is a hood I made by making a duct tape template, I put duct tape on the mask and on a mannequin head that was a little bigger than my sons head and made a hood. Its missing the nose in this pic because I removed some after I updated the nose, but you can see.
20140728_091812.jpg20140728_092042.jpg


3. You can cut holes by the ear to keep it cooler, (right in front of the ears) and then put a mesh similar in color , the fur will help hide but help keep cool. The mouth cools it down a bit, but make sure no cloth is added so the mouth isn't blocked. Drill out the holes in the nose as much as possible. Some people add fans, but Im not sure how. Plus there are tear duct holes with thin fabric which adds more breathability. :) Hope this helps!!

Finally redid the eyes. Was initially freaking scary
20140725_074845.jpg
But now less nightmare inducing
20140728_090141.jpg
 
Thanks again so much for sharing all this info! This is all really useful!

I've finally cast my head out of resin, and about to brave cutting the jaw and adding the eyes. I'm hoping it all comes together properly haha! After his head I've only got his flight suit and backback thingy to go. Not sure if this is useful for you but for his feet I bought toe socks (the ones with individual toes), made foam pads so I can walk around with dry and safe feet, and also made foam claws. then added fur fibres to the top of the sock. For his hands I've got black gloves, added claws and also glued on fur fibres (I don't like how the fursuit hands and feet looked, especially since Raccoons have little delicate hands and feets! Secretly wishing we got raccoons here because they look so cute haha. I'll have to make do with possums ;) )

Here's my progress pics; the feet before they've been furred. I airbrushed the black stripes onto the tail - this costume is a lot of firsts for me! (I hope you don't mind if I share. This thread has been really helpful):
Rocket head cast.jpgRocket feet.jpgrocket feet pads 2.jpgRocket tail.jpg
 
This is really ripper work, mate! (Did I do that right? This seppo just being a wacker by trying?)

But trust me, you do NOT want to have raccoons. Look cute, sure, but man.

Although compared to some of your fauna, I suppose they might be sweet.
 
Back
Top