I bought a Deckard trench coat replica off Ebay but the collar doesn't have the ridges and doesn't stand up like it does in the movie. Does anyone know what kind of material I can attach to the current collar or replace it with to make it more screen accurate?
You are using an out of date browser. It may not display this or other websites correctly.
You should upgrade or use an alternative browser.
You should upgrade or use an alternative browser.
Rick Deckard Trench Coat Collar
- Thread starter OfficerK
- Start date
-
- Tags
- blade runner

GOOD GOD :facepalm SEND IT BACK ASAP!!
GOOD GOD :facepalm SEND IT BACK ASAP!!
I can't. I got it tailored. Does anyone have any suggestions?
Shoguno
Sr Member
Greetings officer K .......... well it is still a good start ...dont listen to those who tell you that this is a lost cause! WHen i look at this coat I thought you could put a lot of weathering on it with an airbrush.... or if you dont feel confortable with the "synthetic" fabric well then patch the whole coat with real or false "leather" ... since it is only fabric , leather would go perfectly on it! Now you will only need sewing skills thought .... For the weathering there is plenty of tutorials on youtube that explain how to make trench coats or old clothes. If you dont have any airbrush then do it only with normal brushes and sponges....You can always put all sorts of materials to make it look used ..... like for example a little bit of rubber latex ...or even plasti DIP (transparent or the color of the coat) to make it glossy(But very little)..... anyway i hope it helps o7
I don’t know much about sewing, but it seems to me that your collar needs a layer of padding material inserted, then the lines sewn in to create the ribbed effect and give the collar more stability.


Last edited by a moderator:
Your local fabric store is the one to go to...and yes, you'll have to find a seamstress to add those ribs to your collar also. Good luck!
How do they add the ribs to the collar? Are they just sown lines? Or should I attach another layer of material?
I would get some similarly colored fabric - cotton twill would be my recommendation - spray mount it to some headliner foam and stitch the details. This will give you the quilted look and also the support for the collar. Then stitch that patch to the inside of the collar.
Overall a relatively simple job - if you have a sewing machine and some experience with collars
The Material and construction have a lot to do with how the collar will stand. Many are made with the exact need built in. Check em out at a thrift store and you'll see what i mean.
The material in the replica you picked up looks light weight. A spring/summer weight as opposed to the screen version looks heavier to me, like a bottom weight/winter weight
The collar to me looks like 3 pieces. The 2 that make up the main body of the collar and the added quilted piece on top collar.
*Before you take it apart - take picture and take pictures during each phase of the deconstruction....especially if your not familiar with sewing or its order of operations.
-Open the collar up, a seam ripper will make life easier and make fixing mistakes easier as well
-add Heavy Weight Iron-on Fusible, Horse Hair Interlining or Buckram depending on how crazy stiff you want it to be - add this to the Under Collar and stand (if you have a stand) (Do not add Boning!)
-*Do not close the collar up yet*
-Find Material similar in color and weight for the top quilted piece (if possible)
-Pin the batting to the fabric and sew a series of evenly spaces lines (look like 1/4" to me) - Leaving the thread hanging off on the head and tails of your start and finish. And now its quilted.
-Now the attaching it to the this to the top collar requires a little bit of patience and pining, but is pretty much like adding another collar to the top collar. Youtube will save your butt here it's be a lot to describe with out pics to illustrate it all. But you take the quilted piece and fold back you seam allowance and sew it with a 1/16 seam. Look like the side and bottoms of the quilted piece are closed up on top of the top collar before the collar is closed and attached. Sometime it's just trial and error to see what works. But the superior edge of the quilted piece might be closed up with the top collar and the bottom collar, cant find any pics of that so...trial and error.
*You may need to unquilt the seam allowance area cause it doesnt look like it is in the ref pics.
-Once the quilted piece is attached closed the collar up and attach it.
That's my 2 cents - for whatever it's worth.
Have fun - bet it'll turn out great.
Alright - ***Edits***
*Found a pic and it look like the whole collar has 1/8 hem top stitch all the way around. The more stitching there is the stiffer and more body the collar will have.
Last edited:
Overall a relatively simple job - if you have a sewing machine and some experience with collars
The Material and construction have a lot to do with how the collar will stand. Many are made with the exact need built in. Check em out at a thrift store and you'll see what i mean.
The material in the replica you picked up looks light weight. A spring/summer weight as opposed to the screen version looks heavier to me, like a bottom weight/winter weight
The collar to me looks like 3 pieces. The 2 that make up the main body of the collar and the added quilted piece on top collar.
*Before you take it apart - take picture and take pictures during each phase of the deconstruction....especially if your not familiar with sewing or its order of operations.
-Open the collar up, a seam ripper will make life easier and make fixing mistakes easier as well
-add Heavy Weight Iron-on Fusible, Horse Hair Interlining or Buckram depending on how crazy stiff you want it to be - add this to the Under Collar and stand (if you have a stand) (Do not add Boning!)
-*Do not close the collar up yet*
-Find Material similar in color and weight for the top quilted piece (if possible)
-Pin the batting to the fabric and sew a series of evenly spaces lines (look like 1/4" to me) - Leaving the thread hanging off on the head and tails of your start and finish. And now its quilted.
-Now the attaching it to the this to the top collar requires a little bit of patience and pining, but is pretty much like adding another collar to the top collar. Youtube will save your butt here it's be a lot to describe with out pics to illustrate it all. But you take the quilted piece and fold back you seam allowance and sew it with a 1/16 seam. Look like the side and bottoms of the quilted piece are closed up on top of the top collar before the collar is closed and attached. Sometime it's just trial and error to see what works. But the superior edge of the quilted piece might be closed up with the top collar and the bottom collar, cant find any pics of that so...trial and error.
*You may need to unquilt the seam allowance area cause it doesnt look like it is in the ref pics.
-Once the quilted piece is attached closed the collar up and attach it.
That's my 2 cents - for whatever it's worth.
Have fun - bet it'll turn out great.
Alright - ***Edits***
*Found a pic and it look like the whole collar has 1/8 hem top stitch all the way around. The more stitching there is the stiffer and more body the collar will have.
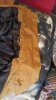
View attachment 754321
View attachment 754327
Thanks so much! I'll have to give these instructions to a tailor because I don't know anything about sewing. Also I need to start the collar from scratch because the previous tailor totally butchered what I had. I bought some similar colored material, so I'm waiting for that to arrive.

Whoa....Sorry, that's not cool. They went pleat crazy....very weird. Your really gonna a seam ripper for that and a beer.
I'd try and pick the stitches out and see how the fabric held up. If looks pretty good, then just iron it, block it/reshape it and start again....but you will definitely need extra fabric for the top quilted piece....just the collar it came with is not enough and one reason why its not accurate to the screen version.
If the fabric just couldn't stand up to what looks like pretty tight stitching...which it may not have - then yup you'll need that extra fabric and start from scratch.
Also, if the patterning is correct and how you wanted it then save the pieces so you or the next person you have work on it can draft the pattern from the existing pieces. Tho, from what i can see - it look like a rectangle with no shaping to it that wont, in the end, lay like a collar should....tho that could just be cause it so puffed up or whatever.
And do not go back to that person....unless it free...and then, buyer beware.
Good luck!
Similar threads
- Replies
- 7
- Views
- 1,249
- Replies
- 2
- Views
- 838
- Replies
- 6
- Views
- 2,607