It has been a long time (42 years) since I put a model together. It was straight out of the box, with minimal paint and the included decals. As I got older, my hobbies shifted and ended on woodworking...but there has always been the desire to build models once again. I have read many of the posts in this forum, in the hopes of getting the nerve to go beyond the basics of my youth. To that end, I have selected the Revell Snaptite MAX Millennium Falcon (not sure if I will use the round or rectangular radar dish).
It is a simple model and I figured it would be any easy model to begin the journey of learning new skills and produce a model better than what came in the box. I know that the model is not screen accurate and with some work can be made to look like the source material. I choose to not to really do to much as far as modification. I am going to try an add some lights to the model and mount it on a custom base with a brass rod. This is something out of my wheelhouse, but each journey starts with the first step.
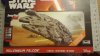
Straight out of the box the lower and upper hull pieces are pre painted for those wishing to assemble the model and either display or let a child(ren) play with it. The edge pieces were not any better. The paint look like is was an after thought. In my opinion, this is the bottom of the barrel for this model, so I can only go up from here. I sprayed all of the parts with Rust-oleum Inspire Flat Grey Primer. This was followed up with a base coat of Rust-oleum Inspire Flat White Paint + Primer over all of the pieces.
Brass rod and the Base after grey primer coat is applies. The brass rod will allow me to pass the light string through with no issue. The base is a simple box lid from my local craft store. It has been sanded smooth and the first coat, as you can see, still shows the wood grain. I am not sure if I want a simple display base or build something to add a little more story to the static model. I was thinking about having the Millennium Falcon just flying level, but she needs to be shown in a "action pose". I have decided to angle the Falcon, just not sure in what manner at this time.
I am attempting to post the pictures in some sort of order.
The pictures below are from left to right:
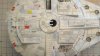
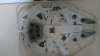
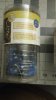
1. Picture of the Box
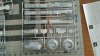
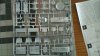
2. Lower Hull out of the Box
3. Upper Hull out of Box
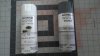
4. Paint used for Primer Coat and Base Coat
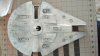
5. Lower Hull after Primer and Base Coats are applied
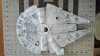
6. Upper Hull after Primer and Base Coats are applied
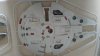
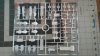
7, 8 and 9. Remaining parts after Primer and Base Coats are applied
10. Focus shot on the mandible parts after Primer and Base Coats are applied
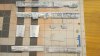
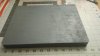
11. Brass Rod used to support the model in it's action pose and as the wire conduit
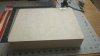
12. Box from the craft store
13. Lid of the aforementioned box removed and first coat of primer
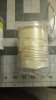
14. Battery powered Blue light string (4.5v DC)
15. Battery powered Soft White light string (4.5v DC)
My apologies for the lengthy initial post. I look forward to any hints, tips or opinions.
Thank you for taking your time to look at my first post of my first model build.
It is a simple model and I figured it would be any easy model to begin the journey of learning new skills and produce a model better than what came in the box. I know that the model is not screen accurate and with some work can be made to look like the source material. I choose to not to really do to much as far as modification. I am going to try an add some lights to the model and mount it on a custom base with a brass rod. This is something out of my wheelhouse, but each journey starts with the first step.
Straight out of the box the lower and upper hull pieces are pre painted for those wishing to assemble the model and either display or let a child(ren) play with it. The edge pieces were not any better. The paint look like is was an after thought. In my opinion, this is the bottom of the barrel for this model, so I can only go up from here. I sprayed all of the parts with Rust-oleum Inspire Flat Grey Primer. This was followed up with a base coat of Rust-oleum Inspire Flat White Paint + Primer over all of the pieces.
Brass rod and the Base after grey primer coat is applies. The brass rod will allow me to pass the light string through with no issue. The base is a simple box lid from my local craft store. It has been sanded smooth and the first coat, as you can see, still shows the wood grain. I am not sure if I want a simple display base or build something to add a little more story to the static model. I was thinking about having the Millennium Falcon just flying level, but she needs to be shown in a "action pose". I have decided to angle the Falcon, just not sure in what manner at this time.
I am attempting to post the pictures in some sort of order.
The pictures below are from left to right:
1. Picture of the Box
2. Lower Hull out of the Box
3. Upper Hull out of Box
4. Paint used for Primer Coat and Base Coat
5. Lower Hull after Primer and Base Coats are applied
6. Upper Hull after Primer and Base Coats are applied
7, 8 and 9. Remaining parts after Primer and Base Coats are applied
10. Focus shot on the mandible parts after Primer and Base Coats are applied
11. Brass Rod used to support the model in it's action pose and as the wire conduit
12. Box from the craft store
13. Lid of the aforementioned box removed and first coat of primer
14. Battery powered Blue light string (4.5v DC)
15. Battery powered Soft White light string (4.5v DC)
My apologies for the lengthy initial post. I look forward to any hints, tips or opinions.
Thank you for taking your time to look at my first post of my first model build.
Attachments
-
 IMG_20180703_183253.jpg915.6 KB · Views: 325
 -
 IMG_20180702_153935.jpg876.5 KB · Views: 214
 -
 IMG_20180630_093640.jpg1.6 MB · Views: 315
 -
 IMG_20180630_093632.jpg839.2 KB · Views: 324
 -
 IMG_20180630_101135.jpg2 MB · Views: 329
 -
 IMG_20180630_101109.jpg813.2 KB · Views: 316
 -
 IMG_20180630_101103.jpg935.3 KB · Views: 310
 -
 IMG_20180630_101144.jpg1.9 MB · Views: 306
 -
 IMG_20180630_101155.jpg887.3 KB · Views: 287
 -
 IMG_20180702_162525.jpg824.4 KB · Views: 343
 -
 IMG_20180703_152718.jpg1.5 MB · Views: 284
 -
 IMG_20180703_152715.jpg1.5 MB · Views: 321
 -
 IMG_20180703_152559.jpg1.6 MB · Views: 309
 -
 IMG_20180703_152540.jpg1.7 MB · Views: 300
 -
 IMG_20180703_152527.jpg1.7 MB · Views: 296