Revell Razor Crest w/ GreenStrawberry upgrades

Jimw100

Well-Known Member
Hey all,

I know there have been tonnes of Razor Crest threads already - I'm late to the party, but I haven't seen one with the GreenStrawberry interior/resin & photo etch grade parts, and I thought some of you might be considering getting these. I couldn't find any reviews of them, but I have bought loads of GreenStrawberry stuff before and it is always awesome.

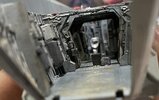
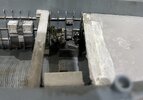
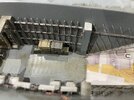
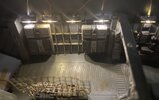
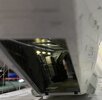
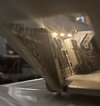
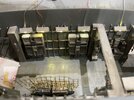
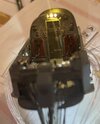
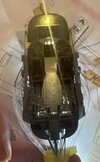
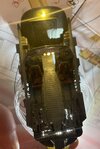
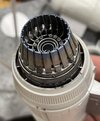
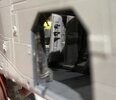
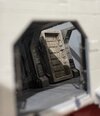
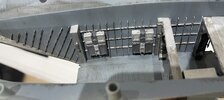
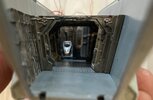
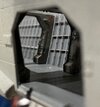
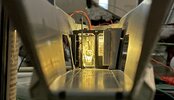
Anyway, I'm not going to go through every step of building it, as you've all seen that before, but I thought someone might appreciate some good shots of the upgrade parts whilst it is still being put together (especially because once it is all done most of this will be hidden). I'm also planning to light the cargo hold, cockpit and engines, and eventually put it all on a base to replicate the frozen lake from Chapter 1 of The Mandalorian.

I am really impressed with this upgrade set (and the original Revell model to be honest). I pretty much messed up most of the parts and they still fit like a glove. I didn't realise how full the interior of the ship is - I'm guessing it's probably one of those situations where the interior set from the series wouldn't fit inside the actual ship if it was real. Anyway, excuse my ropey paint job and messy glueing. In person it looks alright, and when you can only see this stuff through the side door and rear hatch I'm hoping it will look ok.
 

Attachments

  • fullsizeoutput_3f5a.jpeg
    fullsizeoutput_3f5a.jpeg
    1.3 MB · Views: 382
  • fullsizeoutput_3f53.jpeg
    fullsizeoutput_3f53.jpeg
    1 MB · Views: 376
  • fullsizeoutput_3f51.jpeg
    fullsizeoutput_3f51.jpeg
    909.8 KB · Views: 318
  • fullsizeoutput_3f4f.jpeg
    fullsizeoutput_3f4f.jpeg
    1.9 MB · Views: 303
  • fullsizeoutput_3f55.jpeg
    fullsizeoutput_3f55.jpeg
    425.2 KB · Views: 340
  • fullsizeoutput_3f57.jpeg
    fullsizeoutput_3f57.jpeg
    1.1 MB · Views: 335
  • fullsizeoutput_3f58.jpeg
    fullsizeoutput_3f58.jpeg
    486.4 KB · Views: 367
I'm just glad to see someone using the GS set. Your presumption that there would be people considering the set would be absolutely correct. I'm one of them :) Might just have to pick up a set now. Thanks for posting - hope to see more as it comes
 
Those sets sure look great!

Very tempted except for the price

Also I think the Razor Crest is the only Star Wars ship to depict a space urinal

I am sure Mando misses that in his N-1 :D
 
I ordered the cockpit and guns from GS last week. I have the Shapeways cockpit as well but I really can't stand the translucent resin they use so I'll decide between the two which one to use, but most likely the GS.
 
I got the GS cockpit and actually then ordered the shapeways one, because I want to be able to light it and the pre-formed fibre optic holes on the shapeways one just looked much easier to me.
 
This looks awesome, I plan to wholesale steal your idea. I think I’ll try using clear acrylic as a base and paint the underside, which will hopefully give it some depth without using epoxy (which terrifies me)
That would be a lot easier than what I did. I used 32 ounces of resin, and when it started to get tacky, I sprinkled on the artificial snow so that it would melt into the resin. I left the open area so that you can see the ice and not have it all just snow, which would have basically made 3 2 ounces of resin useless. Lol.
 
Some of the cargo bits now done. The helmet, jet pack etc will literally be impossible to see once the top part of the hull is on, so I didn’t put huge effort into painting them.

There are cargo nets that go over these bits as well, so even the parts that are visible will be mostly…err…not visible
 

Attachments

  • DBA91EB2-17CA-4E03-846E-1BFED0932CCD.jpeg
    DBA91EB2-17CA-4E03-846E-1BFED0932CCD.jpeg
    447.9 KB · Views: 188
  • E533A91C-A803-47CD-877E-396947A8E932.jpeg
    E533A91C-A803-47CD-877E-396947A8E932.jpeg
    1.9 MB · Views: 180
A few more bits added in. I did the starboard wall and the lights on the port side. Test fitted the ceilings as well - despite how thin the LED wires it looks like I’ll need to make notches in the ceiling pieces (which are brass photo etch sheets) to get it to fit.
 

Attachments

  • 2DF5262F-190E-4209-9CB8-B5DEC4177E83.jpeg
    2DF5262F-190E-4209-9CB8-B5DEC4177E83.jpeg
    3.4 MB · Views: 168
  • E7815998-5E2B-4BD6-B558-2E2B39033214.jpeg
    E7815998-5E2B-4BD6-B558-2E2B39033214.jpeg
    2.1 MB · Views: 152
  • B12EF406-FD75-443C-A9FC-D59C9CE8D7F1.jpeg
    B12EF406-FD75-443C-A9FC-D59C9CE8D7F1.jpeg
    643.4 KB · Views: 159
  • 85B25204-0D25-4137-A082-8209D57FDFAF.jpeg
    85B25204-0D25-4137-A082-8209D57FDFAF.jpeg
    470.7 KB · Views: 167
  • 1578997D-3875-4958-871C-2E48BB8B6AE4.jpeg
    1578997D-3875-4958-871C-2E48BB8B6AE4.jpeg
    2.7 MB · Views: 169
Just nearly finished up the cockpit. I’ve never built a 1/72 model (normally stick to 1/48 and bigger) so this was a bit trickier than normal. I used the shapeways cockpit consoles with .25 and .5mm fibre optics, plus a few of the same in the side walls of the cockpit. The floor, back wall of the rear room, seats and a few other bits are from the greenstrawberry set.

I put 2 SMD LEDs in, one to light the cockpit itself and one for the rear area. May need to find some photoetch to create a shade for the back LED as it’s quite bright.

I’m planning on splitting the fibre optics into two bundles, one white and one red. Not sure yet whether to use two separate LEDs to light them, or use Tamiya clear red on the ends of some of the fibres to make the red ones. I’ve seen that done really successfully in a build by COlsen lately
 

Attachments

  • 71C594F1-A98C-4D74-8C4D-FD70A13FD0C5.jpeg
    71C594F1-A98C-4D74-8C4D-FD70A13FD0C5.jpeg
    1.3 MB · Views: 149
  • 632C8436-DC55-4AFF-9FA1-839A92C0E8BC.jpeg
    632C8436-DC55-4AFF-9FA1-839A92C0E8BC.jpeg
    1.1 MB · Views: 150
  • CCF1415B-D8C7-4638-A5B5-3C223B8F5DE3.jpeg
    CCF1415B-D8C7-4638-A5B5-3C223B8F5DE3.jpeg
    1.7 MB · Views: 156
I’m simply blown away by the detail that your getting in such a small scale. Well done!
Thanks, I really appreciate that! I always look at the photos and think it looks way worse than in real life, because they’re inevitably zoomed in and can see more detail. I’m really trying to not spend tooooo much time trying to make it perfect, because I know in the end 90% of this detail won’t be visible, and I also don’t have the skills to make it perfect (or anywhere near) anyway!

I’ve worked out that I will need to do the engines next, because the wiring all goes through the front landing gear, and so I’ll need to somehow put that wiring in before I fix the cockpit in place. There’s probably about 1” x .5” space at the front (directly under the front of the cockpit) where I’ll need to fit all the fibre optics, the led for the front red lights and the led for the cockpit fibre optics. It’s gonna be a tight squeeze for sure
 
First time I’ve tried to do the blue/red heat effect, and I haven’t quite managed to get the right look I don’t think. It kinda just looks like blue and red on metal, instead of that heat-blued effect. If anyone has any tips do let me know. I used Tamiya weathering pastels, as I don’t have an airbrush.
 

Attachments

  • BB6330DE-CAC6-437B-8248-44362CB7082C.jpeg
    BB6330DE-CAC6-437B-8248-44362CB7082C.jpeg
    869.7 KB · Views: 110
  • 01F266C5-F8AA-4622-8AE2-3B87DDF2AEBF.jpeg
    01F266C5-F8AA-4622-8AE2-3B87DDF2AEBF.jpeg
    1.1 MB · Views: 114
First time I’ve tried to do the blue/red heat effect, and I haven’t quite managed to get the right look I don’t think. It kinda just looks like blue and red on metal, instead of that heat-blued effect. If anyone has any tips do let me know. I used Tamiya weathering pastels, as I don’t have an airbrush.
Looks great to me!
 
Just got the engine LEDs wired in, along with the navigation lights that sit on the top and bottom of the engines. I used 2 3mm amber flickering LEDs for each engine - it didn’t need 2 for brightness but if you use one flickering LED then you get an effect where, for short periods, there is no light at all, which I don’t like the look of. I think that with the clear amber pieces provided by Greenstrawberry it might actually be better to use white LEDs, but too late now. With amber LEDs and the amber filter the light looks almost red.

I was going to use one red LED with fibre optics to do the nav lights, but I found that it looks a bit better using an SMD led for each of top and bottom, as it makes the light visible from more angles. I figured that the point of a navigation light is that people can see it, and with fibre optics you can only see them from directly above.

You can see the level of detail on the internal parts of the Green strawberry engine pieces in the photos, hopefully.
 

Attachments

  • 3D2AF0BC-F5AC-4B1A-B445-4EFD2FB1ACF6.jpeg
    3D2AF0BC-F5AC-4B1A-B445-4EFD2FB1ACF6.jpeg
    1 MB · Views: 75

Your message may be considered spam for the following reasons:

If you wish to reply despite these issues, check the box below before replying.
Be aware that malicious compliance may result in more severe penalties.
Back
Top