Repainting a MPC Millennium Falcon ***FINISHED*** with tons of pictures

Bringing it down to that line should be better.
20230302_185925.jpg
 
I realized that the Tamiya AS-20 a lot of people recommend for the base color is good, but I also read its good for layering and shading.
So probably why its not covering the gray primer so well. Guess thats learning through trial and error.
I think what I SHOULD have done, was use a white flat primer and THEN use the Tamiya paint.
I was just at Walmart and got some white primer anyways. Guess I could try it on a small piece and see how it looks, as I still have a few other parts only primed gray for now.
The main dish, bottom and top is close enough that Ill just finish it off with the Tamiya...and I have another doctor visit tomorrow, so Ill check in the hobby shop while in the area to see if they got more in. Just want to get this finished now.
 
So for the first day in over a week it didn't snow or rain, in fact, a weather group I'm innon FB, someone posted this little comic. Pretty much besidesthe 78 degree weather.... and so for today, I took advantage of it and finally got another coat of paint on.
FB_IMG_1678910807295.jpg

20230315_140555.jpg


Also printed out a few parts on shiny photo paper, (didn't have decal paper and didnt want to spend the money) that hopefully will fit inside the cockpit for a little detail, sized a few slightly different to make sure.
And the back engine thrusters, one solid, and the other with light blue lines.
I'll see what looks best.
20230315_140826.jpg
 
Looking good

I also did the AS-20 thing, however, over the black primer, I first did a base of AS-16, followed by a lighter coat of AS-20

I also wound up using graphics those on the top of the console in my Fine Molds Falcon, although printing them out on photo paper would have been a much smarter idea and I may go back and do that at some point

just printed mine out on regular paper :rolleyes:.

Pretty sure at least the cockpit graphics were created by ozzyguanche

1678920094340.png
 
Got this all cut out and glued on. Turned out pretty good. I liked the once with the blue lines better, and for as uneven as the sides are, thankfully it looks like it wont really show once unside the back end. But just incase, I got thin styrene strips to mask the edges if needed. We'll see once I get there.
20230316_213824.jpg

20230316_213850.jpg
 
Sure been a rough week with the major nose bleed. Getting ready for another surgery to hopefully fix that here in a few hours.
So before all that happened on Monday, after getting all the smaller pieces primed, I went and checked on the main big ones, and found that on the bottom part in just one area, the paint had little cracks through out it. I'm looking up why.
I think, in my rush to beat the weather, going so quickly, with it still being windy, I sprayed too close, making it too thick, and probably didn't wait long enough for a second coat, being so thick in the first place.Thankfully the worst was in the back. Sanded it down, and yesterday tried a new coat of primer, without any wind this time.

20230319_211840.jpg


A lot better. After this next surgery, once I'm able, I look it over, see if it needs anymore sanding or priming, and then the paint. These things always take longer than you would want.
20230323_034020.jpg
 
Much better after the sanding and re-paint

I have that cracking happen to me with AS-20 as well. I am pretty sure it was the same thing you mentioned. I applied it very thick and on top of a coat that had not fully dried

good luck with the surgery
 
Been quite a rough few weeks, with the surgery, migraine headaches, and when I did feel better, it rained or was snowing.
But little by little, I have gotten most all the coats of paint I'll need.
Then tonight, feeling a bit better and going slowly, I decided to add these printouts to the cockpit. I wasn't completely sure of the sizing, so anfew parts, I made a few sizes, and then still have to cut everything up a bit to fit.
Once its all put together, you can hardly see inside anyways, so thats probably a good thing.

They now have a proper door that doesn't look like something from a submarine.
20230403_205353.jpg


My makeshift control panel is pretty wrong, but yeah, you can't tell much with the nose on.
20230403_205306.jpg

A little ceiling detail.
20230403_210431.jpg

And just holding it all together for now.
20230403_210322.jpg

20230403_210330.jpg
 
Got the "glass" parts glued back in.
I cleaned them up best I could and they both look much better. The edges are still a bit cloudy, but not much I can do about that.
20230405_111301.jpg


I had always just used superglue on everything, but have read a lot of people suggest using white glue on the clear parts. While at the store, they actually had clear glue, so I got that one. Hope it works.
20230405_111312.jpg


Was lining the base of the gun part, before I add the guns back on, and the one pole, left side here, broke off. So tiny little guys. Didn't that part, or around there even break on the SS 5 footer?
I remember seeing picture on Jedi the part was a little different and not movable.
but its glued back together for now.
Until looking at this super close up pic, didn't even realize the paint had cracks.
Looking at other parts, more cracks, but pretty small, so should easily sand down..
I hope.
20230405_111322.jpg


Its finally warming up a little here...although still snowed yesterday, just didn't stick.
I think things will paint better in warmer weather.
I see once I get it all glued together, I will probably have to add some filler, sand and paint some parts before finally getting to any colors, shades and any weathering.
 
Got more a little more done adding the sidewalls back on. Trying to get them lined up a little better than I had before, but, this kit seems to have issues that make it a bit harder than it should be.
I remind myself its not the perfect grade version at all, so just to makenit work best I can. Didn't even plan to do this much already. Probably should change the title to reworking the Falcon model with a repaint.
20230416_185729.jpg


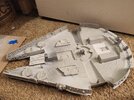
So the end piece here, without having the instructions anymore, and the part being close but still different than the real model, I was hoping I was even putting this part on correctly.
20230416_185758.jpg


Holding on the top piece, it actually looks pretty good. The other side however, holding the end part up, theres about a 1mm gap. I'll get it to work, despite having to make some stuff up as I go. Not like its a filming model anyways.
20230416_185921.jpg


Speaking of models, most everyone has seen my AT-AT collection...well, last night I saw someone who lives about 20 mins from me selling this on the FB market place for $40, so of course I gotniver there today and bought it. Guys garage was full of Star wars stuff and tons of model kits. I actually asked it he was building a studio Millennium Falcon or other ship. But no, he just collects them and hardly gets the chance to build....all our life stories.
20230416_180659.jpg

With the gang and now makes 12.
20230416_181344.jpg

Up close. Middle back one.
20230416_181359.jpg


So once I get the Falcon pit together and fill in any areas with filler, sand down, and paint again, then maybe I can finally add details.
The weather here in south west Idaho has been nuts.
How has the weather been where everyone else lives?
Last Monday got to about 80, then the next day was like 75, then at 3am it snowed about an inch or more, which is crazy for it to even stick this time a year. The next day was like 65, so snow all melted by afternoon, got to 30 degrees that night and the next day was back to 80. For like four days of time, thats a whole lot of changes in temperature.
 

Attachments

  • 20230416_185729.jpg
    20230416_185729.jpg
    3.6 MB · Views: 45

Your message may be considered spam for the following reasons:

If you wish to reply despite these issues, check the box below before replying.
Be aware that malicious compliance may result in more severe penalties.
Back
Top