"Reddish Jammer" Y-Wing Build

Okay, so...
1624074598979.png

is from the AMT 1/25 Peterbilt Wrecker.
Part #224.
The Shortwave Radio handpiece.
NOT the CB Radio handpiece.
(See Step 10 of Instruction 10 here to see the difference.)
HAS to be the Wrecker version of the kit, NOT the Peterbilt 359 "truck" version. (The truck version only has the CB radio, not the shortwave radio)
Interestingly, this means it's the 1977 kit (according to Scalemates), which must have come out in 1976. (Unless it's the 1972 version, which I doubt)
This kit is currently re-issued by 2nd Round Models, and readily available for 39 bucks, so this news won't ruin anybody's secret plans to rule the world...

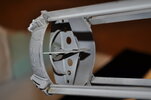
Here's some pictures of the piece from my camera, which doesn't do close-ups very well.
1624075243395.png


The key tells are:
1.) Trapezoidal shape (wider at top of handpiece than bottom)
2.) Angle/curvature of coil
3.) Size/fit in relation to underlying greeblie (yes, it's a match, I just didn't photograph it)

1624075361319.png


Thanks to the RPFer who helped me narrow this down: despite the red herrings along the way, two wasted initial efforts, it was well worth the frustration.

So, by my count, that leaves just one remaining greeblie to ID, which is the "caliper" piece.
 
Where is that center inner ring from? Was it kit-bashed? Or machine-tooled?
View attachment 961124

I believe it was kit-bashed. I believe this for a couple of reasons:
1. Because whenever ILM could find the shape and size they were looking for in a model kit, it saved them time and money on machine-tooling.
2. Because on the actual model (unlike the DaveG perfectly-fitting 3D prints shown above), the center ring is slightly "off" of being perfectly flush with the inside of the Sealab Crane Part #59 double-sided/mirrored nurnie, as seen in the detail picture below of the Alan Ladd rear vectral
View attachment 961126

3. Because I believe I have found the part.

4. And because this part is perfectly "mismatched" to the Sealab nurnie in the same way the original was.

Here is the part on top of DaveG's 3D file printed equivalent:
View attachment 961101

Here is DaveG's 3D-file printed ring piece on top of the kit bashed part
View attachment 961102

Here are the two parts side by side.
View attachment 961103

Here is the part fitting "perfectly" inside DaveG's 3D vertical rear vectral fin, overhead view.
View attachment 961098

Here is the part fitting "perfectly" inside DaveG's 3D vertical rear vectral fin, side view.
View attachment 961100

Here are the measurements of the part, roughly 38mm inner diameter and 40mm outer diameter, but not "exactly" these numbers:
View attachment 961104
Inner diameter 38.62 (but don't take this as gospel, as I'm measuring a flexible part and each time I do it I get a different number, so even this is a "pretty close" guesstimation)

Here is the outside diameter:
View attachment 961105
Outer diameter is 40.54 (but again, don't take this number as gospel). The key is that it is pretty much 38mm on the inside and 40mm on the outside, with roughly 1/4 a milimeter (0.25mm) of wiggle room (i.e., the limitations of either my tool or my measuring abilities)

Here it is fitting inside (but just barely) into DaveG's 3D-printed horizontal rear vectral fin:
View attachment 961072
But here is where the part does not fit "perfectly" into DaveG's 3D-printed part, as the vertical ventral fin is slightly too "tight" to accept the kit bashed part, despite fitting perfectly into his other 3D-printed part: the DaveG part is a few mm shy of the full width of two Sealab Part #59's abutted to each other, which can be accommodated for inside the rear ventral ring (modified L'eggs Pantyhose container) by simply cutting off those same number of mms on the outer legs, as shown by the Gundam marketed pieces on the lower assembly in the photo below
View attachment 961106

So here it is sitting at the midpoint inside another version of the horizontal rear vectral fin, with plenty of wiggle room (but perhaps too much by 1-2mm)
View attachment 961107

So now here it is on the center part of a newly created horizontal rear vectral fin (in layout form, not yet glued together), which I believe is closer to the real original nurnie:
View attachment 961073

So where does this mystery greeblie come from?

So glad you asked...
View attachment 961108
The Entex 1/16 the Hon. C.S. Rolls 1908 Rolls Royce Silver Ghost "balloon car" released in 1975.

Sprue G, Part #1 (10 of them per model, or 5 Y-Wings worth) top side:
View attachment 961121

Sprue G, bottom side:
View attachment 961123

Close-up shot, top-side:
View attachment 961122


Top side is "pretty sharp" and "machined" looking on its edges, while the bottom side of the nurnie is softer, more rounded. So there are some discrepancies, as in many photos it looks like it's sharp and machine-edged on both sides.

But it doesn't look so sharp-edged on this archival Y-Wing, however, does it.
View attachment 961125
That's actually a trick of the light. In the Chronicles book, the lower left quadrant of this circle piece makes it clear that this is a sharp front and back edge, with a longer horizontal surface than front/rear surface area, which is precisely what the kit part has as its characteristics.

I take this to be the authoritative confirmed donor greeblie on Red Jammer, Gold Leader, Gold 2, and Gold 5. I am less certain on Gold 3, but this is only because I can't seem to find any conclusive pictures of this area on that particular model.

You can also get the kit re-issued later by Bandai in the 1980's, and much more common on Ebay.
Great work! love seeing someone putting in the time!! This is the rear of the MOM Y and those details are round (see ref of MOM Y rear ventricle) but on the other Y's the detail from the Balloon car works!
 

Attachments

  • DSC_0299.JPG
    DSC_0299.JPG
    3.8 MB · Views: 152
Actually, the Balloon Car wheel rim pieces are rounded/curved on the front end and sharply-delineated/squared-off at the back end, so my surmise is that these are ALL using the same pieces, but that in some cases the builders weren't bothering to pay attention to whether it mattered to install them front-to-back or back-to-front, as the camera wouldn't pick up this kind of detail at 24fps anyway.

But for purist replica builders, this would mean that total accuracy would mean paying attention to this detail, and building them all back-to-front EXCEPT on the MOM-Y, where it would go front-to-back.
 
Okay, so... if you scratch the same itch for five years, this is what you get...

20181127_172859-jpg.jpg


I think this mystery greeblie may simply be Part #H13 from the Bandai 1/24 Jagdpanther. I think the handles of the bolt cutter are cut off, and either discarded, or possibly, one arm of the handles is used underneath the top piece.

IMG_0122 (3).JPG


In situ before the cut:
IMG_0117 (2).JPG

If so, it is the right size to sit "above" the Nitto Bismark piece with the Peterbilt Wrecker CB radio piece and the Heller Duquesne missile, making this final 4-piece mystery subassembly finally solved.

IMG_0139 (2).JPG


I'm not very good at photographing these things, and this is a dry test-fit so nothing is glued, and thus nothing is properly/exactly in place, but here is a rough sense of the proportions of it.

IMG_0146 (2).JPG


What say the jury of my peers?

I've been wrong before, and happy to be wrong again.

But man oh man, wouldn't it be nice to finally be able to quote Zev and say...

Echo Base... this is Rogue Two.
I found them.
Repeat, I found them.
 
Project Runs page of 150+ Star Wars confirmed donors is still open at Tier 7 only. Price is about to jump significantly sometime in the coming year. Meanwhile, pretty much all the greeblies you need to build a Y-Wing are in the current collection, which is growing.

Here's a teaser:
King Tiger Deck STL snip.jpg
 
In November of 2017, my 7-year old son gave me this for my birthday: A Y-Wing Fighter made from kindling out of the firewood box:
1672008574339.jpeg


He was especially proud of the cockpit/canopy that he remembered had to be included:
1672008686122.jpeg


Fast forward five years, and the same son is now 12 years old, and this is what I got for Christmas today in 2022:
1672008773449.jpeg

Ping-pong balls for the nacelles! Bamboo skewers! An R5 unit in the droid socket! The boy has been paying attention! Body material is cut-up egg cartons held together with a hot glue gun!

1672009044506.jpeg

Top turret guns!

1672009138414.jpeg

Chin bump to match the upper canopy!

1672009281898.jpeg

Model building is all about selective compression, and he even included the rear engine heat diffusers!

I'd say the boy is a model maker, and I'm very proud of him.

He said he wanted to paint it for me, but first wanted me to see his craftsmanship.

I said there's no way we are painting this thing, ever, because it is already a masterpiece.

Merry Christmas to you and yours.
 

Your message may be considered spam for the following reasons:

If you wish to reply despite these issues, check the box below before replying.
Be aware that malicious compliance may result in more severe penalties.
Back
Top