Razor Crest control lever (display stand for The Child's toy ball)

I continue to be blown away by your design revisions! I have only two comments: when I did some scaling of my own, I did get 3" for the housing length/diameter, but the threaded stud seemed more correct at the 5.5" over-all length stud from McMaster (link). Note that the threads on the stud extend internally past the "equator" of the ball. (though perhaps the thread adapter you're using will change this). The ball also scaled out closer to 1.35-1.375" in my estimation; I see some space left between your 1.45" circle and the actual edges of the ball in the screencap... Totally agreed on the room for some idealization here, though.

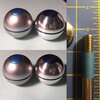
My Sideshow Grogu arrived a couple of days ago so I wanted to mention that the diameter of their shifter ball is exactly that of the 1-3/8" McMaster-Carr ball knob (link) (measured 1.36" Ss vs 1.362" M-C). In the photos below, the Sideshow one looks a little taller, only because the "south pole" has less cut off due to it having a magnet rather than a large threaded hole; diameters measured on the silver portion match within two thou.
72846974-9547-423D-854D-EF86A1AE8589.jpeg

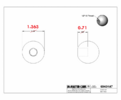
Also, the McMaster dimensioned drawing is not entirely correct. Here it is with the actual dimensions of the ball and depth of functional threading. The tape in the photo above shows how much of the threaded stud is within the ball when fully tightened down (0.71").
1610391482881.png

One final note -- five full threads of the 4" partially threaded stud remain visible when the ball is tightened down, which matches the screencap. However, the McMaster drawing for the 5" and 5.5" threaded stud list the threaded length as 1.25" vs the 1" threaded length on the 4" threaded stud. So that detail may not work out as well.
 
The prop master probably just ordered that exact knob from McMaster, it would be much easier then making a ball from scratch.
I will probably order both the 5" and 5.5" studs and choose later. The studs can always be cut down if needed.
 
I received Zenix's ball, I also ordered all the hardware from McMaster. Next week I will try to get all the parts printed/laser cut.
 
I received the hardware today and 3D printed and laser cut the parts. I realized the layer lines would look better it if were printed on its side, so I will tweak the design to work better in that orientation.

The gearing inside works great. However, the speed limiter is not needed. The lever arm is strong enough that you simply don't get any extra resistance from the limiter, and you can also alter the overall resistance by tightening the axial screws. It is also a pain to install, so I will drop that from the design. The potentiometer fits nicely, but needs to use super-glue and so I am going to see what I can do to make it fit more reliably.

The detent sort of works, part of the issue is the inaccuracy of FDM 3D printing, combined with the layer lines. I think if I want a middle detent that it will have to be some much larger mechanism. I got an idea for that using laser-cut delrin that will be easier to tweak and dial in to the right feel.

The ball and steel rod are so heavy that you have to have it screwed down or magnetically attached to something to move the lever. So as a desk toy it won't work unless the base is made heavier. I may make the final baseplate using 3/16" steel from sendcutsend.com.

I think I will still put in the longer 5.5" rod, as the 5" rod still feels a bit short even though it matches most of the the on-screen photos.
KMaZQC6.mp4

IMG_9481.JPG


6DXls40.gif
 
Last edited:
Mandalorian, Ship Lever Knob, Wired.jpg


Okay, so the lever grew a tail...
After playing with the physical object for a bit, I decided it wouldn't be good enough for it to just have some wires coming to some external circuit. This thing needs to be a self-contained USB throttle!

Adafruit makes a tiny Arduino board I have used on a few projects, and their new Trinket M0 should allow this to become a stand-alone device.

Mandalorian, Ship Lever Knob, Wired, Xray.jpg
Mandalorian, Ship Lever Knob, Wired, Exploded.jpg


I also re-designed almost every aspect of the device.
I added a 3D printed base which will house the PCB, as well as the potentiometer and a sheet of steel to add weight. The plan is to order the ballast and baseplate in stainless steel from sendcutsend.com. Both cause real materials are better, and this things needs the weight.

Screw on rubber feet will prevent it from moving around too much. I have simulated the center of mass, and it shouldn't over tip on it's own. It can still be screwed down if needed. I did look at using lead shot, but it actually didn't change the center of mass by more than 1/8".


Mandalorian, Ship Lever Knob, Detent Ring.jpg


For the detent, I decided to laser-cut a ring which will go on the opposite side from the gear. By laser cutting it I can tweak the detent depth to get just the right feel. I could also even add things like small bumps that make the lever feel like it is ratcheting up/down.

I'll mock up this design in the next week, and I don't have to order any more expensive shipping items from McMaster to build it.
 
Mandalorian, Ship Lever Knob, Ballast.jpg


I printed up the design as shown earlier. The new detent mechanism works pretty well, and is easier to dial in.
The potentiometer holder and gearing also works.

However, I decided that since I will be making the final 3D printed parts on Shapeways, I shouldn't limit my geometry to what an FDM machine can do. It can still be made on one, but will require a bit of extra cleanup.

One thing that was still bothering me was the center of mass sitting right over the feet, meaning almost any extra force on the lever will cause it to top over. So I added mass wherever possible in the way of four 1/8" steel ballast plates. These will sit on the inside of the housing. That way it is far less likely to tip over even in use. Plus it still has the magnets to provide a few pounds of force if placed on a steel surface.
 
I received my Adafruit Tinket M0 today. It took a bit of tweaking the example code, but I have proven the USB joystick throttle idea will work!
Also using capacitive touch I can also detect when the knob is touched.

Now I just need Shapeways to finish making my parts. They use to be so fast, but now they take weeks for even simple stuff. Their current ship date is still a week away, so I may have to FDM 3D print my latest files and just replace them later.
 
IMG_9656.jpg


It took a month, but Shapeways finally delivered my 3D printed parts. There were delays due to both Texas being an ice cube for a week, and Shapeways using the slowest postal method known to man.

I had to grind away a bit of metal on two of the internal plates, but everything otherwise fit perfectly.
The sides have to be pretty tight to get the heavy lever arm to not fall on its own, but it does work. The unit doesn't tip over either, but if I were to use it on a game system I would use the magnets or bolt it down anyways.

I plan on dying all the nylon parts black, and then facing the outside with aluminum tape and polishing that to get a real metal finish.
That won't happen for a bit, as I have Jedi Training Remote Stands to build up and ship out.
 
51204427785_c7b2c4e592_h.jpg


A small update: I have made some parts on the Fuse 1 3D printer, as they come out a dark grey and with less layer lines than Shapeways. It is almost useable as-is, but I still plan on coating the surface with a layer of aluminum tape for a real metal look.
 
51210010882_b3ba7341a8_h.jpg


Another short test. I took one of my FDM 3D prints and applied aluminum tape to the outside surfaces. The resulting part doesn't look 3D printed at all, or even like plastic, it is even cold to the touch.

I then did a chemical blackening and weathering pass. It is much more aged than what is on the TV show, so I might try again but only use acrylic paint to darken the aluminum.
 
Razor Crest Hero Shot.jpg


It is done! I will have a video showing the whole build coming soon. I ran into a bunch of stupid issues that I had to work through as I built. So you get to learn from my mistakes ahead of time.

My favorite thing is that the whole prop looks like it is made from solid metal. The prop is also heavy! It weighs 0.64 kg or 1.42 lbs. The aluminum tape method worked well .However it was quite tricky and tedious. I had to do re-apply it a few times to get the exact look that I wanted.

The USB Joystick function works great, nice and smooth once properly calibrated. The pins on the PCB are exposed on the bottom side. So if someone wants to add this design to a functional Razor Crest cockpit mock-up, you can wire in a few other switches to the spare pins.

My design is released as Attribution-NonCommercial-ShareAlike (CC BY-NC-SA) similar to E Williams original on this thread. The design files are on Google Drive, and the BOM is on Google Sheets.

If your interested here are the issues I ran into during the build:
  1. The Dewalt metal taps from Home Depot can't handle stainless steel. I only got 1 hole done before it broke.
  2. Solder the wires to the potentiometer before the Trinket M0. (Design updated to make this a bit easier)
  3. Test your potentiometer for any dead spots before final assembly. (Order a few spares)
  4. I forgot that the gear inverts the rotation during testing. (This was an easy software fix)
  5. Age more aluminum tape than you need. Applying it is tricky.
  6. Take great care to center the main shaft so it doesn't rub on one side or the other. (I updated the design with a bit more tolerance)
  7. Use E6000 glue instead of hot-glue to prevent metal on metal rattling.
 

I have completed the build video. I need to start recording more of the design process, but that is at least captured here.
I had to use Vjoy and Joystick Gremlin to make Star Wars Squadrons recognize the lever at the same time as my regular HOTAS setup, but it works great. It is actually quite good when used as a throttle in game, but of course lacks any additional buttons. Surely there is someone working on a full size Razor Crest cockpit who could use it.

For now it sits in my office as a display item with my other Mandalorian props. Perhaps I could program it to control the light level in the room.
 

Your message may be considered spam for the following reasons:

If you wish to reply despite these issues, check the box below before replying.
Be aware that malicious compliance may result in more severe penalties.
Back
Top