You are using an out of date browser. It may not display this or other websites correctly.
You should upgrade or use an alternative browser.
You should upgrade or use an alternative browser.
Printing T800
- Thread starter somno666
- Start date
somno666
Member
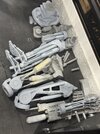
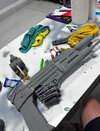
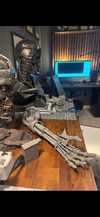
Welp, worked on these pretty much all day. Currently in the middle of printing the chest … won’t be able to work on these until next week when I’m back home from work
In the meantime I’m going to source some hoses and cables since I removed the ones in the STL file to help render the increased polygons without it crashing my Mac computer and to avoid print failures
In the meantime I’m going to source some hoses and cables since I removed the ones in the STL file to help render the increased polygons without it crashing my Mac computer and to avoid print failures
Attachments
somno666
Member
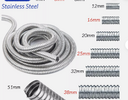
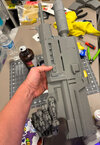
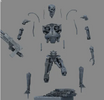
What do you guys think? This hose is a suitable match? or do you have any recommendations?
( this STL file is before i subdivided the polygons, so its blocky in photo )
( this STL file is before i subdivided the polygons, so its blocky in photo )
Attachments
Too Much Garlic
Master Member
Don't look at the model for hoses, look at real endoskeletons. I don't think the endo had that kind of hose there. It should have hose with the criss-cross pattern.
somno666
Member
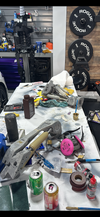
Yeah you’re thinking of steel braided cable? The model has plenty of that - but I also noted this weird fat one. Here’s a render ( you can’t see the big fat one as it’s buried on the chest ) by the spineDon't look at the model for hoses, look at real endoskeletons. I don't think the endo had that kind of hose there. It should have hose with the criss-cross pattern.
I’ll look at other endos
Attachments

Too Much Garlic
Master Member
This was posted in the endo research thread. Sorry, cannot remember who posted it. If anyone can, please post it here, so he/she gets proper credit. It's from a Lucas Francis collection of pictures of the original lying down on the job and getting shot endo.

clonesix
Master Member
a close look at the photo above, those "hoses" are cable protectors, which come in 1/4", 3/8", and 1/2".
also, there are"Cord Protector Sleeves" that are a woven material and split lengthwise, that look like braided hose, and a armature wire can go inside for the right shape.
And don't forget braided rope and bungee cord that can be painted black, and highlighted with silver to simulate hose.
just putting that out there for anyone browsing the Granger Catalog, thinking "How Much?!!"
Toni Plutonij
Well-Known Member
Awesome work, absolutely incredible.
How hard is to print 1:1 scale from the 3D model you use?
How hard is to print 1:1 scale from the 3D model you use?
somno666
Member
Awesome work, absolutely incredible.
How hard is to print 1:1 scale from the 3D model you use?
whats up ,Toni!
ummm, it has to be easy because If i can figure it out, you guys who are savvy will catch up quickly. Again i had ZERO experience with this.
I am using a Macbook air M1 ( when im working in the hospital ) and at home I have a Macmini M4 ( ew, mac products, i know- i blame the iphone ecosystem and too many virus in my past with PC lol )
anyways- I purchase and download the model I want, and use a program like Blender to "subdivide polygons" which smooths things out, the more I smooth, the more enormous the file gets so I do maybe 1-2 typically. As powerful as my M4 mac is, its not the best with 3D rendering so I must subdivide in sections or it'll crash. Once I got it in my printer slicer, i blew the part up 600%, since the original was 1:6 ( still came out a little on smaller side, so ill be making another one )
Now, if you want to save yourself heaps of post-processing, you must smooth (subdivide polygons) the model, as blocky when scaled. I struggled with subdividing the chest, without Blender crashing, no matter how much I broke it down, and i realized all the hoses were the culprit, it made sense- i just had to test it. So i downloaded MeshMixer to figure a way to remove the hoses from the file, which actually was easy. I plan to add real hoses to replace the ones i removed...seems possible, in my head. I was spending too much time trying to cut this large chest file to fit my print bed, so I used Luban and it diced it up effortlessly- the problem is that it may cut in places I rather not have seams, so i did some manual cuts in my standard printer software after the fact. The gun I split into sections where I can join them without much fuss, i did this for everything part ( compare my seams to the 3d model )
I tried using my Bambu P1S for all the large parts, but wanted to utilize my smaller A1mini printer to speeds things up- I cut parts to fit both, where i saw fit. I am using PLA+ ( anycubic sells nice bundle pack) and most parts are 3 wall loops and 10-15% infill. He feels light, and i've dropped parts already and they withstood the fall.
Attachments
-
 IMG_0696.jpg1.6 MB · Views: 57
 -
 IMG_0697.jpg1.6 MB · Views: 59
 -
 IMG_0698.jpg1.4 MB · Views: 54
 -
 IMG_0693 2.jpg1.3 MB · Views: 45
 -
 IMG_0694 2.PNG5.7 MB · Views: 41
 -
 IMG_0695 2.PNG4.8 MB · Views: 46
 -
 Screenshot 2025-06-03 at 8.25.06 PM.png507.7 KB · Views: 63
 -
 IMG_0703.jpg1.2 MB · Views: 43
 -
 IMG_0702.jpg1.2 MB · Views: 44
Last edited:
somno666
Member
now , so far all ive been able to post-process the seams to a satisfactory level - if i run into a problems ( like the chest, since there will be a lot, i may reprint it with another game plan )
Another random project; In the midst of printing, i've acquired some collector heads because of FOMO ( HCG, SS, CC, etc T600, T700, etc etc )
I am really not impressed with the teeth on any of them. I decided to try my luck with those cheap ebay endoskulls and modify the mouth with milliput and acrylic teeth and black wash the whole thing ( with my newly developed skills, haha)... seemed like it would work. Especially since I wasnt going to touch my nice endoskulls. My printed heads have really nice teeth, but i was scared to paint them by this point.
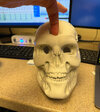
so, I went ahead and got the ebay head and its total **** lol ( i knew it would be bad, but not this bad )... its so small, and so bad , its not worth even experimenting on it, i'd be polishing a turd. From the chrome, to the size of the head, the eyes, the teeth, etc- its so bad, so so bad. I got my money back after sending the seller their product advertisement versus what I got in the mail.... lol... here, have a laugh. They didnt fuss and sent a return shipping label lol. How are these even a thing? who buys it? so bad! lol
Ill share one of my first heads I made with the idea of the acrylic teeth, not bad for my first time. Its not movie accurate but they actually look real unlike my collector heads that show the pearly whites. The pic shows before I post-processed and sanded
Another random project; In the midst of printing, i've acquired some collector heads because of FOMO ( HCG, SS, CC, etc T600, T700, etc etc )
I am really not impressed with the teeth on any of them. I decided to try my luck with those cheap ebay endoskulls and modify the mouth with milliput and acrylic teeth and black wash the whole thing ( with my newly developed skills, haha)... seemed like it would work. Especially since I wasnt going to touch my nice endoskulls. My printed heads have really nice teeth, but i was scared to paint them by this point.
so, I went ahead and got the ebay head and its total **** lol ( i knew it would be bad, but not this bad )... its so small, and so bad , its not worth even experimenting on it, i'd be polishing a turd. From the chrome, to the size of the head, the eyes, the teeth, etc- its so bad, so so bad. I got my money back after sending the seller their product advertisement versus what I got in the mail.... lol... here, have a laugh. They didnt fuss and sent a return shipping label lol. How are these even a thing? who buys it? so bad! lol
Ill share one of my first heads I made with the idea of the acrylic teeth, not bad for my first time. Its not movie accurate but they actually look real unlike my collector heads that show the pearly whites. The pic shows before I post-processed and sanded
Attachments

Last edited:
HOlY $H!7 that is HIDEOUS!so, got the ebay head and its total **** lol ( i knew it would be bad, but not this bad )... its so small, and so bad , its not worth even experimenting on it, i'd be polishing a turd. From the chrome, to the size, the eyes, the teeth, etc- its so bad. I got my money back after sending the seller their product advertisement versus what I got in the mail.... lol... here, have a laugh.
Ill share one of my first heads I made with the idea of the acrylic teeth, not bad for my first time. Its not movie accurate but they actually look real unlike my collector heads that show the pearly whites. The pic shows before I post-processed and sanded
 Did you at least get to keep it? That's beggng for like an emaciated zombie terminator workup
 somno666
Member
Even it it was free, i wouldnt have kept lol.HOlY $H!7 that is HIDEOUS!
I was so excited to have a sideshow-style endoskull with the teeth I wanted , haha. I figured some elbow grease it and it could have potential....I shouldve taken more photos side by side to my SS and HCG heads. I was so disappointed with it, took only a few necessary pics to send it back , haha. I recieved it at like 2pm, and it was back in its box with tape ready to be returned by 2:10 LOL
Too Much Garlic
Master Member
Oh, when you talked about cheap eBay skulls I thought you meant the vinyl M1 recasts and was a little surprised by your comments, until I saw it was the warped, poorly made Sideshow recast. Yeah, those look ugly.
somno666
Member
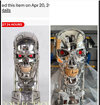
The first endoskull i ever got was the thai recast , i cut the vinyl - had it in water- bent it around... tape it up and then gave up on it, its in the closet in a box with a random 1/8 25cm T800 model that resembles that SS PVC one. It was after i gave up on it, that I moved to 3D printing. Maybe someday ill revist it. When i ordered this I also didnt know what I was doing- first time doing anything of the sort.Oh, when you talked about cheap eBay skulls I thought you meant the vinyl M1 recasts and was a little surprised by your comments, until I saw it was the warped, poorly made Sideshow recast. Yeah, those look ugly.
Attachments

somno666
Member
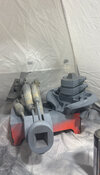
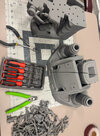
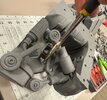
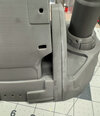
Here is some of the chest, Luban cut these parts but I manually cut them further in the slicer to utilize my little printer, speed things up. I made the cuts on each end, where the hip piston/flexor goes- made sense to me at the time since it seems like a easy seam to hide. Nothing glued yet.
Attachments
somno666
Member
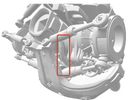
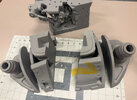
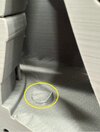
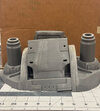
First attachment: I accidentally broke off 1 of 3 hose connectors, as you notice there is no hose- i removed them in meshmixer because subdividing the polygons (digitally smoothing the model) was in the millions and crashing my macmini M4. I left the ends of them to attach real ones in its place when completed.
Attachment 2: This was where another braided fat cable was attached in the model, but i removed it due to the render issues stated previously. This is what is left behind, I left a little behind to see where it was suppose to go. Ill probably sand it fat and glue a real cable in its place.
Attachment 2: This was where another braided fat cable was attached in the model, but i removed it due to the render issues stated previously. This is what is left behind, I left a little behind to see where it was suppose to go. Ill probably sand it fat and glue a real cable in its place.
Attachments
Last edited:
somno666
Member
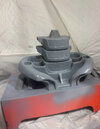
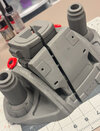
quick set 5 min epoxy , dowels, and plastic welding for good measure.
ready to fill, sand, and primer tomorrow. The other chest parts should be done printing tomorrow as well. ..... getting close to the ENDOSKULL
ready to fill, sand, and primer tomorrow. The other chest parts should be done printing tomorrow as well. ..... getting close to the ENDOSKULL
Attachments

Last edited:
Similar threads
- Replies
- 314
- Views
- 15,447
- Replies
- 3
- Views
- 1,328
- Replies
- 26
- Views
- 2,149
- Replies
- 10
- Views
- 1,777