Printing T800

somno666

Member
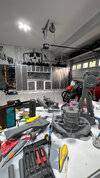
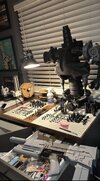
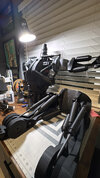
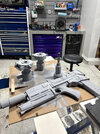
EDIT: I started this thread as a total newbie so my initial thread post was a loaded question. The T800 in progress is awesome- will continue to update.

As title says,

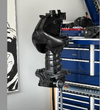
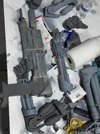
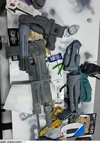
Now its 2024... ive going through a few threads... what is the general concensous on the best looking 1:1 scale T-800 for home printing? Care to share a link?

Also, I was reading someone used PLA but had to re enforce it with resin inside the parts- is ths still the way to do it? Or am I better off using a different materal all together. I have a Bambu P1S/A1 Mini and will get exotic filament if needed. I am also curious into what nozzle size is best. (currently printing some Endoskulls with 0.02 nozzle and its taking foreverrrrrrr)
 
Last edited:
Hi. Who doesn't want an endoskeleton?
Your first question depends on what model you're going for. The original 1984/1991 design(I'm sure there are vast differences between these, but I wouldn't really know) or the newer Genisys design(which I really like). I have been meaning to do one myself. There's a guy making the Genisys model from scratch here: Pepakura genisys T800

And there was a guy in that thread who posted reference pictures. It seems the one used in the Mortal Kombat game is derived from the production model, only with a few tweaks to alter it's proportions that could easily be reverted. That would be my plan.

When it comes to filament, When they made the t-800:s for the Genisys movie they did indeed 3D print the skeletons, but they also 3D printed(or machined) a metal structure that the 3D print would be glued to, to add a structure and stability underneath. Now we mere mortals don't usually have access to these fabulous techniques, but you would still need a structure for it to be strong I think. Considering if you want to build a full size skeleton for posing. Or you would have to have a structure to hold the pieces in the pose.
Not sure how I would go about it. Maybe a little simpler metal frame, designed of course to go into the 3D prints and epoxied in?

to print big parts with that small a nozzle is admirable! I would do the small detailed parts by itself and design it so it would glue to the larger parts and rely on a bigger nozzle for the larger parts and then using spray filler and sanding.
I appreciate your response! thank you for taking the time to write that.

Here, ill update you with what I ended up doing.
 

Attachments

  • IMG_3884 2.jpg
    IMG_3884 2.jpg
    1.9 MB · Views: 178
  • IMG_6043.jpg
    IMG_6043.jpg
    673.6 KB · Views: 184
  • 804F0245-02E0-4333-A14D-410C0123ED5A.JPG
    804F0245-02E0-4333-A14D-410C0123ED5A.JPG
    631.7 KB · Views: 181
I am struggling with motivation to finish , not because I am losing interest, but because I am unsure how he will be chromed. Do i trust myself to airbrush or rattle can myself? ( I have like 5 different chrome products read to try. Some spray amazing, but I cannot clear them without adding some dullness...i think ) Do I entertain another color scheme and make him battle worn and dull ? who knows lol

Ive looked and am still inquiring vacuum metalizing, and electroplating ....

The point of printing was to learn and not need to spend on statue purchases, but I couldnt help myself whenever Ive seen deals ...
 

Attachments

  • IMG_0034.jpg
    IMG_0034.jpg
    1.7 MB · Views: 94
I only have the skull right now. I'm in a similar boat. My plan is to pick a good chrome and paint and then if it ends up dulling the sheen, I'm going for a battle worn version. :lol: As for plating, I started looking at home solutions and I think I need to start small to get some experience with it. I also got my printers to save money on licensed stuff and then it puts you in a whole other spending lane!
 
Nice progress. I believe this is the same file that I used for printing an Endo. There is a thread on this board on the progress.

I printed my first Endo in PLA, and had to reinforce each piece just to carry its own weight! I drilled a hole in the print, and poured in a small amount of resin and rotocast the interior of each piece. After that, I inserted a 1/4" carbon fiber rod thru the thigh pieces, before filling with expanding foam. I tried to do this with all the pieces to ensure they would survive being assembled into a full skeleton.

Primer grey looks fine for a display until you want to go to all the trouble of chroming.
How is your endo holding up? Can you elaborate again how you painted him ( yours looked great ) ? im stuck at this point and struggling to make big moves forward. I keep seeing everyone chrome their print, only for it to turn silver. I am going to expiriment with Revell Chrom spray and really letting it dry for a week or so ( the results looks great, but i hear its delicate to other paints, which makes me worried, since I plan to black wash i or weather it somehow ) Im even debating just using graphite powder, but, ill have to read how to use this stuff. I am looking to just have him look metal, and weathered a bit- not sure if clear coat is required or not. he is just going in my garage.

did you clear yours? did you weather it? how? ..... man, getting a good result with chrome is super challenging- im struggling to even start it! ( going to try to read through your build again )

My t800 is rather heavy. printed it with FDM and most parts are like 35% infill and multi walled.
just started adding some layers to wet sand.... ::shrugs:::

im still planning to swap his head out for the one skynet-2029 offers, it looks meaner.
 

Attachments

  • Screenshot 2025-04-30 at 12.13.09 AM.png
    Screenshot 2025-04-30 at 12.13.09 AM.png
    2.6 MB · Views: 79
Last edited:
just signed up the the Stan Winston Robot finishes online class/videos, wow, they make it looks easy! im going to try these methods!
 
How is your endo holding up? Can you elaborate again how you painted him ( yours looked great ) ? im stuck at this point and struggling to make big moves forward. I keep seeing everyone chrome their print, only for it to turn silver. I am going to expiriment with Revell Chrom spray and really letting it dry for a week or so ( the results looks great, but i hear its delicate to other paints, which makes me worried, since I plan to black wash i or weather it somehow ) Im even debating just using graphite powder, but, ill have to read how to use this stuff. I am looking to just have him look metal, and weathered a bit- not sure if clear coat is required or not. he is just going in my garage.

did you clear yours? did you weather it? how? ..... man, getting a good result with chrome is super challenging- im struggling to even start it! ( going to try to read through your build again )

My t800 is rather heavy. printed it with FDM and most parts are like 35% infill and multi walled.
just started adding some layers to wet sand.... ::shrugs:::

im still planning to swap his head out for the one skynet-2029 offers, it looks meaner.


My endo has sat as a display, and not been moved much. The chrome has held up well.

The process was to paint everything gloss back first. The glossier, the better.
Next, with an airbrush, I lightly sprayed layers of Mirror Chrome for the finish.

No gloss coat was used! Any attempt to add a gloss coat will turn the chrome to silver.

Then, a black acrylic wash went over everything for the weathering.


YouTube has lots of videos about chroming.

There is a process where you spay copper paint onto the model first. The copper sticks to the plastic, and the electroplated chrome sticks to the copper. I’ve never done it, but sounds fun.


If you try chroming some test pieces, you can compare the various finishes.
 
Check Gordon Tarpley and Barbatox Rex chrome videos on youtube.

They show how to apply chrome and clear coat so it doesn't turn silver.

Stick to Allclad chrome. It gives the best Terminator chrome look.
 
not to sidetrack myself, but i also decided to make one of Skynet-2029's 1:6 into a full scale 1:1 ( had to learn blender,meshmixer) at the same time

I think with everything i learned with the previous ready to print model from Djons, this one from skynet will be much better quality and detail. I've also learned from my mistake from Djon and have dropped parts and they have withstood the fall. Learned the importance of wall loops versus infill lol. I will just finish both up as time permits
 

Attachments

  • IMG_0431.jpg
    IMG_0431.jpg
    1.3 MB · Views: 56
Now that I kinda know what I am doing its coming along much faster. Not only is it way more study/stronger but it lighter too.
Adding polygons via subdividing was working great until chest/pelvis area. I discovered if I used meshmixer to remove the hoses and repair the files it wouldnt crash my computer during the rendering via heavy details in blender. I figure ill physically add real cables once its done , anyways


You can see the black Djon t800 in the back, getting no love.... im having more fun with the skynet T800 because i know it's going to come out WAY better so im focused on this for now lol
 

Attachments

  • Screenshot 2025-05-22 at 3.45.52 AM.png
    Screenshot 2025-05-22 at 3.45.52 AM.png
    672.6 KB · Views: 83
  • Screenshot 2025-05-22 at 3.46.07 AM.png
    Screenshot 2025-05-22 at 3.46.07 AM.png
    652.3 KB · Views: 85
  • Screenshot 2025-05-22 at 3.46.18 AM.png
    Screenshot 2025-05-22 at 3.46.18 AM.png
    690.6 KB · Views: 96
Back
Top