sbaxter
Sr Member
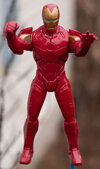
I picked up a cheap ($10) Iron Man figure at Big Lots with the idea that I could make it better -- and the certainty that I cannot afford anything from Hot Toys.
I already posted a month or so back asking about the color of MCU Iron Man's metallic base coat, which madhatter was kind enough to answer: See MCU Iron Man color question here.
Upon closer examination, I determined this figure is more "inspired by" the MCU Iron Man armor than actually attempting to duplicate any of the on-screen designs. I presume it is based on the suit used at the end of the first Iron Man movie and in the first part of Iron Man 2, but with numerous differences. On top of that, I suspect this figure originally came with or had access to some accessories that were not included with this figure (which came from Hasbro's Canadian unit, according to its markings). There are large, deep holes on the outside forearms and in the middle of the upper back, with more shallow holes on the plates covering the back of his hands. The arms are articulated at the shoulder, and his head turns -- and that's it. The arms and head are made of a softer, rubbery material, so for the most part I didn't try to tackle the seams on those parts. On the torso and legs, some of the panel lines kind of "faded away" near the seams and then resumed on the other side. I used various files to connect those panel lines, and was able to mostly eliminate the seams just by sanding them. There were extended armor plates running from the elbows up toward the shoulders, but I wasn't confident I could successfully paint the tight gap between the back of those and the arms -- plus, they looked goofy as heck to my eyes -- so I used a razor saw to cut them to less than half their original length. The aforementioned accessory openings were filled with Aves Apoxie Sculpt.
I applied some adhesion promoter to the entire figure -- I knew that it was a must for the arms and head -- and then sprayed on Mr. Surfacer 1000 from a spray can. I followed with my chosen metallic base coat, Rust-Oleum "Champagne." I was pleased with the pale gold color and the smooth, even look -- more like a bare metal finish than a glittery metallic look. I topped that with Duplicolor "Metalcast" in red for the "candy apple" look (see Duplicolor MC200 Metalcast Red). Very much liked the results.
Then I screwed up painting some of the gold details. Tried to reapply the champagne color in those areas and either it was too cold or too damp, and I got a bubbly paint job. Sanded that down and used a close match combo of Testors gold and silver to try to fix the resulting mess, but the surface still had too many rough areas.
At this point, I became ornery.
I dropped Mr. Stark in a container of Purple Power so I could start over. I left it there a week, but it removed the paint very unevenly. A couple of days ago, I slathered it with Citrus Strip, which did a much better job in just a few minutes, but still took a couple of applications.
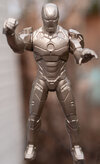
At this point, it looked as you see here:
This is just after a fresh coat of Adhesion Promoter. Interesting that the Citrus Strip removed all of the gold paint from the legs but didn't even touch the gold on the arms and head.
After a new coat of Mr. Surfacer, I applied the "Champagne" gold again.

I like the pale gold color for this!
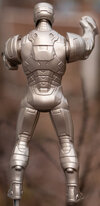
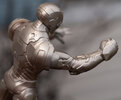
Looking at these images, you can see that the Apoxie Sculpt filling job on the back could have been better. I'm out of practice and have never done a figure like this. Also, especially on the right arm, the filling job looks especially not-so-good; I think that is due to the material used for the arms and would probably happen eventually no matter what I do.

This is a job I'm doing for practice as well as to show my wife I can finish painting something, so I'm not going to drive myself insane trying to fix impossible problems. I might give this figure to one of my boys after it is done (especially after I do the next one) and eventually get one of the Moebius Iron Man kits for a more painstaking effort for myself.
At this point, I ran out of weekend. Late this week, I'll take a swing at reapplying the candy red. Tentatively planning on using Tamiya's Titanium Gold for the gold accents, and then a coat of semi-gloss clear. If the clear coat messes up the Titanium Gold paint (I have a test mule to determine that), I'll reverse the order there. Also planning some details in a flat aluminum and a little gunmetal, and white for the arc reactors and eyes.
It's been so long since I was able to actually work on much of anything -- about 15 years, really -- that I couldn't help but document and share even this low-ambition project. Hope you don't mind seeing it in the feed!
SSB
I already posted a month or so back asking about the color of MCU Iron Man's metallic base coat, which madhatter was kind enough to answer: See MCU Iron Man color question here.
Upon closer examination, I determined this figure is more "inspired by" the MCU Iron Man armor than actually attempting to duplicate any of the on-screen designs. I presume it is based on the suit used at the end of the first Iron Man movie and in the first part of Iron Man 2, but with numerous differences. On top of that, I suspect this figure originally came with or had access to some accessories that were not included with this figure (which came from Hasbro's Canadian unit, according to its markings). There are large, deep holes on the outside forearms and in the middle of the upper back, with more shallow holes on the plates covering the back of his hands. The arms are articulated at the shoulder, and his head turns -- and that's it. The arms and head are made of a softer, rubbery material, so for the most part I didn't try to tackle the seams on those parts. On the torso and legs, some of the panel lines kind of "faded away" near the seams and then resumed on the other side. I used various files to connect those panel lines, and was able to mostly eliminate the seams just by sanding them. There were extended armor plates running from the elbows up toward the shoulders, but I wasn't confident I could successfully paint the tight gap between the back of those and the arms -- plus, they looked goofy as heck to my eyes -- so I used a razor saw to cut them to less than half their original length. The aforementioned accessory openings were filled with Aves Apoxie Sculpt.
I applied some adhesion promoter to the entire figure -- I knew that it was a must for the arms and head -- and then sprayed on Mr. Surfacer 1000 from a spray can. I followed with my chosen metallic base coat, Rust-Oleum "Champagne." I was pleased with the pale gold color and the smooth, even look -- more like a bare metal finish than a glittery metallic look. I topped that with Duplicolor "Metalcast" in red for the "candy apple" look (see Duplicolor MC200 Metalcast Red). Very much liked the results.
Then I screwed up painting some of the gold details. Tried to reapply the champagne color in those areas and either it was too cold or too damp, and I got a bubbly paint job. Sanded that down and used a close match combo of Testors gold and silver to try to fix the resulting mess, but the surface still had too many rough areas.
At this point, I became ornery.
I dropped Mr. Stark in a container of Purple Power so I could start over. I left it there a week, but it removed the paint very unevenly. A couple of days ago, I slathered it with Citrus Strip, which did a much better job in just a few minutes, but still took a couple of applications.
At this point, it looked as you see here:

This is just after a fresh coat of Adhesion Promoter. Interesting that the Citrus Strip removed all of the gold paint from the legs but didn't even touch the gold on the arms and head.
After a new coat of Mr. Surfacer, I applied the "Champagne" gold again.


I like the pale gold color for this!
Looking at these images, you can see that the Apoxie Sculpt filling job on the back could have been better. I'm out of practice and have never done a figure like this. Also, especially on the right arm, the filling job looks especially not-so-good; I think that is due to the material used for the arms and would probably happen eventually no matter what I do.

This is a job I'm doing for practice as well as to show my wife I can finish painting something, so I'm not going to drive myself insane trying to fix impossible problems. I might give this figure to one of my boys after it is done (especially after I do the next one) and eventually get one of the Moebius Iron Man kits for a more painstaking effort for myself.
At this point, I ran out of weekend. Late this week, I'll take a swing at reapplying the candy red. Tentatively planning on using Tamiya's Titanium Gold for the gold accents, and then a coat of semi-gloss clear. If the clear coat messes up the Titanium Gold paint (I have a test mule to determine that), I'll reverse the order there. Also planning some details in a flat aluminum and a little gunmetal, and white for the arc reactors and eyes.
It's been so long since I was able to actually work on much of anything -- about 15 years, really -- that I couldn't help but document and share even this low-ambition project. Hope you don't mind seeing it in the feed!
SSB
Last edited:
