Polar Lights Pike Enterprise 1/1000 build (completed)

Poakwoods

Active Member
Hi, this is not the first model I made, but it is the first build process I post here on the forum.
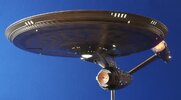
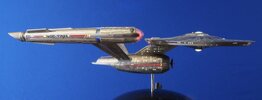
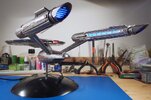
It's the Enterprise led by Capt. Pike which appears at the end of the episodes of the “Discovery” series (and which is “almost” the same ship of the new “Strange New Worlds” series). The kit is manufactured by Polar Lights and is 1/1000 scale. My intention was to illuminate it completely, so I spent a lot of time designing and building the electrical system, driven by an Arduino board. Unfortunately, in the rush to build, I didn't think of taking pictures of the inside of the nacelle and the saucer, where the "brain" (Arduino) resides...
20210314_193316.jpg

For the rotary movement of the bussards, I tried different types of motors, but I was not satisfied (noise and vibrations), so, also given the small size of the nacelle, I preferred to simulate it with a circle of LEDs that light up in cross-fading.
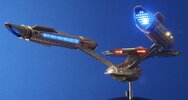
I used both SMD microled and fiber optics of various diameters for the position lights and for the headlights that illuminate the outside of the hull. Here you can see the general effect of the lighting (you can see a lot of light infiltrations, but will be eliminated by some putty and a couple of coats of black primer).
20210316_095046.jpg

20210316_100248.jpg

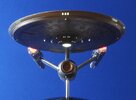
And this is where we are now: priming the exterior black after screening the windows. The next steps will be the painting of the hull with gunmetal color, the painting of the details and the application of the decals.
20220909_111227.jpg
 
Last edited:
Very nice work. Getting such complex lighting into a 1/1000 scale ship is a tricky task, and you've pulled it off beautifully! Well done.
 
Thanks! For a laugh, I started building this Enterprise 1/1000 because I wanted to take a break from the looong build of the Enterprise Refit 1/350 and I chose this one because I thought it was more "simple, fast and relaxing"... :lol:
 
After a period of inactivity due to a sudden and unexpected meeting with Mr. Covid :sick: plus other matters of life, here I am again to update on the progress of this build.
I drew the window masks on the computer and cut them on Tamiya adhesive paper with a Silhouette Cameo cutting plotter. After applying the masks, I sprayed the whole model with Vallejo's Dark Aluminum from the Metal Color series, followed by a coat of Future (of which I have little left now, as I have not yet found a worthy replacement...).
The following step is now the long, long process of applying the aztec decals. I am having some difficulties with the quality of the decals: very thin, fragile and easy to wrinkle. Because of this, the job is progressing slowly, but I should be almost done...

View attachment 1634926

View attachment 1634927
 
Last edited:
The decals look great. Perfect fit for the base color, they look just the right subtlety, contrasting enough to be noticeable, but not overwhelming. I like the overall design of this version of Enterprise, except for the open pylons and the way the portholes are shaped around the edge of the primary hull. I have plans top make some drastic changes to this one when I finally get around to lifting the lid. Which will probably be sometime next decade... :)
 
The decals look great. Perfect fit for the base color, they look just the right subtlety, contrasting enough to be noticeable, but not overwhelming. I like the overall design of this version of Enterprise, except for the open pylons and the way the portholes are shaped around the edge of the primary hull. I have plans top make some drastic changes to this one when I finally get around to lifting the lid. Which will probably be sometime next decade... :)
Yes, about the base color I did several tests, and dark aluminum is the one that seemed to me the most suitable, not too dark to make the decals disappear and not too light to make them stand out too much.
In the meantime, today I have completed the application of the aztecs, and tomorrow I will apply the gloss and then once it is dry it will be the turn of the decals with the signs and writings. I hope to complete everything in two or three days, I can't wait to see it finished and all lit up, it has been a longer job than I thought!
 
You've done an excellent job so far. I know when it's finished it will look fantastic. Will be interested in your 1/350 build.
The 1/350 scale Enterprise Refit has been under construction for some time, and required a lot of effort to design and build the lighting and sound system ... Now I have finished the electronics of the saucer and, separately, of the main hull. I am working on the nacelles now. When it will be completed, turning a switch the soundtrack of the original movie will start, with the voices of the crew and the music of the famous “Leaving the Drydock” scene, and the various headlights will light up in sequence, as in the movie. I have already tested the system, which is based on a couple of Arduino boards, and it works :p
Masking and painting the aztec in 4 pearl colors, then, will certainly be an adventure on its own!
It is for sure the most demanding build I've ever dealt with…
 
Last edited:
We are here for now… the saucer is in a box. Nothing really interesting to see, the electronics are sealed inside. Maybe, when completed, I will post a new thread with also some photos of the build (if people are not tired of ANOTHER refit build…).

View attachment 1630202
I never get tired of refit builds. Seems like I learn something new every time I see one. Even if I don't, it's still a joy to see someone working up their build of my favorite Enterprise. Will be looking forward to a sound and light show when she's ready to leave drydock!
 
After completing the decal work, I noticed one thing: the decals do not (obviously) allow the panels to stand out by reflection, a feature that is clearly visible in the original ship. After thinking about it, even though I knew this would take A LOT more work, I decided: armed with patience, with some background music (Star Trek soundracks of course), I started:
schermo.jpg


First I drew the profiles of the panels with a CAD program, tracing the scans of the decal sheets, then I cut the masks on Oramask adhesive vinyl with a cutting plotter Silhouette Portrait.

For now, I'm still applying masks to the model and spraying semi-gloss clear varnish to bring out the unmasked parts.
20221103_003336.jpg

Below you can see the difference on the side of the saucer I have already made:

Soooo... if I had used masks from the beginning I could have saved myself the tedious work of aztec decals. Oh well...
 
Last edited:

Your message may be considered spam for the following reasons:

If you wish to reply despite these issues, check the box below before replying.
Be aware that malicious compliance may result in more severe penalties.
Back
Top