You are using an out of date browser. It may not display this or other websites correctly.
You should upgrade or use an alternative browser.
You should upgrade or use an alternative browser.
Planet of the Apes Spaceship builds...
- Thread starter MARK M3
- Start date


Zombie_61
Master Member
Just to be clear, the ship is a kit, but the water-effects base is custom/scratch-made, correct?Yes...it is a kit from Crow's Nest Models...
Regardless, it's brilliant! I've seen a lot of modelers attempt the "more ship under the surface" look, and yours is easily the best--it's the most realistic, and replicates the scene from the movie perfectly!
I agree. Water is one of those things that either can be done amazingly like with this or less than amazingly. There's better materials to make the water out of too these days so it looks more realistic. i remember trying it as a kid using white glue on a Gato submarine lol.
division 6
Master Member
Nice.
I've seen the Crows Nest kit's before but never with the water.
Is it a solid clear cast part you slip the ship into?
I've seen the Crows Nest kit's before but never with the water.
Is it a solid clear cast part you slip the ship into?
Demoriel
Member
I recognize all the cool stuff on their web-page. Astonishing detail. I've seen these castings up close through work, and they are very nice.
Here's some cool production photos
http://www.customreplicas.com/kit_production.html
Here's some cool production photos
http://www.customreplicas.com/kit_production.html
Last edited:


Jaitea
Master Member
Firstly Capt, you are making masterpieces (again)...lovely clean work
Have you seen this website....mock-ups of a Space Airshow:
Sci-Fi Airshow: Liberty 2 Lander

J
Have you seen this website....mock-ups of a Space Airshow:
Sci-Fi Airshow: Liberty 2 Lander
J
Firstly Capt, you are making masterpieces (again)...lovely clean work
Have you seen this website....mock-ups of a Space Airshow:
Sci-Fi Airshow: Liberty 2 Lander
http://www.scifiairshow.com/images/ships/liberty/liberty2-lander-1.jpg
J
Sincere Thanks my friend! And Yes indeed I have seen that fantastic work!
Great Work, Mark!
A few extra bits of info for you guys..(I'm Drew from Crow's Nest Models)
The Paperweight kit
super fun build... includes full body decals of the re-entry weathering, and tinted clear water part... but you will want to cover up the seam between the ship and the water part with some woodland scenic "Water effect"... roughed up with a toothpick into a little clear froth at the base of the ship!
1/48 ICARUS UPDATE....The client requested I correct a small flaw on the kit. The floor as is was too shallow to allow the round escape hatch to function, so I had to enlarge the area...carefully, with my dermal, X-Acto Blades, sandpaper etc... Now the Hatch, with a small hinge I am fabricating will be able to open and Close.
The model is in it's raw form and will be cleaned up.

The model is in it's raw form and will be cleaned up.

UPDATE...
As I work on refining the floor area beneath the escape tunnel hatch, I fashioned a working Atmospheric testing unit. I used brass and aluminum tubing to allow the unit to raise, and inversely, lower back into the ship. The tip of a pin provides the weight necessary to keep it in the "closed" position.
I also used my IWATA air brush and started the base colors on the sleeping units...
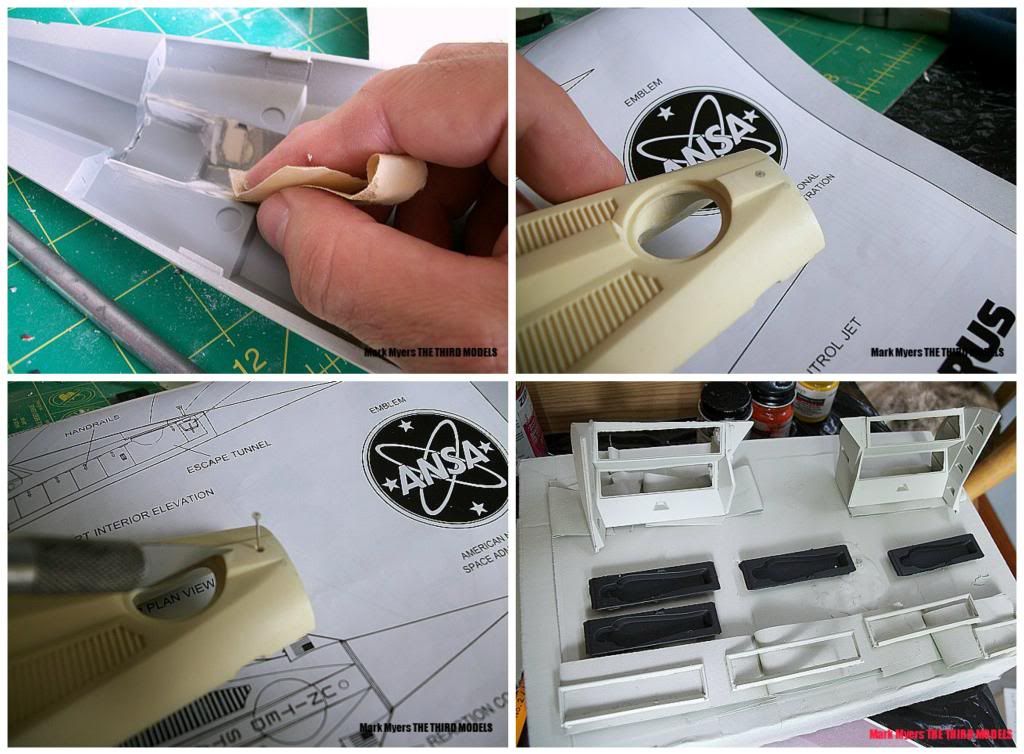


Similar threads
- Replies
- 31
- Views
- 2,972
- Replies
- 24
- Views
- 1,769