Pedro's Blasters - Current projects: DL-18 and A295 Hoth rifle

I seem to be stuck toying with the shroud for my Hoth rifle. Maybe you guys can weigh in?

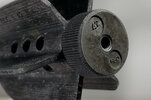
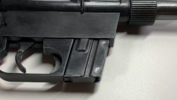
One thing that has always bugged me about this is the "broken" part under the front on the right. Every single original blaster I've seen has something going on up there. There's a notched out/broken bit under the protruding front cylinder, and there's some kind of long greeblie above it that looks to have multiple small domes or something on it. This is the part that leads me to believe that it was pieced together from some found parts. To me it looks very much like a hollow molded part that doesn't come together for whatever reason. Surely I'm not the only one to agonize over this? I haven't seen anyone try to replicate it.

Here's my current take on it (not at all satisfied though). I matched the break/whatever as best I could, and for the greeblie I've tried a lot of things. To my knowledge the ONLY model kits used for greeblies on ESB blasters are the Visible V8 and the 1/32 Phantom. I didn't find anything that looked the part on the sprues, so decided for now to "chop up" some other known greeblies. So I have a reshaped 4 bump greeblie from the Bespin Relby, and a piece of an unknown greeblie shared by the Relby and the DL-21. Meh. What do you guys think? I'm pondering putting some cylindrical V8 parts inside of the opening, though I suspect that it's just torn up RTV rubber down there.
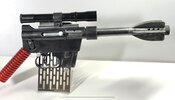
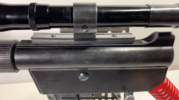
Hoth_Rifle_Shroud.jpg
 
I like your model so far, but recommend to print the added greeblies on the right side separate.
Personally, I just see the bumpers on the right and the either rectangular or square greeblie (my bet is on a RS microswitch pushbutton) on the shrouds left side.

The area you´re referring to is most likely a remain of the original part, that the shroud was made from...probably just a poor cutting/ sanding job, just like the crappy holes in the shroud.
 
Yeah, for this piece most greeblies will be kept separate, good call. It hadn't occurred to me that it might be one of those RS buttons on the left. Dimensions seem to match, though it's a bit "short"...perhaps they filed the back down? I have scoured the Internet trying to find these buttons! I think I have a lead on some, which is awesome, since they keep turning up on stuff I want to make!

I'm not at all happy with the details on the right side, just playing for now, I want SOMETHING there. I found another reference pic that seals the deal for me for the cutout on the right. Here you can clearly see that the trapezoid shape on the front left is fairly thin, it does not extend all the way to the other side. I do agree that it's probably just sloppy work of course, but I don't think the two halves (assuming that they are halves!) ever matched up at the front.
IG-88_shroud.jpg
 
My blaster roll is still rolling along. :) Today I present my super accurate 3d model of a SinglePoint scope. I needed one for my A295, only own 1 real one, and frankly you can never have enough SinglePoints. There are some good replicas out there, in particular Think Jedi did a run of very nice 3d prints, which I used on my DL-21. But there are a few little things that I haven't seen on any replicas, and I want this thing to be perfect. There are some small details that I focused on getting right, nailing the chamfers, and most importantly the overall shape.

Looking closely at the real scope, I found that there's actually a flat under the adjustment knobs as well as a smaller flat under the smaller cylinder thingie. (does anyone know how the scope bodies are made?)

I've got mine pretty close, but need to made some tiny adjustments. The flat really makes a difference! Here's a render without adjustment cylinder to make it clear:
singlepoint_flat.jpg


Little details make the replica! Here are some pics of a test print next to my real scope. Oh, yeah, I botched the length of the front section, human error :lol: The eyepiece is separate, and I haven't bothered with the tip yet (don't need it for the A295!). Did you know the 'stairs' in the eyepiece are actually rubber on the real scope?? I still need to add a serial number and some small adjustments. If you see anything that doesn't look right feel free to pipe up!
singlepoint-1.jpg

singlepoint-2.jpg

singlepoint-3.jpg

singlepoint-4.jpg

singlepoint-7.jpg
 
Yeah, for this piece most greeblies will be kept separate, good call. It hadn't occurred to me that it might be one of those RS buttons on the left. Dimensions seem to match, though it's a bit "short"...perhaps they filed the back down? I have scoured the Internet trying to find these buttons! I think I have a lead on some, which is awesome, since they keep turning up on stuff I want to make!

I'm not at all happy with the details on the right side, just playing for now, I want SOMETHING there. I found another reference pic that seals the deal for me for the cutout on the right. Here you can clearly see that the trapezoid shape on the front left is fairly thin, it does not extend all the way to the other side. I do agree that it's probably just sloppy work of course, but I don't think the two halves (assuming that they are halves!) ever matched up at the front.
View attachment 1486060

The RS button is just the first thing, that came to my mind.
They might have used the small square bumpers alternatively, that can be found on the Hoth binoculars and Leia´s ROTJ DDCD. Those have very similar dimensions. Have to check my pics again, if the sides of these squares taper or not.
 
My blaster roll is still rolling along. :) Today I present my super accurate 3d model of a SinglePoint scope. I needed one for my A295, only own 1 real one, and frankly you can never have enough SinglePoints. There are some good replicas out there, in particular Think Jedi did a run of very nice 3d prints, which I used on my DL-21. But there are a few little things that I haven't seen on any replicas, and I want this thing to be perfect. There are some small details that I focused on getting right, nailing the chamfers, and most importantly the overall shape.

Looking closely at the real scope, I found that there's actually a flat under the adjustment knobs as well as a smaller flat under the smaller cylinder thingie. (does anyone know how the scope bodies are made?)

I've got mine pretty close, but need to made some tiny adjustments. The flat really makes a difference! Here's a render without adjustment cylinder to make it clear:
View attachment 1487470

Little details make the replica! Here are some pics of a test print next to my real scope. Oh, yeah, I botched the length of the front section, human error :lol: The eyepiece is separate, and I haven't bothered with the tip yet (don't need it for the A295!). Did you know the 'stairs' in the eyepiece are actually rubber on the real scope?? I still need to add a serial number and some small adjustments. If you see anything that doesn't look right feel free to pipe up!
View attachment 1487472
View attachment 1487473
View attachment 1487474
View attachment 1487475
View attachment 1487476

Now that´s NICE...remind me again, what printer are you using?
 
Now that´s NICE...remind me again, what printer are you using?
Thank you sir! I'm currently using a Phrozen Sonic Mighty 4k. Most of the stuff I've shown here was done on my Mars though, aside from the SinglePoint and dark grey Beckett blasters. The A295 shroud just barely fit on the Mars, will print better on the larger printer because I can use a better orientation. The SinglePoint would fit on the Mars too. Definitely a big difference between the two though, the Mighty is MUCH faster, more reliable, bigger (more flexible when orienting parts!), but the print quality is about the same. I'm only down to .05mm layers, could go lower.

If you have any great shots of the A295 I'd be grateful to see them! I have the propstore pics and usual ones that go around, and a couple from Gus Lopez' collection, but maybe there are more? I did a bunch of work on the shroud and will post up some pics of the new one later today.
 
Hey OdiWan72 - does this sell you on the opening under the tip of the A295 scope? I’m sold on it, but the greeblies I tried, not so much.

00108BC3-C007-4FCE-9066-5C56EEA68C93.jpeg

Now that I have a digital Singlepoint, I ended up scaling it down some after the above. Hopefully my next iteration will be “done”. I’ll print without the bumps next time, will use rubber feet like (I think) the original.
 
Hey OdiWan72 - does this sell you on the opening under the tip of the A295 scope? I’m sold on it, but the greeblies I tried, not so much.

View attachment 1487950
Now that I have a digital Singlepoint, I ended up scaling it down some after the above. Hopefully my next iteration will be “done”. I’ll print without the bumps next time, will use rubber feet like (I think) the original.

Looking great Pedro, but I still believe that the "opening" is just a defect from filming and/ or a casting flaw. So I´d model one shroud with and one without the damage, depending on which state of the blaster you´re intending to build

Check out this picture from the set of ESB...no "opening" on the shroud (even if the damage IS present on the IG88 rifle and -at least- the long mag version of the Hoth blaster rifle.

HothSoldier[1].jpg
 
I'm certain your right OdiWan72, it's just a question of whether or not to include the "damage". For some reason I'm stuck on it, was hoping someone else would jump onboard so I could feel important. :lol: I do of course have a version without the break. Maybe it's actually a thin cross-section on that side in the casting, with a specific structure/shape behind, and that's why it breaks off in a particular shape? Unless they're coming out of different molds that seems the most likely explanation. I had considered that it might be assembled from some of the V8 motor box (red and clear) pieces, there are some areas that match profiles/dimensions, but I can't piece it together. *shrug*

Anyhoo, mostly because I hope folks will play research with me, I whipped up a collage of photos to illustrate it. There are at least 2 different blasters here, possibly 3 or 4. I've named the Hoth soldiers Beard Guy and Young Guy (of course), and there's Gus Lopez' screen used blaster, and a pic of good ol' Treat Williams with Carrie. Beard Guy seems to have an intact shroud, particularly in the pic you posted, though maybe it's there on the 2nd on the right? I think I see it on all the other blasters though, and as Markus said, it's on the IG-88 and long-mag version. Oh well, lookie! See anything else of note?
Scope_research.jpg
 
Are the days of researching the crap out of stuff gone, or are we just bored with the Hoth Rifle?? Come on guys, play with me! :lol:

Well, I'm about ready to call this DL-18 done, though I will probably fiddle a bit with the paint (already darkened up the "marker cap" a bit), and shoot some better photos. I love the way it feels in hand, heavy and very Star Wars-ey - this is my current favorite build! I don't know if anyone else bothers to fire theirs (not easy to cock frankly!), but it's got a good kick to it as well. Pew pew! :D

DL-18_3.jpg


DL-18_1.jpg
 
Looks great but I’d add a black wash to the grip. Not sure why but builders tend to forget to weather a grip. Always looks weird to me to see a weathered blaster but a pristine grip.
 
I haven't posted anything in a while, but I've been pretty productive. Several blasters done or nearly done, I just haven't found the time to visit the forums much. Currently I'm finishing up details on my DL-21 project, Ponda Baba and Hoth versions based on very accurate AR-7 I 3d modeled. I keep being "done", then deciding "Oh, I guess I'll make that weird scope...and mount...and..." :p

I'm having a lot of fun playing with paint and patina stuff, this is all spray-bomb and paintbrushes (plus abuse and chemicals!). Oh, and I finished up my Fieldmarshall Mando blaster! A really interesting and fun build, I'll post some pictures and info when I have some more time. Anyway, pics...
IMG_6792.JPG
 

Attachments

  • IMG_E6978.JPG
    IMG_E6978.JPG
    1.1 MB · Views: 43
  • IMG_6798.JPG
    IMG_6798.JPG
    1.7 MB · Views: 59
  • IMG_6791.JPG
    IMG_6791.JPG
    926.3 KB · Views: 46
  • IMG_6784.JPG
    IMG_6784.JPG
    1,019 KB · Views: 46
I'm going to do a run of these DL-21 kits very soon, I just want to make sure everything is perfect first! I'll have Ponda Baba and Hoth options, I built everything but the Sterling Grip, which are easy to come by. Feel free to PM if you're interested!
 

Attachments

  • IMG_E6985.JPG
    IMG_E6985.JPG
    413.1 KB · Views: 66
  • IMG_6981.PNG
    IMG_6981.PNG
    3.5 MB · Views: 63
  • IMG_6982.PNG
    IMG_6982.PNG
    3.3 MB · Views: 67

Your message may be considered spam for the following reasons:

If you wish to reply despite these issues, check the box below before replying.
Be aware that malicious compliance may result in more severe penalties.
Back
Top