Hi all, rather than keep making new threads, using somebody else's great idea, I've decided to make a single thread for all my stuff.
This used to be my Obi Fossil build...
Enjoy
Update: 3/25/17
So after 5 years here at the RPF, I've decided to attempt the near impossible and do a real parts OB1 build. Madness I know but hey, why not?
Please feel free to critique the build, the good, the bad and the ugly.
I'd like to say thank-you to some of our members who've helped me out either with parts, information or machine services. I appreciate the trail that's been blazed before me.
An incomplete list I'm sure but:
Mugatu
Sym-Cha
Roman
3cell
James Kenobi1138
Teecrooz
Scottjua
Serenity
NeoRutty
Thd9791peacefrog35
This started when I bought Roman's weathered OB1 saber and I thought,"This an amazing piece of art, what more could I ask for?"
I liked it so much, I took a picture.

After awhile, I couldn't help it and the idea of adding vintage parts started to become an obsession.- Thanks guys...
I like that this prop is all beat up and so I thought it would be cool to take it further and create something that was more of a decayed relic or unearthed artifact. Along the way, I discovered that building one this way could make it cheaper, slightly cheaper...as some of the parts wouldn't command as high a price.
First, the parts-
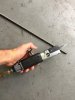
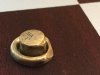
So I pulled it apart when I got my 1st real component - An AS hand wheel. Thanks Mugatu!
Starting at the bottom:
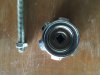
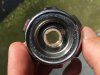
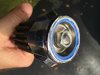
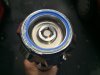
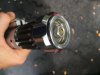
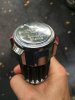
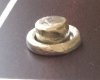
I got the cold one as I liked the blue.
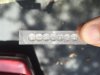
This came off a bidet in the UK. I like the worn plastic ring, it already looks old and the chrome is scratched in places. I'm doing some research into aging chrome with finishes.

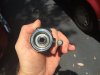
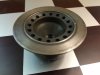
Next up, holy grail #1. A booster. Until a miracle occurs, I'm sticking with Roman's replica which is an amazing piece. I'm currently trying to source the real deal by selling a kidney but I'm not holding my breath. Weathering will be forthcoming.

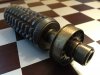
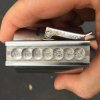
The clamp assembly is interesting to me as it's really a number of parts working together.
Clamp, transistors, bubble strip and washers.
Real Graflex clamp with some natural weathering but in overall good condition. It'll need work to age it properly.

I found some vintage transistors of the proper Motorola MA series. They're the 205's. Seems like some here have gone high profile while others like the low version.
There's a photo of the saber on Obi's cloak showing one high and one low. I'm going that route in the end and shortening one of these. I'm still looking for a good vintage washer...

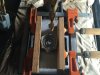
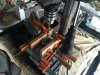
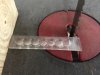
Onto the bubble strip. Got the proverbial Exactra 20 and pulled it apart for the strip.

I did this before with my Luke ANH build but labored over it with hand tools- filing and cutting etc. This time I decided to use a belt sander and a band saw.
This made it faster but also introduced other issues like a possible trip to the emergency room. Luckily, I still have all my digits.
When I used the belt sander to slim the strip down to fit under the clamp, an interesting thing happened; it melted, bubbled and frosted over. I was originally thinking of polishing it out but then the look grew on me. It reminds me of old broken glass that's been left out too long in the elements.


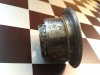
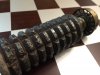
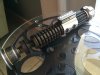
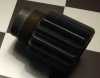
Next up is the grenade. Thanks again to Mugatu for parting with this treasure. You may recall his excellent tutorial thread on reconstructive surgery to this piece found here.
http://www.therpf.com/showthread.php?t=238323&highlight=mugatu
I can't say enough about what an outstanding job of rebuilding the bottom edge he did. Top drawer.
One of the beauties of this piece is that it's so worn, there'll be no weathering to do. It sat in the French soil for the last 100 years and I think it's perfectly battered by time and the elements.
The cracked ring even adds to the concept of the build.


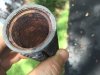
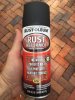
It does need some TLC on the inside as there's a good amount of surface rust.

I took some sand paper to it and it looks better now. I'm going to hit the inside with this product I found which claims to transform rust into a black paintable surface and renders the rust inert.
I hope....

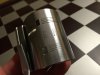
Ok, that leaves Holy grail #2. The balance pipe. I may be collecting Social Security by the time I find this part, I'll run around the nursing home brandishing my saber at the staff, I'm sure they'll appreciate it...what?
Until that fateful day, I'm sticking with Roman's weathered pipe which I'm probably going to seriously maim and discolor to fit in with the rest of it.


So that about wraps it up for now. Those are the parts I have. Next installment will be about the odyssey that is putting them together. Almost there...
More to come.
This used to be my Obi Fossil build...
Enjoy
Update: 3/25/17
So after 5 years here at the RPF, I've decided to attempt the near impossible and do a real parts OB1 build. Madness I know but hey, why not?
Please feel free to critique the build, the good, the bad and the ugly.
I'd like to say thank-you to some of our members who've helped me out either with parts, information or machine services. I appreciate the trail that's been blazed before me.
An incomplete list I'm sure but:
Mugatu
Sym-Cha
Roman
3cell
James Kenobi1138
Teecrooz
Scottjua
Serenity
NeoRutty
Thd9791peacefrog35
This started when I bought Roman's weathered OB1 saber and I thought,"This an amazing piece of art, what more could I ask for?"
I liked it so much, I took a picture.
After awhile, I couldn't help it and the idea of adding vintage parts started to become an obsession.- Thanks guys...
I like that this prop is all beat up and so I thought it would be cool to take it further and create something that was more of a decayed relic or unearthed artifact. Along the way, I discovered that building one this way could make it cheaper, slightly cheaper...as some of the parts wouldn't command as high a price.
First, the parts-
So I pulled it apart when I got my 1st real component - An AS hand wheel. Thanks Mugatu!
Starting at the bottom:
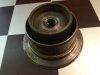
I got the cold one as I liked the blue.
This came off a bidet in the UK. I like the worn plastic ring, it already looks old and the chrome is scratched in places. I'm doing some research into aging chrome with finishes.
Next up, holy grail #1. A booster. Until a miracle occurs, I'm sticking with Roman's replica which is an amazing piece. I'm currently trying to source the real deal by selling a kidney but I'm not holding my breath. Weathering will be forthcoming.
The clamp assembly is interesting to me as it's really a number of parts working together.
Clamp, transistors, bubble strip and washers.
Real Graflex clamp with some natural weathering but in overall good condition. It'll need work to age it properly.
I found some vintage transistors of the proper Motorola MA series. They're the 205's. Seems like some here have gone high profile while others like the low version.
There's a photo of the saber on Obi's cloak showing one high and one low. I'm going that route in the end and shortening one of these. I'm still looking for a good vintage washer...
Onto the bubble strip. Got the proverbial Exactra 20 and pulled it apart for the strip.
I did this before with my Luke ANH build but labored over it with hand tools- filing and cutting etc. This time I decided to use a belt sander and a band saw.
This made it faster but also introduced other issues like a possible trip to the emergency room. Luckily, I still have all my digits.
When I used the belt sander to slim the strip down to fit under the clamp, an interesting thing happened; it melted, bubbled and frosted over. I was originally thinking of polishing it out but then the look grew on me. It reminds me of old broken glass that's been left out too long in the elements.
Next up is the grenade. Thanks again to Mugatu for parting with this treasure. You may recall his excellent tutorial thread on reconstructive surgery to this piece found here.
http://www.therpf.com/showthread.php?t=238323&highlight=mugatu
I can't say enough about what an outstanding job of rebuilding the bottom edge he did. Top drawer.
One of the beauties of this piece is that it's so worn, there'll be no weathering to do. It sat in the French soil for the last 100 years and I think it's perfectly battered by time and the elements.
The cracked ring even adds to the concept of the build.
It does need some TLC on the inside as there's a good amount of surface rust.
I took some sand paper to it and it looks better now. I'm going to hit the inside with this product I found which claims to transform rust into a black paintable surface and renders the rust inert.
I hope....
Ok, that leaves Holy grail #2. The balance pipe. I may be collecting Social Security by the time I find this part, I'll run around the nursing home brandishing my saber at the staff, I'm sure they'll appreciate it...what?
Until that fateful day, I'm sticking with Roman's weathered pipe which I'm probably going to seriously maim and discolor to fit in with the rest of it.
So that about wraps it up for now. Those are the parts I have. Next installment will be about the odyssey that is putting them together. Almost there...
More to come.
Attachments
-
 IMG_5949.JPG1.6 MB · Views: 1,580
 -
 IMG_5952.JPG1.6 MB · Views: 1,570
 -
 IMG_5953.jpg1.6 MB · Views: 1,559
 -
 IMG_5919.JPG1.6 MB · Views: 1,569
 -
 IMG_5921.jpg2.3 MB · Views: 1,523
 -
 IMG_5954.JPG1.7 MB · Views: 1,544
 -
 IMG_5955.JPG1.5 MB · Views: 1,525
 -
 IMG_5893.JPG1.9 MB · Views: 1,652
 -
 IMG_5892.jpg1.8 MB · Views: 1,606
 -
 IMG_5898.JPG1.4 MB · Views: 1,599
 -
 IMG_4017.JPG1.8 MB · Views: 1,655
 -
 IMG_5948.JPG1.5 MB · Views: 1,628
 -
 IMG_5885.jpg2.1 MB · Views: 1,622
 -
 IMG_5448 - Version 2.JPG182.5 KB · Views: 1,501
 -
 IMG_5448.JPG241.6 KB · Views: 1,516
 -
 IMG_5958.JPG414.4 KB · Views: 1,528
Last edited: