chazzychaz
Sr Member
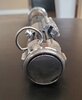
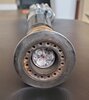
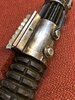
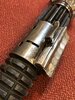
Ah more than likely the cotter pins used to hold the thing together. ThanksBetween the clamp and booster there are wires protruding from tiny holes in the clamp at 180° from each other, same as the screws on the opposite end of the clamp.
View attachment 1343709
Here is one of the lesser seen Chronicles pics, posted by Serenity in another thread.
Thank you!View attachment 1343714View attachment 1343715View attachment 1343716
These aren't mine, if I need to take them down anyone let me know,
")