Orca from JAWS

I thought that this would be easier to show in a video. Foredeck storage is removable for lower cabin photo ops. Eventually I’ll cut the beams and affix them to the removable part.
 

Attachments

  • IMG_8875.mov
    48.8 MB
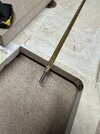
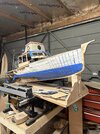
So I decided to install a prop shaft on the off chance that I want to take it out on a boating lake. I imagine I’ll take it out once and that’ll be enough. I routed out a channel to receive the prop shaft which I’ll epoxy in place tonight, capped off with a strip of ply. Thinking ahead, I’ll be planking the hull with two layers, followed by a couple of coats of epoxy, thinned down to within an inch of its life. I want to retain the look of planking so whilst I’ll be sanding it between coats I don’t intend on filling any visible seams. This is a display model for the most part but it’s as accurate as I can make it. Caking on resin and fibreglass matting or tissue I think is excessive in my case.
 

Attachments

  • IMG_8901.jpeg
    IMG_8901.jpeg
    2.2 MB · Views: 30
Gunwale on and the boat, gluing up the shear rails (?) and taking one last look before I strip it right back to bare bones for planking. Adding the rails has instantly created a 3D element that was missing from the overall model and I'm now realising the enormity of the dang thing :p
 
I started to second guess myself so I needed a quick and easy way to check my hull profiles. Tape is a super quick way to check contouring profiles and once I did, fears were quickly allayed. I’m going with walnut for the planks as I have it in stock in bulk and it’s an easy wood to work in especially for a job like this. Plus machining walnut smells amazing haha!
 

Attachments

  • IMG_8964.jpeg
    IMG_8964.jpeg
    2.1 MB · Views: 53

Your message may be considered spam for the following reasons:

If you wish to reply despite these issues, check the box below before replying.
Be aware that malicious compliance may result in more severe penalties.
Back
Top