Officer K Jacket Build - Parallel Build With Deckard

Egon

Sr Member
Hey everyone,

While working on the Deckard jacket with Mark (explained in that thread - Deckard Soup to Nuts) we are also going to tackle the jacket from 2049 for Officer K.

This thread will mostly be be picture dumps as the costume is well dissected in other threads.

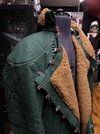
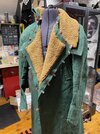
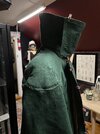
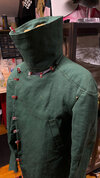
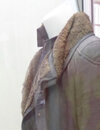
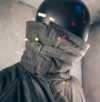
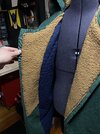
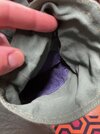
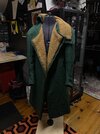
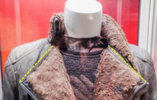
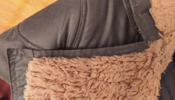
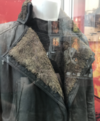
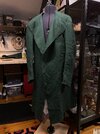
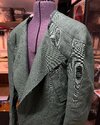
These first images are a rough mock up using the tremendous reference we have, as again, I am able to tackle this with the help of other folks and their prior work. However, unlike Deckard, I have to do a lot less detective work on materials, order of operations, techniques etc.

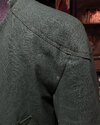
I did unfortunately make the sleeves a bit too wide on this, so I will be slimming them down tomorrow and adding a more pointed cuff.

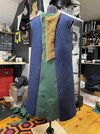
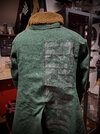
As for the graphic on the back, I am toying with how to approach that with the available tools in my shop (so no screen printing) but I may end up stenciling with paint, or printing onto transfer paper so the graphic is subtle.
 

Attachments

  • 1E8AE658-5AB1-4CC2-B105-C1AD9E561E86.jpeg
    1E8AE658-5AB1-4CC2-B105-C1AD9E561E86.jpeg
    3.1 MB · Views: 140
  • 670DD94D-BC94-4FED-9B9D-E6C9D23C30BE.jpeg
    670DD94D-BC94-4FED-9B9D-E6C9D23C30BE.jpeg
    1.8 MB · Views: 134
  • 8F2928B8-7342-40E1-9635-701A42AEDEDB.jpeg
    8F2928B8-7342-40E1-9635-701A42AEDEDB.jpeg
    1.2 MB · Views: 122
  • 7044081B-1320-43EA-889C-20F466F5267F.jpeg
    7044081B-1320-43EA-889C-20F466F5267F.jpeg
    1.1 MB · Views: 139
Right on!! Congrats, Egon. It's looking superb already. Those shoulder panels are bang on.

Only one thing to point out, if I may. The movie coat does not have an upper pocket on the right side (when viewed from the front). It's asymmetrical, with only one upper pocket on the left side.

1637501995030.png


1637502139641.png
 
Last edited:
Right on!! Congrats, Egon. It's looking superb already. Those shoulder panels are bang on.

Only one thing to point out, if I may. The movie coat does not have an upper pocket on the right side (when viewed from the front). It's asymmetrical, with only one upper pocket on the left side.

View attachment 1514601

View attachment 1514602
Hey man, good catch!

It's funny how you kinda go blind to this stuff after looking at it for so long!

I am not gonna beat myself up about it too much on the mock up, there's a few things that will change on the front panels. I don't think I am going to add any magnets on this one either. It will just be a time suck and large expense for something I *know* will not be accurate, like my first Deckard trench I made (which is laughably rough compared to the finals we are working on)

Long story short, but my work on the K jacket will be a lot more straight forward than the Deckard Jacket.

On Deckard, with the reference provided, I ended up having to change almost everything but the main pattern for the front panels (altered the pockets on the front) where with K, I am not drafting the patterns at all. So I can't take credit for that part (but on the one I am working on now as the mock up, those patterns are roughhh ones I made from other reference, NOT the final patterns)

This one is more to understand how it is constructed and the materials, etc. particularly around the shoulders and collar. Also just order of operations, like on the sleeves. They are made up of several parts that need to jive together in order to look right.

I am also using a much heavier thread for this one. The screen used ones seem to have a pretty standard cotton or blended thread but I am using a heavy poly thread. Reason being is consistency. On the screen used ones, being canvas, thinner thread, it wanders a bit. Which isn't uncommon, but looks a little wonky. You can see that on the back stitching down the center in the photo below
5BF22119-63BD-4783-82E2-026CDBC0AAEB.jpeg
 
Slammed out a bunch of house work this AM, so I was able to get a little more done.

Testing out how to attach the faux shearling. Best way would be to do almost a bluff stitch, but it is a pain, and doesn't lay super flat, so I went with a regular top stitching on the lapels, vs the collar where it is stitched underneath. I didnt add batting to the collar just for the sake of saving time and getting it on there.

Also, once I got the sleeves on, I also realized how the shoulders are structured and padded, which is kinda one of those things I wouldn't have known with out doing a "full" mock up.

Certainly looks more the part now!
 

Attachments

  • 38A95CDE-6EC8-4079-ADEC-C6744ED67D85.jpeg
    38A95CDE-6EC8-4079-ADEC-C6744ED67D85.jpeg
    2.7 MB · Views: 127
  • 2788AEDA-7A19-47B2-AE24-870711C0CEC5.jpeg
    2788AEDA-7A19-47B2-AE24-870711C0CEC5.jpeg
    2.4 MB · Views: 136
  • CD7F22B1-F4A8-4807-BB60-8BD3F9235527.jpeg
    CD7F22B1-F4A8-4807-BB60-8BD3F9235527.jpeg
    2 MB · Views: 123
  • 5EB15A4D-1E95-467E-97EB-1DB4D3D80218.jpeg
    5EB15A4D-1E95-467E-97EB-1DB4D3D80218.jpeg
    2.1 MB · Views: 123
  • 997BA819-CD6C-4DAA-95EA-B495B790BC22.jpeg
    997BA819-CD6C-4DAA-95EA-B495B790BC22.jpeg
    630.5 KB · Views: 134
“Imma just make the most awesome k coat ever …… on Sunday.”

So much awesome here.
How does the collar not go past the end of the top of the left lapel when down and still wrap all the way around and connect when turned up?
 
“Imma just make the most awesome k coat ever …… on Sunday.”

So much awesome here.
How does the collar not go past the end of the top of the left lapel when down and still wrap all the way around and connect when turned up?

Thanks man!

We chatted about it a bit, but looking at some pics, I think the collar *does* go past the left lapel by a bit.

I can't take credit for the patterning though, that reference was provided to me via Mark.
 

Attachments

  • 680F8F93-3FB2-4C05-B16E-689AFCA00929.jpeg
    680F8F93-3FB2-4C05-B16E-689AFCA00929.jpeg
    729.9 KB · Views: 98
  • CACD17F2-D394-439F-A846-DB608C8249AA.png
    CACD17F2-D394-439F-A846-DB608C8249AA.png
    1.6 MB · Views: 93
Slammed out a bunch of house work this AM, so I was able to get a little more done.

Testing out how to attach the faux shearling. Best way would be to do almost a bluff stitch, but it is a pain, and doesn't lay super flat, so I went with a regular top stitching on the lapels, vs the collar where it is stitched underneath. I didnt add batting to the collar just for the sake of saving time and getting it on there.

Also, once I got the sleeves on, I also realized how the shoulders are structured and padded, which is kinda one of those things I wouldn't have known with out doing a "full" mock up.

Certainly looks more the part now!
That is looking really superb, man. And it's such a treat to see how the coat is taking shape.

Personally, I've had a keen interest in the coat's collar ever since I had WSL make one with custom specs. An accurate collar is something that the current coat providers, unfortunately, can't seem to crack. So, I was going ask if you could please walk us through a little further regarding how you arrived at the size, shape, pattern etc? Very curious!
 
Thanks all!

Waiting on a ton of materials again, so I got a little done today on setting the liner in.

As this one is almost done, I am glad I did a full size mock up to work out a few things around the shoulders and the collar. Everything else is fairly straight forward.
 

Attachments

  • E23A78D7-3819-4083-B689-2DAE4FC2EDDD.jpeg
    E23A78D7-3819-4083-B689-2DAE4FC2EDDD.jpeg
    2.2 MB · Views: 95
  • D0559CCD-6191-4B37-BE2C-9A62CA664FB7.jpeg
    D0559CCD-6191-4B37-BE2C-9A62CA664FB7.jpeg
    2.5 MB · Views: 96
  • 1B4D3A8E-2C46-44B4-B2C7-4D611D93141C.jpeg
    1B4D3A8E-2C46-44B4-B2C7-4D611D93141C.jpeg
    1.3 MB · Views: 105
  • FB04824F-E887-4A76-94DC-2FB6EB74F7BD.jpeg
    FB04824F-E887-4A76-94DC-2FB6EB74F7BD.jpeg
    1.6 MB · Views: 105
Hi Egon,

Quick question, if I may, about your lapel pattern. Let me preface all of this saying it may just boil down to camera angles, but it appears as if you’ve incorporated a slight swoop/curvature to the lapel's top edge. Is that the case?

1637670422710.png
1637671132227.png


Just pointing that out because, to my eyes, it appears that the move coat’s lapels are nearly a straight angle extending from the bottom edge of the collar, as seen here:

1637675617595.png
1637680220575.png


That said, in a lot of photos the lapel does appear to have that slight curvature, but I think it's due to the way it naturally hangs/curves/wraps around with its own weight (i.e. when not lying flat and fully extended across the body like in the prop display photo above). For example, the curvature effect is clear here:

1637671609464.png

1637672091470.png

Then, more of a straighter look again:
1637671557437.png

1637671986779.png

1637672302068.png

Just for reference, my WSL does have the (nearly) straight-edged lapels, but also displays that curving effect when worn normally.
1637672686498.png
1637672848646.png

Pattern-wise, this is something that WSL really nailed, IMO.
1637675341913.png
1637680563982.png


Anyway, I'd love to hear your thoughts on these sort of 'optical effect' issues when it comes time to designing patterns...
 

Attachments

  • 1637671441710.png
    1637671441710.png
    178.1 KB · Views: 74
  • 1637671179266.png
    1637671179266.png
    933.7 KB · Views: 64
  • 1637675340721.png
    1637675340721.png
    2.9 MB · Views: 60
  • 1637680181411.png
    1637680181411.png
    184 KB · Views: 61
Last edited:
Yes, I think Mechanismo is right about the lapels. Too much curve on your model Egon. The weight of the fabric + shearling + liner will give you that natural curve when the coat is open;) Keep up the great work(y)
 
Hey all,

Thanks for the feedback!

Again, I am going to reiterate that this mock up is just to help me understand the process and order of operations. The patterns on this mock up are absolutely not going to be used for the final jackets for myself and Mark. Mark had very accurate patterns developed (which again, the jacket I am mocking up now is literally eyeballing and winging it to get the gesture - not to be accurately scaled, etc) and I will be sewing from those. So this thread is more on process than design, as I will have very little to do with designing except a few modifications Mark is requesting.

That said, I think the curve on the lapel is just exaggerated in those photos because the canvas hadn't been pressed yet, and the top stitching hasn't been added. The screen used jackets look like they definitely have a curve from the attachment point to the tip of the lapel, but closer to the neck line to allow it to have room when closed. These areas are also tricky because the faux shearling can give the illusion or wider or more narrow edges to the canvas. And again, I top stitched the shearling on the lapels to save time as it isn't a functional aspect of the coat.
Screen Shot 2021-11-23 at 2.22.18 PM.png
 
This one fits me pretty perfectly, but I am about a 46 chest now.

I did end up adding the graphic today with a real quick and dirty method. Took a picture of the graphic from a figure into illustrator and traced it. Then printed it in a very light grey onto iron on transfers, scorched a few spots to weather it, and it looks darn good for about 30 minutes of work.
 

Attachments

  • 35E185DA-A22A-44F0-9D54-0F38B4259993.jpeg
    35E185DA-A22A-44F0-9D54-0F38B4259993.jpeg
    4.7 MB · Views: 87

Your message may be considered spam for the following reasons:

If you wish to reply despite these issues, check the box below before replying.
Be aware that malicious compliance may result in more severe penalties.
Back
Top