OCP POLICE UNIFORM project – PIC INTENSIVE

DarthVader1

Well-Known Member
(This is my current project that have being ongoing for the past two years, and was supposed to be revealed at Dragon*Con ’10, but with Celebration V last year was a no-brainer to postpone this project until 2011, but here I will post the progress since then; and then some more. Please, be advised that if you see some quotes that don’t match here, that means that it’s just copied from other forums from the beginning, also it will be posted in MULTIPLE POSTS for easier reading... enjoy!)

Here are pics of the current helmet I have at home (or the actual helmet it was based on, but white)....and another hint: same helmet kind/brand used in TRON. I have two similar variations (one will be shown later on), but the shell IS basically the same.

My%20new%20helmet%201.jpg

My%20new%20helmet%202.jpg


Now, pics of the REAL SCREEN-USED HELMET for comparison (please, disregard the red lines, I was pointing him (the owner of the real helmet) details that leads to the kind of helmet it was based on.

robohelm1-1.jpg

OCP%20helmet%20notes.jpg

OCP%20helmet%20notes2.jpg


BTW, I forgot about it....here's a pic of my ROBO GUN replica with one of the patches (I have two patches ready, though). ;) (that’s was the cheap plastic version, now I have a KSC Airsoft gun, showing in this video:

Oct 28, 2009

I've said before that I will be starting really soon the design and construction of the replica of the OCP POLICE HELMET (ROBO1 version), and the moment JUST ARRIVED. :D

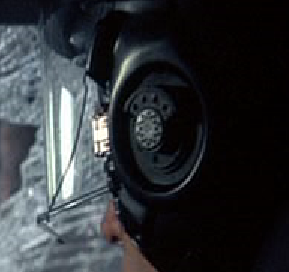
I was making a lot of research based on the photos sent to me of a SCREEN USED helmet, in all angles possible, and based on his and MY HOCKEY helmets....I came to the conclusion that they were in fact HOCKEY HELMETS (not designed, but ALTERED) to look different on screen. It'd indeed a COOPER SK 2000 HOCKEY HELMET. The helmet I have is the MEDIUM-sized version, but I don't know the year, and it could be fit to ANYONE. From the two helmets I have, I would say that the OCP helmet came from my first purchased helmet, based on details here and there, specially from the EARS area. Here are the pictures to prove it: First two are of my helmet without the protective foam/rubber material,

DSC03674.jpg

DSC03672.jpg


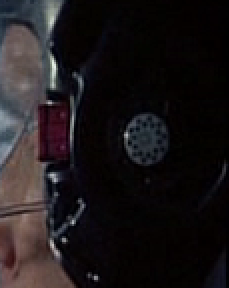
Now, showing the pics sent to me of the SCREEN USED helmet in comparison with mine. His is showing the areas that tells the fact of the real helmet, and you could notice by the details of at least two (2) out of four (4) square-shaped holes (A); and the leather/cardboard things that cover the gaps between the gaps of the hockey helmet (B and C). Only difference though, when they did the helmet or add the details, the back neck leather piece was placed on top of the plastic piece instead of underneath as mine is from the factory (RED ARROW).

OCP%20helmet%20notes2.jpg


OCP%20helmet%20notes%204.jpg


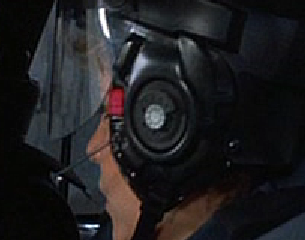
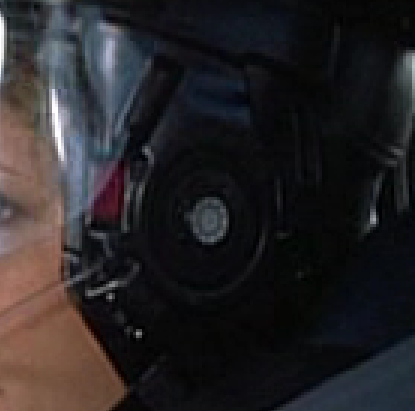
Here's another angle showing the ear pieces from underneath. You could tell that the leather pieces are in the very same location, same shape (sorry, pics were difficult to follow with my POWERPOINT program), and location, size, and shape of the holes basically THE SAME as the original.

OCP%20helmet%20notes.jpg

OCP%20helmet%20notes%203.jpg


I think, once again, the top of the helmets were only vacuuformed, besides the ear sides, to cover the high details of the COOPER helmet, since you could barely see the ridges between the two segments, the line that goes across the head from ear to ear, AND SPECIALLY the square-shaped holes. Overall, there are about 12-14 pieces per helmet, including the chin strap and face shield.

What do you think about that? I will post more pics later on of my DISSASEMBLED helmet, and showing the options I have for the replica.

DSC03475.jpg


Above is just the cheap airsoft version of the ROBOCOP gun, JLS 2030B, but it has quite a few things far from the Uber accurate HSC, M93R AUTO-9C.
 
Last edited by a moderator:
- Mar 17, 2010 -

Weather is looking nice lately, and it’s time to get this project running. I already have what I need to start. I’ve being toying the design of the center ear greeblie pieces based on the screen caps I have so far, since the owner of the screen-used helmet doesn’t have them… probably lost before the auction/purchase or something.

Here are the screen caps for reference, and at the end my design made with MS Publisher and a CAD program (eMachineShop.com),

Murphy:

Ear%20Detail%201.bmp
Ear%20Detail%202.bmp


Lewis:

Ear%20Detail%204.bmp
Ear%20Detail%203.bmp


Now, a side by side shot, when they’re in the car arriving at the abandoned factory,

Ear%20details%20-%20screen%20grab.bmp.jpg


And here’s my design based on those pics:

Center%20Detail%20pattern%202.bmp


And here’s the starting process of the sculpting of the ear pieces. I cut a few circles of the same size, and I will sand them according to the graphic, and they will go staggered. Disregard the design on the table, that was the old design.

Ear%20Greeblie-2.jpg


And here’s the thickest piece, which will be the “semi-circle” and center piece where the “drain” will go in the center,

Ear%20Greeblie-3.jpg


- March 28, 2010-

I've decided to make another topic about this, since the last one ended up showing progress about my ROBOCOP suit, rather than the OCP Police helmet/uniform progress/interest in the near future for a group topic for D*C 2011.

Update for this project (OCP Police helmet). Man, taking advantage of the weather, but it was tricky today…wind, clowdy, sunny, cold, hot….insane, but finished making the scatch-built, Uber-accurate, center ear piece for the helmet. Here's the progress so far,

What I’m doing is just the same concept about using a drill with some adapters (to hold the rings while trimming with sandpaper) as in MACHINING ALUMINUM, and a dremel tool… but all done MANUALLY and with PLASTIC.

All the circle pieces trimmed, and ready to put together.

2010-03-27%2016.41.12.jpg


The center piece that has an awkward semi-circle shape, cut and sanded (basically 3 layers of .060 HIPS plastic), and glued together.

2010-03-27%2016.49.14.jpg


All the pieces fixed (temporary) with some BONDO spot filling on the edges after the sanding process, just to cover imperfections and really small gaps. They will go through the same process once I glue all the parts together before casting, and making the detail holes.

2010-03-27%2017.22.05.jpg


Well, this was probably the most challenging part I’ve done in any prop or project,.. making the “ridges” from the awkward looking piece and at the bottom, which I had to sand down here and there, and make it fit both top and bottom.

2010-03-28%2013.50.28.jpg


I took the “ridge” ring piece and cut it according to my needs to fit precisely the top and bottom of the piece,

2010-03-28%2013.54.33.jpg


Test fitting of the “ridge” ring pieces,

2010-03-28%2013.54.21.jpg


I’ve made the holes according to the pattern on “piece #2”, and hole indentations in “piece #4”, just before glueing the “ridge” pieces together…

2010-03-28%2014.08.37.jpg


This could probably was my second most challenging step from the whole project, since I’m dealing with the SMALLEST disc piece of the whole ear detail. I’ve took the disc and aligned to the back of the graphic and securely taped it to the paper to prevent sliding,

2010-03-28%2014.16.23.jpg


I flipped the paper around, to expose the front of the graphic, and mark the holes with my hobby knife, by rotating my hobby knife on the graphic paper through the plastic disc.

2010-03-28%2014.16.48.jpg


This was yet ANOTHER piece to work on… making the hole indentations on the smallest disc of the prop. I had to MANUALLY do the holes, like inserting Japanese ACCUPUNCTURE needles (by twisting your fingers to create the effect of a drill, swinging left and right), since I didn’t have the proper sized bit for my DREMEL rotary tool,

2010-03-28%2014.32.14.jpg


After this process, I’ve decided to join and GLUE ALL PARTS together, add some more BONDO putty to conver inperfections, sand, prime, and here’s my end result…

2010-03-28%2015.38.46.jpg

2010-03-28%2015.38.58.jpg

2010-03-28%2015.39.27.jpg


If any questions, please refer to my ROBOCOP pics folder here:

http://ImageEvent.com/darthvader1/robocop

Next, I will be making the sculpt to make the mold to start the MAIN HELMET PARTS.
 
Last edited by a moderator:
-April 3rd, 2010-

Right now, I’ve started the HELMET project. I’ve decided to start making the molds to make the vacuum forming MASTERS, and the resin castings of the ear greeblies. Finalized the mold, and time to cast the ear greeblies,

2010-04-03%2011.41.39.jpg


…and after sanding, priming, and painting… the result is UNBELIEVABLE.

2010-04-03%2014.54.51.jpg


Now, to start with the MAIN PARTS of the helmet. This side details are the ones showing on the original helmet as well, so I’m really picky about this particular part. Covered the screw holes with some clay,

2010-04-03%2014.14.45.jpg


…and after cleaning the excess clay from the holes, time to sculpt the vacuuforming master for these particular pieces,

2010-04-03%2015.55.21.jpg


and building the GREAT WALL OF CHINA… no, seriously, making the mold box to pour the silicone rubber to make the mold,

2010-04-03%2016.07.24.jpg


- May 23, 2011-

Well, some progress so far with my OCP POLICE Helmet. Like I’ve mentioned before, I will do the whole thing like the real helmets were. I’ve started making a mold for the real Cooper Hockey Helmet ear pieces, which will give support on the sides.

IMG_20110522_161025.jpg

IMG_20110522_161101.jpg


Poured the silicone rubber; this is the brushable kind.
IMG_20110522_170829.jpg


Once it dried up, I applied the plaster bandages shell
IMG_20110522_185022.jpg


And the end result, a clean, detailed, ear pieces mold. This will be used to pour “Hydrostone” plaster to make the actual vacuum-forming mold,
IMG_20110522_185044.jpg


Newest casting from that mold to be used for the vacuum forming machine, of course the "snaps" details will be sanded down and substituted by REAL snaps,

IMG_20110525_164309.jpg
 
Last edited by a moderator:
-JUN 1st, 2011[-

I’m going HYPERSPACE with this project as we speak, and I’m not backing up from this point now. This next step is the BIG “cover shell” that covers the vents and the gap in between the two halves of the original hockey helmet, not counting the “side bars”, which are separate pieces. Here’s the helmet on screen:

helmet5.jpg


…and my helmet, the one “unaltered”… see the differences? This means SAND OFF / BONDO FILL-IN a lot of areas, namely in between the gaps and the “MOHAWK” lines,

IMG_20110530_130945.jpg


To make it look like the screen-used helmet, I will have to take the helmet assembled (the main two halves), and make a cast of the whole thing… I had to find scrap wood to the exact height up to where the parting line should be, and create a “bracing system” for the helmet to stay up and not move,

IMG_20110531_111915.jpg


… but first I’ve had to cover all the vent holes and the gap in between the two helmets, highly visible, and create a seal at the bottom with some scrap HIPS plastic at the parting line, where after vacuum-forming should be cut plus some extra gap (about an inch) for error correction,

IMG_20110531_190343.jpg

IMG_20110531_190400.jpg


Silicone rubber cocoon applied (showing after the second coat, it has now 3 ½ coats of silicone as we speak),

IMG_20110601_151229.jpg


… and the plaster bandages shell for strength.

IMG_20110601_174421.jpg

IMG_20110601_174433.jpg


Tomorrow, I will try the light casting (or some would say “rotocasting”, with “HYDROSTONE”. More to come tomorrow to see how it goes.

========================================

- 14 JUN 2011-

I’m sculpting the side details of the helmet and will be ready to make molds for the vacuum forming machine by this weekend. The first one at the right, I had to start over again since it came out too bulky, and the measures were not correct from the pictures to the actual helmet I have, resulting in a 4th version sculpt (perfectly done for the right side), but the results of correcting myself and find ways of doing things were taking a toll on my body…. Literally! (clack)…OUCH!

Look what happened while making those white rings for the center piece FROM SCRATCH with plastic resin and disposable cups; drilling and using a dremel to make a hole in the center and make them perfect…

IMG_20110607_154136.jpg

IMG_20110607_170340.jpg


when accidents happens; broken drill bit; drill slipped hitting me in the finger…

IMG_20110607_135528.jpg

IMG_20110607_135427.jpg

IMG_20110607_135444.jpg


These is what I’ve accomplished so far… the first (actually version 3) for the left ear is on the right, with the new one done at the left (right ear).

IMG_20110614_140138.jpg

IMG_20110614_140149.jpg

IMG_20110614_162654.jpg

IMG_20110614_162714.jpg


And here a few shots of the screen-used helmet (right side), I have over two dozen pics of the screen used helmet from the person who own it now in a museum in France,

dsc0854d.jpg

dsc0850z_1.jpg


Now that I'm looking at the pics I still have to fix a few details here and there, namely at the bottom back, and the gap between the circle and the face shield “stopper”…, the paper print outs I have are not that defined as in the pics on a PC screen. More to come by this weekend.
 
Last edited by a moderator:
-17 JUN 2011-

Right now, I have READY-TO-USE, 6 out of 10 plugs molds I need to complete for the vacuum-forming machine. Next 4 molds/plugs are for the face shield, Right ear side detail, and the two main helmet skeleton shells to support the rest… last three being the most challenging due to the ear detail to be sculpted, and the other two I have to come up with some kind of structure to cover the innards of the two helmet halves while preparing them for making the master molds.

These are the plugs so far,

IMG_20110618_163222.jpg


This one needs to be trimmed, namely that ridge between the two halves and the screws, apply BONDO all over the place to cover imperfections, specially at the bottom edge, and expand the two “fins” on the top back to make space underneath for the original helmet shells to fit,

IMG_20110618_163235.jpg


As we speak, I’m waiting for the ACCURATE measurements of the screen used helmet’s visor, to make the mold/plug for the face shield.

“DOME” casting.

This is the “plug” to be used in the vacuum-forming machine to make the piece that covers the “original” helmet shell… this is a work-in-progress, since now I have to use some BONDO… big time, to make this plug as the final product.

Here’s what it should look like in three different shots: Top is a screen caption. Now, you see the middle ridge line in my original casting (second pic)... now you DON'T (third pic)...

Dome_comparison.jpg


I've being doing some work on how to make the last two molds for the vacuum forming process, plus making sure to have my vac-forming machine to work properly.


- 7 July 2011-

Well, good news. Since I think I already have a "PROSPECT - FIRST- CUSTOMER", I’ve accelerated the process and I've just finish sculpting and making the mold for the left ear cover TODAY, just in case I have to redo something in the process, meaning that’s the very LAST MOLD of the main helmet besides the one for the FACESHIELD.... I have already a plan to save on time and material costs to make it happen.

Here is the process, compared to the right side… only difference is that the left side will be added the “boom microphone” and the “activation switch” of said bendable boom mic.

Starting the sculpting process; new one on the right. I’ve saved the left one for measurement and alignment purposes… as in the pics

IMG_20110707_135106.jpg


Completed sculpt (again, new one on the right),

IMG_20110707_155729.jpg


Silicone rubber layer,

IMG_20110707_165255.jpg


And now the plaster bandage shell. Now it’s up to make the castings for the table,

IMG_20110707_181056.jpg


I’ll be starting (actually) the vacuum-forming process after Monday more likely, since I have to fix the castings first for the table.

;)

-9 July 2011-

partsin01.gif


Lookie-lookie, what I’ve just received at the door… ”PLASTIC HEAVEN”!

IMG_20110709_114129.jpg


Now I’m ON BUSINESS! In another thing... I’ve just bought this yesterday… the plastic tubing to make the “microphone”.

IMG_20110708_155459.jpg


As we speak, all vac-form plugs are DONE. Just need to fix one or two, and we’ll start the process this week.
 
Last edited by a moderator:
Well, since we have bad weather in the Alabama-Georgia border area… I’ve decided to do something inside instead, just to take advantage of the situation… to start with the OCP POLICE VEST.

I’ve seen some folks in a picture (below), I don’t know when or where that pic was taken, but the guys in OCP police uniform are not quite exactly accurate, specially the VEST. Waaaaay off. I have to give them kudos for the closeness of the pockets location on their jumpsuits, unless those are the real deal,

Robocop.jpg


The ones I’m about to start, are as close as it could be from the originals and not just some foam pads with some stitching as in tha pic above, but based only on screen grab pictures, close-to-accurate materials, and average measurements according to the pics. I’m just trying to figure out some things, such as the straps on the shoulders, which looks different from pic to pic of screen grabs, and proper attachment method (I know already it’s generally VELCRO).

Here’s what I’ve done today… the PATTERNS for the vest. Started with measurements and diagrams based on myself, my wife, and a mannequin torso I have from a friend,

IMG_20110715_134156.jpg


the drafting process based on the measurements, and correcting errors, based on the measurements,

IMG_20110715_134128.jpg


And here they are, the completed patterns… consist of 4 pieces: one for the main outer fabric, one for the collar, one for the chest/back cushioning (the white and yellow are the same), and one for the belly/back “ribs”, upgradeable/downgradeable for front and back.

IMG_20110715_142055.jpg


Again, here's a screen grab compilation pic for comparison;

vest_reference_1.jpg


Thanks to that last pic, I’ve just remember I have to add something to the front panel, to add a half inch “flare” outwards, as seen in the screen caps, but not important, plus some details I missed in the design process, so this pattern is NOT THE FINAL RESULT. As I’ve mentioned before, I should have a FULL COSTUME prototype done sometime next week… unless something happens.


-July 21, 2011-


Just a teaser… showcasing my SEWING SKILLS,

IMG_20110721_113742.jpg

IMG_20110721_113759.jpg


-22 July 2011-

I’ve hit a snag yesterday while working on the vest, which forced me to go to the sewing supply store (Jo-Ann Fabrics) today, plus some fabric/material I needed for the Velcro closure on the sides. Here’s the finished vest on my wife and on a mannequin. There’s more room for improvement, but looks really accurate being the first one done. The padding was a pain in the rear to install, so as the method of doing things to it could look and work accurately.

My wife with the jumpsuit and utility belt, sorry for the dark and fuzzy picture,

IMG_20110722_190545.jpg


And now on a mannequin torso outside,

IMG_20110722_191312.jpg

IMG_20110722_191337.jpg

IMG_20110722_191358.jpg

IMG_20110722_191425.jpg

IMG_20110722_191444.jpg

IMG_20110722_191417.jpg

IMG_20110722_191545.jpg

IMG_20110722_191556.jpg


With utility belt on,

IMG_20110722_191831.jpg

IMG_20110722_191838.jpg


I was relying on pics from different vests made, from screen grabs and pics of one actually done by someone in a similar way, but not accurate, also on the mannequin torso in previous pics I’ve posted. Other than that, I've just realized some things I have to fix (minimal) further down the road, more likely after Dragon*Con '11.

What do you think?
 
Last edited by a moderator:
I have to applaud you on this project! :thumbsup

Not one of the more popular costumes out there, but your hard work and attention to detail are outstsnding! That earpiece greeble came out amazing!


Can't wait to see the final result! :thumbsup


Kevin
 
First off, sorry for the lack of news, but a lot of stuff have been happening in my real life, not to mention bad weather.

Finally, I’ve got to do some vacuum forming at home after quite a few setbacks. My vac-forming machine was not heating enough I don’t know why, making me waste two sheets of plastic of two different thickness (.060” and .040”) thinking that the thinner plastic could do the job… I was wrong. :angry


IMG_20110814_160740.jpg


But that’s something I’ll deal with later on. In the meantime, after using a “JEDI MIND TRICK” on my wife, I’ve had to use my first improvised vacuum forming machine, which so far I have no complaints since the first time… my KITCHEN OVEN and this setup; the vacuum table top set for the aluminum frame (in the corner behind the table) with binding clips, frame being just big enough to fit inside the oven; heat gun; a 6 hp – 16 Gallon SHOPVAC; and an improvised wood bracket to hold the aluminum frame (which you’ll see with the helmet pieces),


IMG_20110814_145007.jpg


Finally, I have all the pieces to put together this piece of art. This are the pieces, roughly trimmed, just out of the vac-form table, with the improvised wood holding bracket behind them,


IMG_20110814_145028.jpg


These are all the pieces for the helmet (lightly trimmed), but there are some more pieces not pictured, but are just minimal… like the visor, fake boom microphone, chin strap, fuses, padding and screws, which I already have handy,


IMG_20110814_154050.jpg


Here’s the ear center greeblie, and fits like “Cinderella’s Shoe”,


IMG_20110814_154146.jpg


I’ll be having the assembled helmet just before the next weekend, since I’ve started a new job and little time available during the week.
 
Last edited by a moderator:
Yep. I don't know the gauge used, but the color is RED.
Figured out, it's a 10 amp gauge, which is on the fuse itself... but it makes no difference as long as the outside shell is the same.

I’ve being kinda busy lately; real life stuff mostly, but slowly moving forward with the project. I just didn’t want to post anything unless I have some pics. Well, I’ve order some nylon strapping material to add to the actual hockey helmet chin straps I currently have, which it seems that they did the same I’m planning to do back then… adding the extra strap to make them look like MILITARY CHIN STRAPS. If you don’t believe it, watch the first movie again, and notice the difference in thickness in the chin straps. Another thing you don't see here is the clear visor, which I will post pictures this week.

Just attached the fuses to the ear details and the “boom microphone” by using the fish tank tubing, and some thin aluminum wire, able to fit through the plastic tubing, and be BENDABLE to the needs. I still have to trim to (expected) size and do the microphone silver tip, but that will be the very last thing before finishing, just to have an estimate measure of the whole thing.

IMG_20110823_105818.jpg

IMG_20110823_105851.jpg


Last pic with the ear greeblies in place (cannot permanently attach them until I have everything put together first, to include the visor)… the assembly method might change with the time, though,

IMG_20110823_105920.jpg


More to come this week. BTW, I've just noticed the difference between the visor "stoppers" on the last pic... something I could fix after Dragon*Con. Remember, this is a prototype, and NOT THE FINAL VERSION.
 
Last edited:
HELMET IS DONE!

But first, let me explain the last steps… I had to come up with a stencil based from screen grabs and measure to my own helmet. After making sure the size is right, then I cut and bent the PETG plastic with a heat gun.

IMG_20110827_173340.jpg


After cutting, I’ve sanded the edges for a smooth finish. Took the top part of the protective film, and covered with painters tape to make the 1” black border with black satin spray paint.

IMG_20110828_125352.jpg


And here’s the finished helmet. There’s still room for improvements in small areas, but I’ll be fixing those before making a second helmet set, Next time, I’ll use some kind of mold for the visor for a more straight look

IMG_20110829_123424.jpg


And the screen-used helmet, for comparison,

Copy%20of%20robohelm1.jpg


Real hockey chin strap, real car fuze, real slide switch, and imitation microphone, which I did with the small diameter aquarium tubing and some thin wire I’ve found around,

IMG_20110829_123605.jpg


The tip of the microphone, all I did was to submerge the tip in silver paint. Note to self: next time, I’ll use ACRYLIC PAINT, instead of the Testors brand enamel.

IMG_20110829_123550.jpg

IMG_20110829_123712.jpg


All I have to add is the padding inside, and add the crossing strap to the chin strap, just to make it look like the one used on military helmets. I hope you like it. If anyone’s interested, I’ll be fixing the molds soon after Dragon*Con, and offer them once I’m happy with the results.
 
Last edited by a moderator:

Your message may be considered spam for the following reasons:

If you wish to reply despite these issues, check the box below before replying.
Be aware that malicious compliance may result in more severe penalties.
Back
Top