Huge thanks to CWOODREPLICAS! Almost done with my build, pictures incoming very soon! 
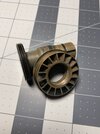


I just leave it so it spins around like a real one.Also, do you guys just leave the wind vane loose, or do you glue it in place (E6000?) so that it stops moving and unscrewing as you hold it? Thanks for the valuable input, everyone!
Also, a small heads up: your windvane sleeve is upside down.
Dammit... Good catch, thanks...
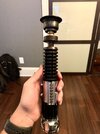
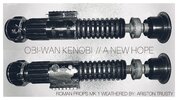
Hey good job man, looks nice!! A quick tip for that windvane; I found that suspending the windvane section above warm vinegar and salt, rather than soaking worked much better! Then you can hit it wit just a tad of brass black on a rag to sort of darken it just a tad. Then shine up that top portion by the emitter with some steel wool and it's done!Adding to the list of people weathering of Roman's MK1 kit, with some much-apprecaited direction help from both this thread and Halliwax. This started as the machined FX kit:
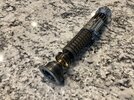
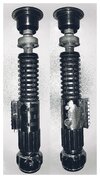
View attachment 1444148
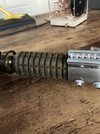
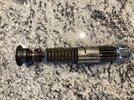
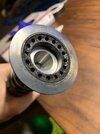
And after some sweet love and attention, here's where we are!
View attachment 1444144View attachment 1444145
Process: The emitter was dinged up just a TINY bit by dropping it and hitting it with various garage hardware, then painted flat black, sanded back partially, and then flamed with a blow torch until it discolored from the heat and burned the pain to fused-on gunk. Brass part of the grenade was soaked in the standard vinegar/salt wash for the patina, although I think I'd like to get it just a little darker eventually. Grenade was the most fun. I'd go for walks with the wife each day and as we were sauntering about I would drop the grenade, hit it against walls, kick it across the ground for a bit, and then finally took it to my shop and lightly hit it all over with multiple-sized hammers on my anvil. (Note: Be careful, you can bend the threaded collar that the brass section screws into very easily, and takes a lot of work to remedy. Don't ask me how I know this...) After that, I super-heated it with a blowtorch, and dropped it in some used motor oil to blacken it, which worked brilliantly (but is a very potentially flammable/toxic process, so don't try at home unless you're familiar with the safety precautions). After that, I sprinkled some steel wool "bits' into the crevices of the grenade, sprayed it with vinegar and water, and let it sit on an open window sill for 2 days. I brushed back most of the rusty gunk build up, and ended up with a nicely aged grenade! The clamp is just randomly scratched up with a kitchen scouring pad, and some 80 grit sandpaper. Washers/transistors were partially steel-blued, and sanded back with the scouring pad. The booster was also lightly hit with hammers and rolled around, then used BC steel bluing to darken it up. Finally, the sink knob was rolled around and brushed up a bit with a scouring pad and 80 grit. Et voilas! My first weathered lightsaber project, and I absolutely love it.
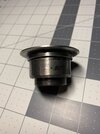
My only complaint is that the Roman sink knob is tapered internally, so it can't be flipped around easily like the Tunisia saber unless I Dremel it, so i might get to that later on. In the meantime I have more pressing matters for this project...
Also, do you guys just leave the wind vane loose, or do you glue it in place (E6000?) so that it stops moving and unscrewing as you hold it? Thanks for the valuable input, everyone!
So the original prop was obviously a chromed armitage shanks knob (and quite shiny). The way I weathered my romans to look more real, was by taking small pebbles and sharp rocks, along with some small screws and miscellaneous bits, and putting them in a coffe can or box with the knob and giving them a good toss around. It stays still bright, but gives it a realistacally weathered look. If you use any clear coat on a knob like that, it will chip off in only a matter of time just given the nature of the chrome, making it tough for paint to stick to.Added some weathering to the clamp as well. I don’t want to ruin the sink knob, but it looks too bright now. Any ideas on how to semi-permanently weather it?
Very Nice!!View attachment 1480176just need an emitter and pommel adapter for this FX that gives it the look and weight, then I might try out hand engraving the BP.
Really happy where it’s at now
Get yourself a vibro pen. It’s what was used and is still used at RollsView attachment 1480176just need an emitter and pommel adapter for this FX that gives it the look and weight, then I might try out hand engraving the BP.
Really happy where it’s at now
That was the plan! I had one at my last shop but haven’t grabbed another yet.Get yourself a vibro pen. It’s what was used and is still used at Rolls
...Tom a gas burner really!?!These adaptors are sexy. I have an older Roman's cone in my emitter and it didn't move when I dropped it in a natural gas burner, so eventually... i'm taking inspiration from these gorgeous builds

Actually, when done right, anything like raw steel that...Tom a gas burner really!?!